如何使用 Adafruit 的 FadeCandy 控制 LED
概覽
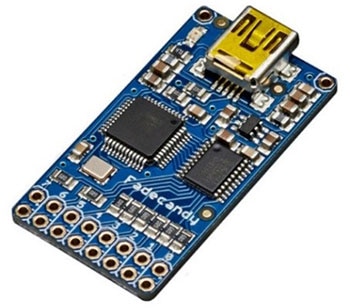 (圖片來源:Adafruit)
Adafruit 與 Scanlime 的 Micah 合作推出 Fadecandy,此內建顫動的驅動器板,可透過 USB 控制。Fadecandy 同時包含軟硬體,能更輕鬆建造和控制可定址 LED 專案 WS2811/WS2812,使其更美觀且耗用更少微控制器資源。FadeCandy 讓入門者更容易開始,也能為專業人員提供先進的功能。
Fadecandy Server Software 以單一或數十個 Fadecandy 板件通訊。在 Windows、Linux、Mac 作業系統或 Raspberry Pi 等嵌入式平台上運作。Open Pixel Control 通訊協定是一種簡單的方式,將畫素資料傳輸至 Fadecandy 伺服器。各控制器板支援多達 512 個 LED,配置為 8 個燈條,每個燈條含 64 個 LED,但不支援 RGBW LED。在本文出刊時,僅支援 RGB LED。本文稍後將會討論基礎編程。
此專案在 8 個燈條中,各使用 52 個 Adafruit NeoPixel,用於吸引玩家玩夾娃娃機,同時作為視覺化倒數計時器。使用大量的可定址 LED 和傳統 Arduino 資料庫,並直接連接至 GPIO 會減慢處理器並導致遊戲功能延遲,還有執行計時問題。Raspberry Pi 3 已有夾娃娃機的音效,Pi 3 作業清單將會加入 FadeCandy 的燈光通訊。
決定功率需求
功耗是使用 LED 燈條的重要考量。儘管單色 LED 僅使用 20 mA 的電流,以 Adafruit NeoPixel 為例,有三個顏色的 LED,若同時啟用,將耗用 60 mA 的電流。將此電流與燈條上並聯的 NeoPixel 數量相乘 (乘以 52),則各燈條的最大電流超過 3 A。再乘以 8 列,會導致潛在電流耗用達到 25 A,這尚未包含專案之外的其他較小燈條。不過,一個專案為何會將所有 NeoPixel 的 LED 同時長期開啟?答案是並不會,因此選擇電源供應器器成為一項猜測作業。假設 75% 的 NeoPixel 在指定時間開啟,且都僅顯示一個顏色,則電流降至約 6 A。編程燈光情境並使用儀表測試電流消耗是唯一能確認的方法。
考慮使用分接 PCB,解決設計和佈線問題
編程前,可以使用 KiCad 設計客製化 PCB,以分接 FadeCandy 連接至方便的端子台,組織更容易的連接和輸出。夾娃娃機的背側 LED 在一個通道上,右側、左側、前側也是,以保留通道。上方和下方的獎品滑道 LED 則分別分接,留下兩個對稱通道以備不時之需。
分接 PCB 必須納入處理功率匯流排潛在電流消耗的走線。選擇 2 oz 銅作為板件,也可協助處理更大的電流。圖 1 和 2 展示使用 KiCad 和 DigiKey 的 PCB Builder 工具 打造 PCB 的範例。
 圖 1:原廠裸板 PCB。
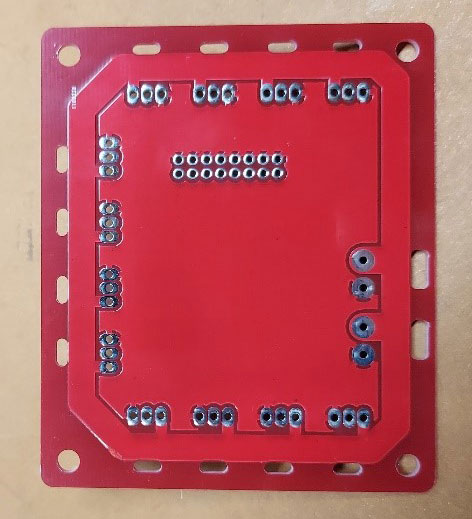 圖 2:高電流功率匯流排走線。
PCB Builder 工具準備項目
完成完整開發後,使用 File (檔案) 清單下的 Plot (標繪) 功能將客製化 PCB 匯出至 KiCad 的 PCB 設計工具。在 Plot (標繪) 對話框中,選擇 Generate Drill File (產生鑽孔檔案),即可儲存 Gerber 鑽孔檔案至自訂資料夾。接著,點選 Plot (標繪) 按鈕。KiCad 會新增額外的 Gerber 檔案,並且會放入與鑽孔檔案相同的資料夾中。從 Windows 檔案總管,找到包含 Gerber 檔案的資料夾。選擇所有與 PCB 相關的檔案,接著右擊滑鼠並選擇傳送到 > 壓縮的 (zipped) 資料夾。在原始資料夾中將會產生新的壓縮資料夾。
DigiKey 的網頁架構 PCB Builder 工具可協助客製化 PCB,含多種選項和多家廠商。啟用 PCB Builder 工具後,選擇Upload Gerber File (上傳 Gerber 檔案) 按鈕,接著選擇剛才建立的壓縮檔。PCB Tool Viewer 視窗會開啟,顯示板件影像,以及生產板件所包含的檔案/圖層清單,如圖 3 所示。
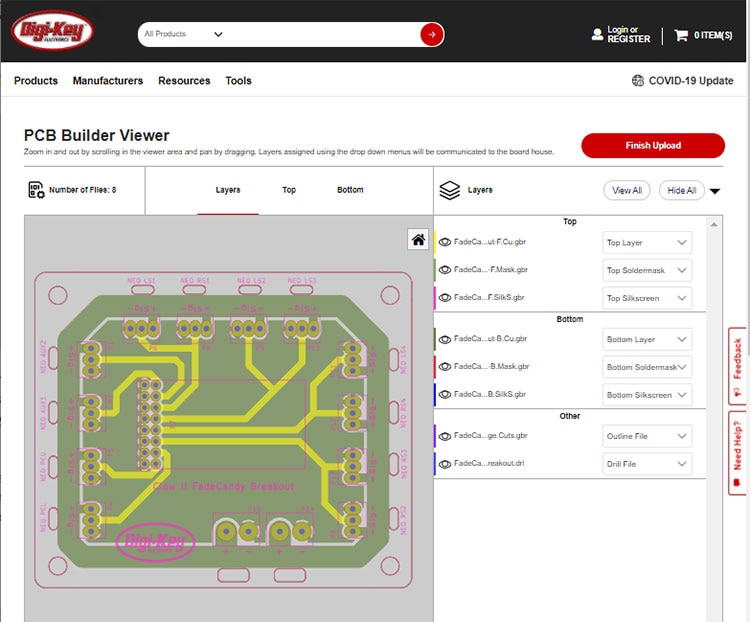 圖 3:PCB Builder Viewer,使用 DigiKey 的 PCB Builder 工具的第一步驟。
PCB Builder Viewer 能為提出的 PCB 提供許多工具進行檢驗。在 PCB 影像上滑動查看並放大縮小,手形指標也能讓 PCB 以各方向移動。在板層清單上開啟或關閉眼睛圖示,可以選擇各層進行檢視。
選擇 Finish Upload (完成上傳) 按鈕,前往下一個訂購步驟。下一個視窗顯示 PCB 的數據,以及選項清單,例如顏色和銅厚度 (見圖 4)。請注意,不同選項會有不同價格,各廠商提供的選項也不盡相同。板件的數量從 1 開始,再依需求選擇其他項目。
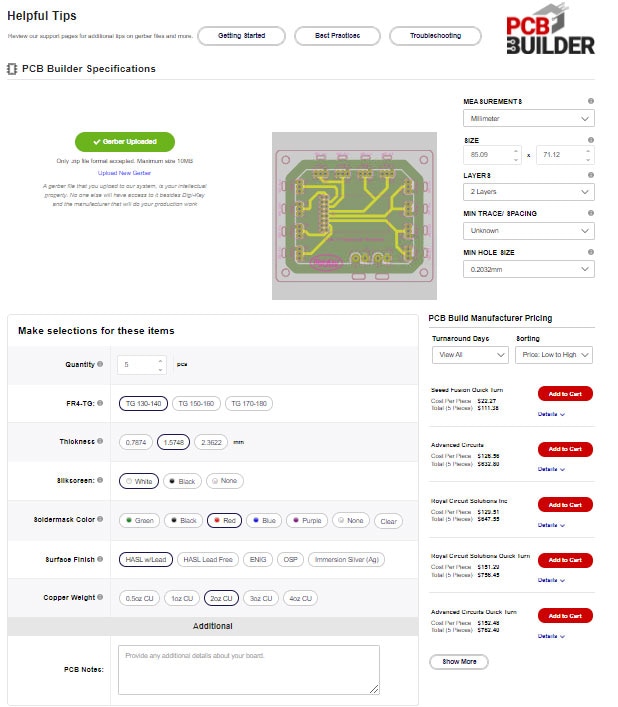 圖 4:選擇 PCB 規格、廠商、數量。
完成所有選項且決定廠商後,再將板件的數量從 1 開始增加,並查看價格。重複此步驟直到價格增加。此方式可以決定如何以最低價格生產最大量的板件。準備訂購時,請選擇 Add to Cart (加到購物車)。
組裝客製化分接 PCB
成品 PCB 上會佈上 LED 燈條端子台、功率端子台、16 引腳排針座。Adafruit 的 FadeCandy 板搭載排針引腳,並且在 PCB 上嵌入排針座和 3D 列印隔離柱,支撐板件的 USB 端。請見圖 5。
 圖 5:全滿客製化分接板。
要實作板件和開始編程,以 8 列各 26 個 Adafruit Neopixel 組成的測試台用於展示此概念,稍後會在實際的夾娃娃機中升級至 52 Neopixel。
連接 LED 燈條至綠色端子台,觀察適當的功率和訊號連接。5 V 電源連接至黑色端子台,觀察適當的功率和接地連接。圖 6 顯示 NeoPixel 在使用分接板前的接線,圖 7 顯示佈線的改良。
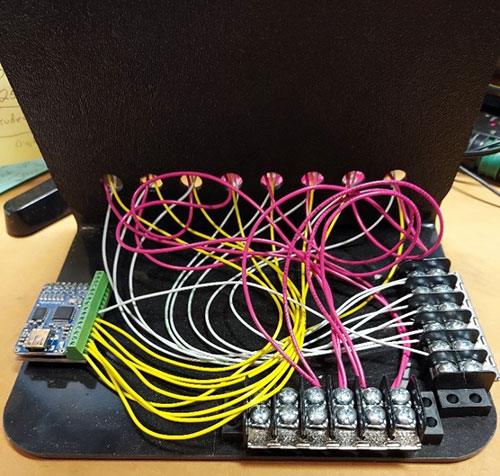 圖 6:使用分接板前的測試台佈線。
 圖 7:使用分接組織的測試台。
硬體和佈線就緒後,使用適當的 USB 連接 Raspberry Pi 3 至 FadeCandy,然後連接 Raspberry Pi 至監視器、鍵盤、滑鼠。啟動系統,開始編程。FadeCandy 設置為客戶端,可透過 USB 從作為伺服端的 Pi 接收資料。在此設置中,Pi 也與 Arduino 的 Mega 透過 USB 以序列連接進行通訊。Mega 處理所有遊戲機的輸入和輸出,並且簡單告知 Pi 遊戲是否在進行。Pi 處理音效和光效。
FadeCandy 有多種功能和應用。許多簡單和複雜的範例可以在線上找到,並且一直在增加。以下程式碼代表一些非常基本的多執行緒功能,針對此專案的特定燈光需求。Pi 編程為讓 Neopixel 充滿基本色,接著增加各色的隨機閃光以進行強調。遊戲進行時,其中兩個燈條會轉換為視覺化倒數計時器。請見影片 1。此專案的程式碼如下 (清單 1)。
複製#Raspberry Pi Game Machine Script
import serial
import threading
import queue
import random
import opc, time
import pygame

#Initialize the sound mixer
pygame.mixer.init(44100, 16, 2)

#Create a game start sound effect object
Start_Sound = pygame.mixer.Sound("glass.wav")
Start_Sound.set_volume(1.0)
Start_Sound.play()

#Create a tick-tock sound object
Tick_Sound = pygame.mixer.Sound("ticktock.wav")
Tick_Sound.set_volume(1.0)
#Tick_Sound.play(maxtime=600)

#Create an end of game sound object
End_Sound = pygame.mixer.Sound("Buzzer-sound-16.wav")
End_Sound.set_volume(1.0)
#End_Sound.play()

#Build queue objects for transfer between threads
game_q = queue.Queue(1)
users_q = queue.Queue(1)
matrix_q = queue.Queue(1)

#State the NeoPixel array for the testbed
numLEDs = 8*26
pixels = [ (0,0,0) ] * numLEDs

#Set FadeCandy meter start pixel
meterStartPix = 130

#Create a serial communication object for the Mega
serMega = serial.Serial('/dev/ttyACM0', 115200)

#Create a client object for the Open Pixel server
client = opc.Client('localhost:7890')

#Define a function for the t1 thread that reads data from the Mega
def MegaData():
        while True:
                if serMega.inWaiting() > 0:
                        GameDuration = int(serMega.readline())
                        PlayFlag = int(serMega.readline())
                        game_q.put((GameDuration, PlayFlag))
                        TotalUsers = int(serMega.readline())
                        if not users_q.full():
                                users_q.put(TotalUsers)

                time.sleep(0.001)

#Define a function for the t2 thread which runs the time meter Neopixels
def RunMeter():

        while True:
                GameDuration, PlayFlag = game_q.get()
                matrix_q.put(PlayFlag)
                SleepNum = (float(GameDuration)/100/27)

                if PlayFlag == 1:
                        #Quickly fill the meter with green
                        meterPix = meterStartPix
                        Start_Sound.play()
                        for i in range(0, 26):
                                pixels[meterPix] = (0, 200, 0)
                                client.put_pixels(pixels)
                                time.sleep(.02)
                                meterPix = meterPix+1

                        #Fill the meter with red based on game timer
                        meterPix = meterStartPix + 25
                        for i in range(0, 26):
                                if not game_q.empty():
                                        GameDuration, PlayFlag = game_q.get()
                                if PlayFlag == 1:
                                        pixels[meterPix] = (200, 0, 0)
                                        Tick_Sound.play(maxtime=600)
                                        client.put_pixels(pixels)
                                        time.sleep(SleepNum)
                                        meterPix = meterPix-1
                                else:
                                        break

                        #Wait a tad bit
                        time.sleep(.50)
                        End_Sound.play()
                        time.sleep(.50)

                        #Quickly Clear the meter with soft white
                        meterPix  = meterStartPix
                        for i in range(0, 26):

                                pixels[meterPix] = (30, 30, 30)
                                client.put_pixels(pixels)
                                time.sleep(.01)
                                meterPix = meterPix+1

                        time.sleep(2)
                else:

                        #Quickly Clear the meter with soft white
                        meterPix = meterStartPix

                        for i in range(0, 26):

                                pixels[meterPix] = (30, 30, 30)
                                client.put_pixels(pixels)
                                time.sleep(.01)
                                meterPix = meterPix+1

                        time.sleep(2)
                time.sleep(0.001)

#Define a function for the t3 thread that controls the non-meter Neopixels
def RunMatrix():

        numLEDs = 6*26

        while True:
                if not matrix_q.empty():
                        play_flag = matrix_q.get()
                        if play_flag == 1:
                                numLEDs = 5*26
                        else:
                                numLEDs = 6*26

                r = random.randint(25,85)
                g = random.randint(25,85)
                b = random.randint(25,85)
                Bright = 3
                DotNum = 10

                for j in range(5):
                        for h in range(10):
                                pixels = [ (r, g, b) ] * numLEDs

                                for g in range(DotNum):
                                        p = random.randint(0,numLEDs-1)
                                        pixels[p] = (r*Bright, g*Bright, b*Bright)

                                client.put_pixels(pixels)

                                if not matrix_q.empty():
                                        play_flag = matrix_q.get()
                                        if play_flag == 1:
                                                numLEDs = 5*26
                                        else:
                                                numLEDs = 6*26
                                time.sleep(.1)

#Create thread objects
t1 = threading.Thread(target = MegaData)
t2 = threading.Thread(target = RunMeter)
t3 = threading.Thread(target = RunMatrix)
t1.start()
t2.start()
t3.start()
清單 1用於控制夾娃娃機專案 LED 的程式碼。
總結
使用可定址 LED 效果讓人滿意,但是卻具備挑戰性。通常達到完美視覺效果所需的編碼會干擾微控制器的其他作業。FadeCandy 和其他類型的精細 LED 驅動器用於緩解此類問題,並且為無限照明情境開啟另一扇門。只要搭配正確的驅動器,客製化 PCB 能良好組織輸入和輸出及配電。

Have questions or comments? Continue the conversation on TechForum, Digi-Key's online community and technical resource.
Visit TechForum


