製造商零件編號 5395
ADAFRUIT QT PY ESP32 PICO - WIFI
Adafruit Industries LLC
License: See Original Project LED Strips Wearables Wireless
Guide by Erin St Blaine
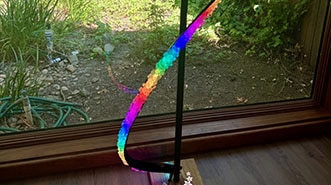
Spice up your boots with custom animated NeoPixel LED lit shoelaces. Sync them to each other wirelessly using the free and open-source WLED software, and then take them out dancing in the great outdoors. Your shoes will stay connected to each other even when you're out of reach of WiFi.
WLED's access-point mode keeps your shoes connected and in sync. You can still connect to your shoes and control the animation modes with your smartphone, even when you're lost in the desert or deep in the woods.
This is an easy project that requires just a little soldering. You'll need to do some software configuration, but no coding. WLED gives you dozens of customizable animation modes and color palettes to choose from. Make a playlist of super cool animations with just a few taps on your phone.
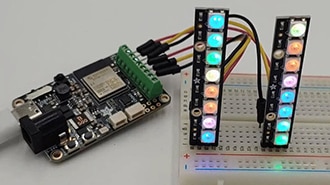
The QT Py ESP32 Pico is a fantastic tiny little board that makes NeoPixel projects easy. Hook it up to the NeoPixel BFF to plug the pixels directly into the board. Remember to get two of everything - one for each foot.
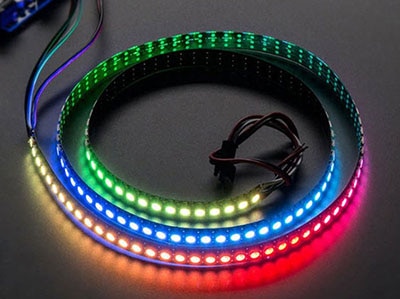
My boots have 9 sets of eyelets. I found that 1m of LEDs fill the shoelace holes perfectly. If your boots are taller, order more pixels.
These slim LED dots are a great choice for this project. Initially I tried using a standard NeoPixel Skinny strip to get more lights, but the light strand broke when I tried threading it through the eyelets. These pixels are made to bend and flex, and I had a lot more success with them. They're also a lot less expensive. You only get 20 lights in the strand but that is plenty of lights to show some awesome animations on your feet.
Adafruit carries a short USB C cable which will work to connect the QT Py to your battery. Or, check below for a cable that also has an on/off switch.
2 x USB C Adapter
2 x Stemma Connector
Boot Lace Hook Adapters
Most boot eyelets are too small to accommodate a NeoPixel strip. These Boot Lace Hook Adapters fit right inside the eyelets and convert them to a bigger loop that will let the skinny NeoPixels slide right through.
The QT Py and NeoPixel BFF stack on top of each other, back-to-back with the USB port and NeoPixel port facing the same direction. Solder them together using the included headers.
NeoPixel strips have an IN and OUT end. Be sure you're connecting to the IN end or the pixels won't light up. Look for arrows on the strip to show direction of data flow.
The NeoPixel strip plugs directly into the 3-pin connector on the BFF. Plug the power switch tail into the USB port on the QT Py and then into the battery.
This project powers the pixels directly through the board since there are only a few pixels. This arrangement works for small projects of 30-60 pixels. For larger projects with more LEDs, you'll want to power the pixels directly from a 5V power supply. If you are powering more than 60 LEDs or so, see the guides below:
WLED runs on several different boards in Adafruit's collection. There are different benefits to each, but the installation process is largely the same. This page contains instructions for multiple boards -- be sure to use the pinouts and installation instructions for the one you're using,
This is our flagship ESP32 board, designed with WLED and Xlights in mind. It has 4 outputs and is set up to drive either 5v, 12v or 24v pixels. It's a workhorse of a board and for larger projects it's the clear winner. It has an onboard microphone for instant sound-reactive support, and an IR sensor built in, to make it easy to control your project with an infrared remote. It also has a couple stemma ports so you can add your own sensors or peripherals.
The Sparkle Motion Mini is a smaller version of the Sparkle Motion board. It has two LED outputs, a microphone, and two stemma ports that make it easy to add an IR sensor or other peripherals. It's got an onboard NeoPixel and a small footprint, making it perfect for wearables or smaller projects. It will power a whole lot of pixels through the onboard USB port: it's safe to draw up to 4A through this port, giving you plenty of power for most wearable projects.
For Sparkle Motion Mini use at least the 0.15.1 release of WLED.
The QT Py Pico is small and affordable, so usually my go-to for smaller costumes or wearables. It also has a range of BFF add-on boards that add functionality. Here's a guide with more QT Py info. The QT Py will drive up to around 30 pixels through the onboard USB port, so if you have more LEDs than that you may want to consider the Sparkle Motion Mini instead, or you can power the board through the +5v pin.
Note: WLED works on the QT Py Pico but NOT on the S2 or S3 versions, at the time of writing.
The Feather Huzzah ESP32 the top of the line. It's a great choice for projects where you want to add sensors, interaction, or drive a whole lot of LEDs. It's the most reliable as well -- I've run these for two months straight with no power cycling and they just keep on truckin. Adafruit has a very wide selection of Feather Wing boards that connect to the Feather microcontroller line. The sky is the limit with these boards.
It also comes in a version with a high-powered WiFi range extender! If you're trying to sync multiple instances across distance, check this one out. Feather Huzzah ESP32 V2 w.FL Antenna
The Feather Huzzah ESP8266 will run WLED as well but won't drive as many pixels: the ESP32 limit on WLED is around 1000 pixels per input, but the ESP8266 tops out at around 500. It's about $5 cheaper though, so for smaller projects it's a great way to save a little money and still have access to all the Featherwing options in the Adafruit store.
Some versions of our controllers have a new serial chip which needs a driver installed before we can install WLED. Head over to our How to Install Drivers for WCH USB to Serial Chips tutorial and download and install the new driver.
If you have an older QT Py with CP2102 USB-to-Serial bridge, use SiLabs’ driver instead.
These next steps require a Web Serial-compatible browser. As of this writing, that means Google Chrome, Microsoft Edge or Opera “desktop” browsers. Other browsers (Safari, Firefox, Explorer and anything mobile) won’t work.
Visit https://install.wled.me/
Plug your microcontroller into your computer with a known good USB cable. Click "Install" and select the port for your board.
Depending on the USB-to-serial bridge chip on the board, you might see one or two serial ports. On Mac, for instance, there might be both “/dev/cu.usbmodem[number]” and “/dev/cu.wchusbserial[number]”. Use the “wchusbserial” one.
After successful installation, enter your WiFi network name and password when prompted. This must be a 2.4 GHz WiFi network; ESP32 does not support 5 GHz networks. If it can’t connect, then as a fallback WLED will create its own 2.4 GHz WiFi access point.
Sometimes the "Connect to Wi-Fi" prompt doesn't show up. Don't panic, just see the step below on connecting your computer or mobile device to the WLED-AP access point created on the microcontroller itself!
If you don't see the "Connect to Wi-Fi" prompt, you'll need to set up your WiFi network using AP (access point) mode. Open up your WiFi settings and look for a WiFi network called WLED-AP. (Note, this access point can take up to 30 seconds to appear sometimes.) Connect to this network using the default password wled1234. The WLED interface will pop up in its own captive browser window.
From here, go into Config/Wifi Settings and enter your WiFi credentials for the access point you normally use near the top.
Give your project a name in the mDNS field a little further down the page. Now you can type in "projectname.local" (where "projectname" is your mDNS name) into any web browser on the same wifi network to access your microcontroller.
You can also scan the QR code below to open access point mode.
For more help and troubleshooting tips visit the Getting Started page on the WLED knowledge base.
Head to the WiFi Setup screen under Config and create a good URL so you can control your project from any web-enabled device. Call it something you'll remember, that's easy to type into any web browser on your WiFi network in order to connect to your project.
In Safari or Chrome on your phone or computer, type in this web address to access the WLED interface: http://projectname.local (where "projectname" is whatever you put into this field).
Check out the Additional Settings page for more info on accessing your project. WLED has an "access point mode" that doesn't require a WiFi network for when you're out on the go. It's also helpful to download one of the WLED apps to help manage and organize your projects.
Next, head to the LED Preferences tab under the Config menu.
Scroll down to Hardware Setup. Put your total number of LEDs into the "Length" field and change GPIO to the pin number associated with the pin you soldered to. Check the pinout diagram for the board you're using (it's the number in yellow).
Feather Huzzah ESP8266 Pinout
Now you can use any computer or handheld device to control your LEDs.
Make sure your device is on the same WiFi network as your board. Navigate to your custom URL (projectname.local/ ) in a web browser. You'll see a color picker above a whole bunch of color palette choices.
Choose a color, choose an effect, and watch your lights animate and glow!
Save your favorite combinations as presets, create playlists, control the speed and intensity of the animations, and lots more. This web app is incredibly intuitive and easy to use.
Head over to the WLED wiki at https://kno.wled.ge/ to delve into all the particulars.
Find this on the LED Settings screen.
WLED automatically limits the brightness of your project, so your power supply doesn't get over-taxed. The default amperage is 850mA, which is a little low for most power supplies.
For some projects, especially battery-powered projects, having the limiter turned on is a good idea. But if you're not getting the brightness you expect, try adjusting this number to match the amperage of your power supply or battery pack.
While you're home, it's easy to control your project over your local WiFi network. But when you're out at a festival you probably don't have WiFi access. It's still possible to connect to your project and control it using WLED's Access Point Mode.
Turn your project on and give it a minute or two to start broadcasting. Look in your WiFi networks and find WLED-AP - this is a mini WiFi network being broadcast by the microcontroller. Connect to it - the default password is "wled123". An instance of WLED will automatically pop up and you can control your project from anywhere.
If you're putting your lights up in public, it's a good idea to change the AP Mode default password so strangers can't log in and control your lights. This could be a security risk.
AP Mode only broadcasts for a few minutes after you boot up the board so if you don't see the WLED-AP network try rebooting.
There are a couple different apps available to manage your WLED projects. Name and organize your projects, and find them quickly without having to type in a URL. Check the Apple or Android store for downloads.
My favorite is "WLED Native". It allows you to organize multiple instances and easily switch between devices without having to remember any URLs.
Under Config / Security & Updates you will find a place to back up your data. It's a good idea to back up your config file as soon as you're happy with the settings. Save it as a .json file on your computer. Now you can prototype and experiment to your heart's content, and if everything breaks, just re-upload this file. Or, if you're doing another build you can use this feature to copy all your settings from one board to another.
Assembly is fairly simple for this project. Watch this video tutorial for a complete step-by-step.
Solder headers onto the QT Py and BFF to stick them together. If you're new to soldering headers, check out this How to Solder Headers guide.
The boards align back-to-back with the JST and USB connectors facing the same side. It's easiest to use a solderless breadboard and slot the headers in to hold the board in place while you solder.
These lights come with a 3-pin connector, but it's not the correct one for the NeoPixel BFF so you will need to replace it with the 3-pin, 2mm Stemma connector.
First, verify which wire is which. The Stemma connector is handily color-coded: Red for power, black for ground, and white for data. However, the LED strips are not marked in any way, so it can take some trial-and-error to figure out which wire is which.
On my strands, with the resin bump facing me:
Cut the FEMALE connector -- this is the IN end
Left wire goes to Stemma Power (red)
Middle wire goes to Stemma G (black)
Right wire goes to Stemma Data (white)
Strip a bit of shielding from the wires and twist the 3 wires securely to the Stemma connector. They'll be in a different order on the LED strip and the connector. Before you solder, carefully be sure the bare wires are not touching each other and then plug in the connector and power to be sure the lights come on.
Once you're sure you've got it right, solder the wires and cover the connections with heat shrink.
Plug the NeoPixel strip into the BFF using the NeoPixel port. Plug the QT Py into the power switch tail, add the male-to-male adapter, and plug into your USB battery.
Cut the male connector off the other end of your strip and seal up the ends with some hot glue and clear heat shrink to keep this end waterproof.
If you're using more than one strip for your shoes, I recommend cutting the connectors and hard wiring the two NeoPixel strips together since the connectors won't fit through the boot lace loops.
If the lights don't come on here are a couple things to try:
Open the WLED software and go to the LED Settings page. Make sure you have the correct pin (GPIO) entered here. The BFF's port is attached to A3, which corresponds to digital pin 15 (A3 is the analog pin number. Find this out in the pinout diagram in the QT PY guide.)
Your LED strip may have a different wiring configuration. Try swapping the wires around or try soldering the data connection to the other end of your strip.
If it's still not working, head over to the NeoPixel Uberguide and try uploading some basic code, just to see whether the problem is with your wiring or with the software. If you can get the lights to come on using Arduino or CircuitPython, the trouble is with the software -- try reinstalling.
These laces are going to be decorative, not functional. Be sure you're using boots with a side zipper so you can get them on and off without having to "untie" your NeoPixel strip each time.
My boots have standard 6mm eyelets, which are not quite big enough to fit the NeoPixel strand through. Luckily, there's a product available which converts eyelets to loops on your boots. Search for Boot Eyelets on Amazon. Shop around - they come in a variety of colors and styles.
These adapters have 3 pieces: a loop, and a rivet front and back.
Push the rivet back (the longer piece) through the hole from the back. Place the loop on top, then cover with the rivet front. It snaps neatly into place.
Once they're in, squeeze each assembly with a pair of pliers to set the rivet.
Electronics placement on the boots will vary depending on your boot style. I found it convenient to hide the QT Py under the laces near the bottom. To conceal it and keep it safe and dry, I first covered it in a piece of black 1" heat shrink.
I used extra-strong thread (upholstery thread, or button / carpet thread) and a sharp needle to stitch the QT Py and USB switch to the tongue of my boot. I kept them in the center for easy access to the switch.
Thread the pixel strand through the laces. It looks best if you're consistent with always threading in the same direction through the loops. Skip every other loop on the way up and then thread back down.
I secured the end of my LED strip to the last eyelet with a zip tie.
Before you get the boots talking to each other you'll want to set up some presets and an animation playlist.
"Presets" refer to a particular combination of animation, color palette, and speed/intensity/brightness settings. Making the presets is a lot of fun - you get to play around in WLED and find settings that suit your style.
"Playlists" are a scripted list of Presets that will play in a specific order (or shuffle) for a specified amount of time. WLED gives you a lot of control. You can also set your playlist as the default setting when WLED boots up, so you can just turn them on and go.
Play with the effects and colors until you have the lights in a mode you want to save. Click over to the "presets" tab and click "+ Preset". Give it a name and save it to your list.
Once you've saved a few presets, you can string them together into a playlist. The playlist options include the ability to set your duration (how long each preset plays) and the transition time.
Take note of the number assigned to your playlist. In the next step you'll set up WLED to default to this playlist on startup.
Head to Config --> LED Preferences and scroll down until you find the Defaults section. Here you have an option for "Apply preset 0 at boot". Enter the number of your playlist here and click "save". Now when you boot up WLED your playlist will load first automatically.
You can also control the default brightness here. If you're finding your battery life to be too short, turning the brightness down will help.
WLED software is great when you're within range of WiFi. But my goal with this guide is to get my shoes to sync when I'm out dancing at a festival, out of reach of any of my known WiFi networks. WLED has this capability! As long as the QT Py boards are close to each other (within a few feet), we can use Access Point mode (AP-MODE) to sync our boots or other costume pieces together.
Here's how this works:
The right shoe will be set up as the access point host.
Turn your right shoe strand on, but keep the left one turned off to avoid confusion. Make sure your smartphone or computer is on the same WiFi network you used during setup.
Connect to your right shoe QT Py by going to http://rightshoe.local in your web browser to bring up the WLED interface.
Head to Config --> Wifi Setup. Scroll down until you find Configure Access Point.
By default, this field is populated with WLED-AP. Change this to "shoelaces" and give it a password.
Change the AP opens dropdown to Always.
Scroll back up and find the Network Name (SSID) field. This should contain your WiFi network name, which you entered during setup. Remove the text from this field so your shoes stay off the WiFi while we're testing.
Click Save. Now your QT Py is no longer connected to your home WiFi but is broadcasting its own WiFi network called "shoelaces". You may get an error in your browser -- this is normal.
Go into WiFi settings and connect to the "shoelaces" network. (If you don't see it, try power cycling the QT Py). This network is being created by your QT Py. It's not connected to the internet, but you can still use it to control and sync your shoes.
Once you join "shoelaces" you may get a popup window with your WLED controls. Success! Now you can control this board without relying on your home WiFi.
If you don't get a popup, you can connect manually by heading to 4.3.2.1 in your browser.
Click Config and choose Sync Interfaces. Click the "Send" box on channel 1 since this is our broadcasting shoe.
Turn the right shoe power off and turn the left shoe on.
The left shoe is still talking to your home WiFi network, so go back to your WiFi settings and connect to your home WiFi instead of the "shoelaces" network. This might have happened automatically since "shoelaces" will disappear when the right shoe is turned off.
Type in leftshoe.local in your browser to pull up the WLED interface.
Head to Config --> Sync Interfaces again, and this time under Sync Setup click the Receive box since this is our receiver.
Go back to Config --> WiFi settings.
Replace your home network name with "shoelaces". Don't put this in the AP-mode field like you did with the right shoe -- put it in the Network Name field since this shoe is a receiver, not a broadcaster. Update the password as well.
Click "save". Now your left shoe is looking for the "shoelaces" network and so you may lose connectivity for a bit.
Turn the left shoe off and the right shoe on. In just a moment or two you'll see the "shoelaces" WiFi network appear again.
Click the Sync button at the top of the screen to turn on sync mode. Now your right shoe is broadcasting to the "shoelaces" network.
Turn the left shoe on. Wait a moment or two. When the lights change between modes (if you're playing a playlist) the two shoes will sync up. Magic!
Learn more about how all this works at the WLED knowledge base at https://kno.wled.ge/
Click the "nodes" button under the Info tab to see a list of all the instances of WLED on a particular network and their respective IP addresses.
Things can get confusing when you're working with more than one instance of WLED. If you find you can't connect to your board at all, on any WiFi network, the best thing to do is to plug the board into your computer and head back to install.wled.me and go through the install process again. During this process you'll have the opportunity to "Visit Device" or "Change WiFi". This is the best way to troubleshoot if you've mistyped a password or just can't connect for any reason. Don't be afraid to reinstall the software and start fresh if you can't figure out what's wrong.
It also really helps to install the WLED Native app, which adds a layer of control where you can name and organize different instances of WLED.
To control your shoes when you're not in WiFi range:
Turn on the right shoe (broadcaster)
Connect to the "shoelaces" WiFi network that appears with your smart phone
Turn on the left shoe (receiver)
Be sure the "sync" button is checked in the app. Changes made in the app will control both shoes.