Mfr Part # DFR0706-EN
UNIHIKER IOT PROGRAMMING SBC
DFRobot
License: Attribution Arduino ESP32
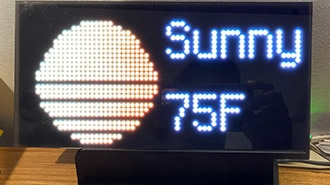
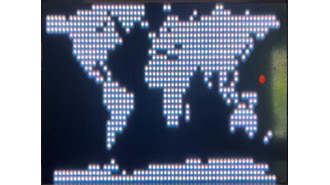
This project was first published in our DF Chinese community. It aims to achieve a wireless handwritten dot matrix screen using UNIHIKER. It combines handwritten input on the UNIHIKER screen with Python OS library screenshotting. It then analyzes the handwritten traces on the image to extract coordinates. These coordinates are subsequently transmitted via TCP to Arduino for illuminating the dot matrix screen.

HARDWARE LIST
1 UNIHIKER - IoT Python Single Board Computer with Touchscreen
1 Gravity: IO Expansion Shield for Arduino V7.1
1 WiFi Module
Here is all the hardware used in this project:

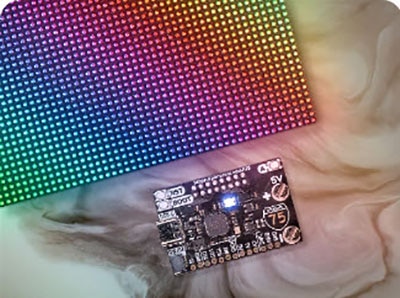
Here I use 32x16 RGB LED Matrix Panel from DFRobot.
For more information about this panel can refer to the product documentation.


Connect the Arduino to the dot matrix screen according to the two diagrams above.
Using the WiFiBee-MT7681, inserted into the Arduino expansion board. Here I've noticed that this WiFi module is no longer available. So you can you search for alternative options.

Connect UNIHIKER to the internet, load the socket library, press the A key sends "A", and press the B key sends "B".
CODE
s.connect(('192.168.31.38',1000))


"192.168.31.38" is the IP address for the WiFiBee-MT7681 connected to the network.
CODE
import socket

from unihiker import GUI

i=0

def on_buttonb_click_callback():

    s.send(b'B')

def on_buttona_click_callback():

    s.send(b'A')

u_gui=GUI()

u_gui.on_a_click(on_buttona_click_callback)

u_gui.on_b_click(on_buttonb_click_callback)

s=socket.socket(socket.AF_INET,socket.SOCK_STREAM)

s.connect(('192.168.31.38',1000))

while True:

    pass

Arduino uses serial communication to receive information from WiFiBee-MT7681. When it receives "A", the dot matrix screen displays the letter "A", and when it receives "B", it clears the screen.
CODE
#include <Adafruit_GFX.h>

#include <RGBmatrixPanel.h>

#define CLK 8

#define LAT A3

#define OE  9

#define A   A0

#define B   A1

#define C   A2

RGBmatrixPanel matrix(A, B, C, CLK, LAT, OE, false);

void setup() {

Serial.begin(115200);

  matrix.begin();

  matrix.fillScreen(matrix.Color333(0, 0, 0));

  matrix.setCursor(1, 0);

  matrix.setTextSize(1);

  matrix.setTextColor(matrix.Color333(7,0,0));

}

void loop() {

if ((Serial.available())) {

String  mystr=Serial.readString();

if(mystr=="B"){

     matrix.fillScreen(matrix.Color333(0, 0, 0));

  }

else{

    matrix.print(mystr);

  }

}
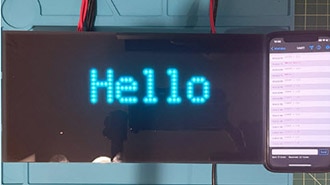
The UNIHIKER Python program captures handwritten traces and sends the coordinates of the traces.
CODE
import socket

from unihiker import GUI

import time

import os

import cv2

import numpy as np

pos_xy = []

def image_rotate(src, rotate=0):

  h,w,c = src.shape

  cos_val = np.cos(np.deg2rad(rotate))

  sin_val = np.sin(np.deg2rad(rotate))

  M = np.float32([[cos_val, -sin_val, 0], [sin_val, cos_val, 0]])

  img = cv2.warpAffine(src, M, (w,h))

return img

def on_buttonb_click_callback():

    u_gui.clear()

    s.send(b'B')

def on_buttona_click_callback():

    os.system("scrot -a 0,0,240,320 sc.png")

    img = cv2.imread("sc.png")

    img=cv2.resize(img,(16,32))

    hsv = cv2.cvtColor(img, cv2.COLOR_BGR2HSV)

    low = np.array([0, 0, 0])

    high = np.array([180, 255, 46])

    dst = cv2.inRange(src=hsv, lowerb=low, upperb=high)

    xy = np.column_stack(np.where(dst==255))

    mystr=b''

    k=0

for c in xy:

for d in c:

          mystr=mystr+b","+str(d).encode()

          k+=1

if k==10:

             mystr=str(k).encode()+mystr

print(mystr)

             s.send(mystr)

             k=0

             mystr=b''

             time.sleep(2)

if k>0:

        mystr=str(k).encode()+mystr

print(mystr)

        s.send(mystr)

u_gui=GUI()

u_gui.on_a_click(on_buttona_click_callback)

u_gui.on_b_click(on_buttonb_click_callback)

s=socket.socket(socket.AF_INET,socket.SOCK_STREAM)

s.connect(('192.168.31.38',1000))

def mouse_move(x, y):

    global temp_time

    temp_time = time.time()

    pos_xy.append([x,y])

if len(pos_xy) > 1:

        point_start = pos_xy[0]

for pos_tmp in pos_xy:

            point_end = pos_tmp

            line_text = u_gui.draw_line(x0=point_start[0],y0=point_start[1],x1=point_end[0],y1=point_end[1],width=20, color=(0,0,0))

            point_start = point_end

def on_release(event):

    pos_xy.clear()

u_gui.master.bind("<ButtonRelease>", on_release)

u_gui.on_mouse_move(mouse_move)

while True:

time.sleep(0.5)Use custom function fenge, split the received string coordinates, use matrix.drawPixel to light the coordinates.
CODE
#include <Adafruit_GFX.h>

#include <RGBmatrixPanel.h>

#define CLK 8

#define LAT A3

#define OE  9

#define A   A0

#define B   A1

#define C   A2

RGBmatrixPanel matrix(A, B, C, CLK, LAT, OE, false);

void setup() {

Serial.begin(115200);

  matrix.begin();

  matrix.fillScreen(matrix.Color333(0, 0, 0));

// draw  text!

  matrix.setCursor(1, 0);

  matrix.setTextSize(1);

  matrix.setTextColor(matrix.Color333(7,0,0));

}

int fenge(String str,String fen,int index)

{

int weizhi;

String temps[str.length()];

int i=0;

do

 {

    weizhi = str.indexOf(fen);

if(weizhi != -1)

    {

      temps[i] =  str.substring(0,weizhi);

      str = str.substring(weizhi+fen.length(),str.length());

      i++;

      }

else {

if(str.length()>0)

        temps[i] = str;

      }

 }

while(weizhi>=0);

if(index>i)return "-1";

return temps[index].toInt();

}

String Mystr = "";//声明字符串变量

void loop() {

if (Serial.available() > 0)

    {  Mystr=Serial.readString();

if(Mystr=="B"){

       matrix.fillScreen(matrix.Color333(0, 0, 0));

       }

else{

int num=fenge(Mystr,",",0);

for(int i=1;i<=num-1;i=i+2){

int pose0=31-fenge(Mystr,",",i);

int pose1=fenge(Mystr,",",i+1);

              matrix.drawPixel(pose0,pose1, matrix.Color333(7, 7, 7));

             }

           }

      Mystr=="";

      }

}

The article was first published on April 11, 2023
Cr: https://mc.dfrobot.com.cn/thread-315889-1-1.html
Author: 云天