Mfr Part # 5362
64X64 RGB LED MATRIX PANEL - 2MM
Adafruit Industries LLC
License: See Original Project Addressable LEDs Displays LCD / TFT
Courtesy of Adafruit
Guide by Trevor Beaton
Overview
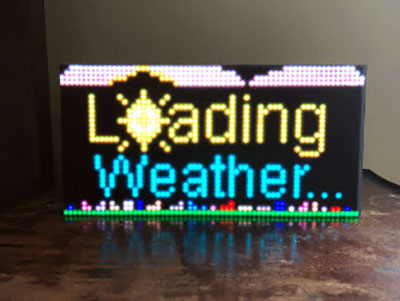
Express yourself with this Bluetooth-controlled sign using Adafruit's RGB LED Matrix Display, Adafruit nRF52840 Feather running CircuitPython, and the RGB Matrix nRF52840 FeatherWing.
With this project, you can effortlessly display text on the Matrix panel and change the text color with ease through the Bluefruit Connect app. You can display scrolling text on the Matrix display and easily change the color of the text using the Bluefruit Connect app.
This setup was initially written for the 64x32 Matrix, but has also been tested on the 64x64 Matrix, 16x32 Matrix, and 32x32 Matrix as well.
To complete this project, it is necessary to perform soldering.
Parts
CircuitPython for Feather nRF52840
CircuitPython is a derivative of MicroPython designed to simplify experimentation and education on low-cost microcontrollers. It makes it easier than ever to get prototyping by requiring no upfront desktop software downloads. Simply copy and edit files on the CIRCUITPY drive to iterate.
The following instructions will show you how to install CircuitPython. If you've already installed CircuitPython but are looking to update it or reinstall it, the same steps work for that as well!
Set up CircuitPython Quick Start!
Follow this quick step-by-step for super-fast Python power :)
Download the latest version of CircuitPython for this board via CircuitPython.org
Click the link above to download the latest UF2 file.
Download and save it to your desktop (or wherever is handy).
Plug your Feather nRF52840 into your computer using a known-good USB cable.
A lot of people end up using charge-only USB cables and it is very frustrating! So, make sure you have a USB cable you know is good for data sync.
Double-click the Reset button next to the USB connector on your board, and you will see the NeoPixel RGB LED turn green (identified by the arrow in the image). If it turns red, check the USB cable, try another USB port, etc. Note: The little red LED next to the USB connector will pulse red. That's ok!
If double-clicking doesn't work the first time, try again. Sometimes it can take a few tries to get the rhythm right!
You will see a new disk drive appear called FTHR840BOOT.
Drag the adafruit_circuitpython_etc.uf2 file to FTHR840BOOT.
The LED will flash. Then, the FTHR840BOOT drive will disappear, and a new disk drive called CIRCUITPY will appear.
That's it, you're done! :)
Update Bootloader
Your board's bootloader must be 0.6.1 or later to be able to load CircuitPython 8.2.0 or later.
Older versions of Adafruit's nRF52840 boards were shipped with a bootloader that does not handle large UF2's, including CircuitPython 8.2.0 and later, and has other issues. To check whether you need to update the bootloader, double-click the reset button, and look in the ...BOOT drive for INFO_UF2.TXT.
Inside that file, check the version number of the bootloader. There are multiple version numbers. Look for the number just after "UF2 Bootloader" on the first line. See the picture below It should be 0.6.1 or newer.
The dafruit nRF52 Bootloader can be upgraded/downgraded without any additional hardware. There are 3 different ways to update bootloader, each has its pros and cons:
Use UF2: This is the fastest and safest way to update bootloader. However, it requires your existing bootloader version is at least 0.4.0 and only work with nRF52840 (not nRF52832)
Use Arduino IDE: work with all Adafruit nRF52 boards and bootloader version, typo free but may not be the latest bootloader version due to the BSP release cycle
Use Command Line: work with all boards and bootloader version (including 3rd party one). This command line uses the back end of the Arduino IDE method above.
Use UF2
This is the fastest and safest way to update bootloader. However, it requires your existing bootloader is at least 0.4.0 and only work with nRF52840 (not nRF52832) since UF2 make use of USB MSC interface.
Download update-bootloader UF2
You need a .uf2 file containing the latest version of the bootloader. The most common updaters are linked below. For updaters for other boards, look for the .uf2 files here that begin with update-...
Note if you click the link above, you must scroll down to the UF2 files that begin with the word update as the zip files do not include UF2s. Most users will click the appropriate green button below to select the file for their board.
Feather nRF52840 Express bootloader updater UF2 (version 0.8.2)
Circuit Playground Bluefruit bootloader updater UF2 (version 0.8.2)
ItsyBitsy nRF52840 bootloader updater UF2 (version 0.8.2)
CLUE nRF52840 bootloader updater UF2 (version 0.8.2)
Feather Sense nRF52840 bootloader updater UF2 (version 0.8.2)
Enter Bootloader Mode
Double-click the Reset button on your board, and you will see the NeoPixel RGB LED turn green (identified by the arrow in the image). If it turns red, check the USB cable, try another USB port, etc.
Note: on nRF52840 USB Key with TinyUF2 (PID 5199) you need to hold its button while plugging into your PC.
Drag & Drop UF2
You will see a new BOOT disk drive appear e.g., FTHR840BOOT. Drag the downloaded .uf2 file to FTHR840BOOT. The LED will flash. Then, the FTHR840BOOT drive will disappear. That's it, you have successfully updated your board to the latest version.
Issues
If you download the wrong UF2 file for your board, dragging the file to the ...BOOT drive will close the drive but will not update the firmware (as it is the firmware for the wrong board). You can check the INFO_UF2.TXT on the board and see if the firmware was updated (likely with the wrong UF2 file it was not).
If you cannot find the correct UF2 check all the files in https://github.com/adafruit/Adafruit_nRF52_Bootloader/releases for the correct UF2 (they all start with the word update-boardname-bootloader-version.uf2 so scroll the list down to the files starting with u.
Non Adafruit board firmware updates can be found using this method also.
Use Arduino IDE
Arduino IDE Burn Bootloader menu option will pick the correct bootloader binary for your selected board and prevent any command typos or other common errors.
Close the Serial Monitor before you click "Burn Bootloader". Afterwards, you shouldn't close the Arduino IDE, unplug the board, launch Serial Monitor etc ... to abort the process. There is a high chance it will brick your device! Do this with care and caution.
This is an advanced method: if your existing bootloader version is 0.4.0 or later, you can use the UF2 method, which is faster and safer.
If you have not already done so, set up Arduino IDE for nRF52, using the instructions in Arduino Support Setup.
Make sure no other program is attached to the serial port on the board, such as Mu, the Serial Monitor in Arduino, or a terminal program. Then, to start, select the correct board you are using under Tools -> Board.
Then select "Bootloader DFU for Bluefruit nRF52" for Tools->Programmer.
Double check all of the following: Board, Programmer...
Then select Tools->Burn Bootloader to start the upgrade.
After receiving the new Bootloader over the serial connection, the old Bootloader will erase itself! The new bootloader will then be flashed. The process typically takes 30-60 seconds to complete. Make sure you see the "Device programmed" in the output log before launching Serial monitor or uploading a new sketch.
Upgrading target on /dev/ttyACM0 with DFU package
/Adafruit_nRF52_Arduino/bootloader/feather_nrf52840_express/feather_nrf52840_express_bootloader-0.6.2_s140_6.1.1.zip. Flow control is disabled, Dual bank,
Touch 1200
Touched serial port /dev/ttyACM0
Opened serial port /dev/ttyACM0
Starting DFU upgrade of type 3, SoftDevice size: 151016, bootloader size:
39000, application size: 0
Sending DFU start packet
Sending DFU init packet
Sending firmware file
########################################
########################################
########################################
########################################
########################################
########################################
########################################
########################################
########################################
############
Activating new firmware

DFU upgrade took 20.50154972076416s
Device programmed.
Drawbacks of this method are that you will need to install the Arduino IDE, and the bundled bootloader may not be the latest one. Check out the next page for a more advanced command line version.
Use Command Line
This is an advanced method, which is only necessary if your bootloader is older than 0.4.0. If your existing bootloader version is 0.4.0 or later, you can use the UF2 method, which is faster and safer.
Download Bootloader Package
To update the bootloader, you need a .zip file containing the latest version of the bootloader. The most common bootloader .zip files are linked below. For .zip files for other boards, look for the .zip files here that begin with the name of the board you want to update.
Pick the download below for the board that you have. If you have a different board, look for the right .zip file for the board you have at the link just above.
Bootloader .zip package for Adafruit Feather nRF52840 (latest version)
Bootloader .zip package for Adafruit Feather nRF52840 Sense (latest version)
Bootloader .zip package for Adafruit CLUE (latest version)
Bootloader .zip package for Circuit Playground Bluefruit (latest version)
Bootloader .zip package for Adafruit ItsyBitsy nRF52840 (latest version)
Do not unzip this .zip file after downloading. It will be used as is.
Download adafruit-nrfutil
You will also need the utility program adafruit-nrfutil, which has slightly different names on different platforms.
adafruit-nrfutil for Linux
On Linux, you can download and install adafruit-nrfutil by doing:
pip3 install --user adafruit-nrfutil
adafruit-nrfutil for macOS
On macOS, if you have python3 and pip3 installed, you can install via pip3, as above for Linux. Otherwise download the zip file adafruit-nrfutil-macos...zip from the link below, and then extract the file adafruit-nrfutil from the zip file.
adafruit-nrfutil-macos for MacOS (in .zip file)
Then make adafruit-nrfutil executable by doing:
chmod +x adafruit-nrfutil
adafruit-nrfutil for Windows
Download the .zip file from this link and extract the file adafruit-nrfutil.exe.
adafruit-nrfutil.exe for Windows (in .zip file)
Update Bootloader
To update the bootloader, first connect the board, and then double-click the RESET button to get the ...BOOT drive to appear.
Different boards will have different boot folder names, but they should all end with BOOT.
Updating on Linux
Run a command similar to the one below in a shell window. Substitute the name of the .zip file you downloaded above for the file given below.
adafruit-nrfutil --verbose dfu serial --package feather_nrf52840_express_bootloader-0.8.0_s140_6.1.1.zip -p /dev/ttyACM0 -b 115200 --singlebank --touch 1200
Updating on macOS
Find out the device name for the connected board, by doing:
ls /dev/cu.*
The device name will be something like /dev/cu.usbmodem411. Use this command, substituting the device name you've discovered. Substitute the name of the .zip file you downloaded above for the file given below. and the name of the .zip package you downloaded above. If you are running it other than where you downloaded adafruit-nrfutil-macos, change the path to the command accordingly. If you installed it via pip3, it's just called adafruit-nrfutil, and it should be in your PATH.
./adafruit-nrfutil-macos --verbose dfu serial --package feather_nrf52840_express_bootloader-0.8.0_s140_6.1.1.zip -p /dev/cu.usbmodem411 -b 115200 --singlebank --touch 1200
Updating on Windows
Use this command in the folder where you downloaded the other two files above. You'll need to specify the correct COM port, instead of COMxx. Look in Device Manager->Ports for the name of the COM port (it will be listed as a "USB Serial Device" on Windows 10) after you have double-clicked the RESET button. Substitute the name of the .zip file you downloaded above for the file given below.
adafruit-nrfutil.exe --verbose dfu serial --package feather_nrf52840_express_bootloader-0.8.0_s140_6.1.1.zip --port COMxx -b 115200 --singlebank --touch 1200
Output when Updating
When you run the adafruit-nrfutil program, you will see output similar to this (it will vary slightly depending on your OS).
Upgrading target on COM29 with DFU package C:\Users\halbe\Desktop\update-feather-nrf52840-bootloader-0.8.0-windows\feather_nrf52840_express_bootloader-0.8.0_s140_6.1.1.zip. Flow control is disabled, Single bank, Touch 1200
Touched serial port COM29
Opened serial port COM29
Starting DFU upgrade of type 3, SoftDevice size: 151016, bootloader size: 39000, application size: 0
Sending DFU start packet
Sending DFU init packet
Sending firmware file
########################################
########################################
########################################
########################################
########################################
########################################
########################################
########################################
########################################
############
Activating new firmware

DFU upgrade took 21.119003295898438s
Device programmed.
Once done, click the RESET button again - the bootloader will be running!
Assembly
Assembling your Bluetooth sign with the RGB LED Matrix Panel is straightforward but will require some soldering.
In addition to your Adafruit RGB Matrix FeatherWing Kit, you'll also need a Header Kit for Feather - 12-pin and 16-pin Socket Header Set.
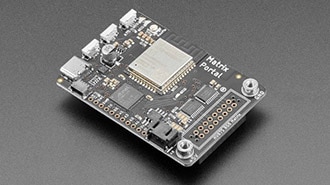
First, you'll need to solder two socket headers to each side of the RGB Matrix nRF52840 FeatherWing.
Next solder the 2x8 IDC header on to the back of the feather.
Finally, you'll need to solder the 5.08mm terminal block and the 2.1mm DC jack to the feather.
Attach the jumper wires included in the Matrix Panel kit to the terminal block on your Feather board. Remember, the negative sign denotes ground (black wire), while the positive sign is for the 5 volts (red wire).
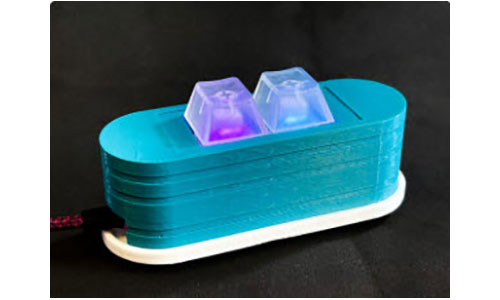
Stack your Adafruit nRF52840 Feather Express onto your RGB Matrix nRF52840 FeatherWing to match the photo above.
Next, connect your RGB Matrix nRF52840 FeatherWing to your Matrix panel. Be sure to place your FeatherWing on the LiPo battery socket on the left side. For the correct orientation, the arrows on the Matrix panel should point to your right and upward.
Finally, connect your 5V 2A (2000mA) switching power supply to your RGB Matrix nRF52840 Feather Wing's 2.1mm DC jack.
Great! Now, now to get the Bluefruit Connect app.
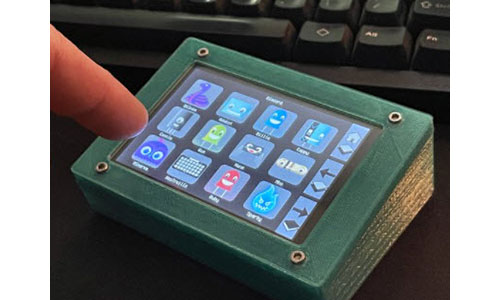
Bluefruit Connect App
Use Bluefruit Connect to display text to our Matrix Panel via Bluetooth.
The Bluefruit Connect app allows you to wirelessly connect your iOS or Android device to Adafruit Bluefruit LE modules for control & communication with your projects. First, we'll need to download it.
Installation and Setup
The Bluefruit LE Connect app provides iOS & Android devices with a variety of tools to communicate with Bluefruit LE devices. These tools cover basic communication and info reporting as well as more project specific uses such as Arduino Pin Control and a Color Picker.
The iOS app is a free download from Apple's App Store. It requires iOS 11.3 or later and works on iPhones, iPads, and iPod Touches.
The Android app is a free download from the Google Play Store. It requires Android 4.4 or later.
The app is compatible with these BLE devices from Adafruit, and possibly more:
First off - install the app from one of the App stores listed above if you haven't already.
Enable Bluetooth
If Bluetooth is disabled on your device, enable it by going to Settings->Bluetooth on your iOS device, or the analogous setting on your Android device.
Enable Location Services
If you plan to use the app to send location/GPS data to Bluefruit LE, enable Location Services. Enable it on iOS using Settings->Privacy->Location Services.
Scan for Devices
On launch, the app will automatically begin to scan for nearby Bluetooth LE devices. Devices are presented in a table view in the order in which they were discovered.
Don't forget to turn on Bluetooth on your device! Airplane Mode turns off BLE.
iPhone
The following images depict the app when used on the iPhone. The Android app looks similar.
The device list will display all BLE devices discovered by the app (not just Bluefruit hardware) - so you may see a quite a few "" or <Unknown> entries for devices that don't advertise their name, as seen above.
To refresh the list and start a new scan, simply swipe down on the current list
Each device's signal strength is displayed in the left side of its row
If you tap on the device entry (not on Connect), you'll see more detail about a particular device:
iPad
The following images depict the app when used on the iPad.
Tap the middle of a device's table row to reveal its relevant advertisement data.
Any device listed with a "Connect" button at the right can be accessed in Info mode
Any device listed as "UART Capable" can be used with all modes - Info, UART, Pin I/O, & Controller
To use the Bluefruit Connect app with your device it must be "UART capable"! All Adafruit BLE devices implement the UART interface, but other devices may not.
Multiple UART Mode
The Multiple UART feature allows to monitor incoming data from and send data to multiple devices simultaneously.
To use it:
Activate the Multiple UART Mode switch
Tap Connect next to each device you'd like to include
Tap the Start button below the Multiple UART mode to begin.
Once connected, you can choose UART or Plotter module to view incoming data from all connected peripherals. In the UART module, you can send data to one or all connected devices at once.
Connect
Tap the Connect button on the UART capable list entry you wish to use and choose a connection mode from the menu that appears.
Troubleshooting
If you’re having trouble finding your Bluefruit device in the scanned peripherals list, ensure the board is powered and not paired with any other BLE devices. If the problem persists, it could be due to caching issues in the iOS or Android operating system. For a fix, try the following:
Cycle Bluetooth - Turn your mobile device’s Bluetooth radio off and on again in the Settings app
Relaunch App - Quit the Bluetooth LE Connect app and restart it. (instructions for iOS & Android)
Cycle Power - Restart your mobile device by powering it off and restarting.
Doing one or both of the above solves most peripheral scanning issues. If you're still having trouble, try searching the Adafruit Support forum for your issue.
Code the Matrix Sign
Once you've finished setting up your Adafruit nRF52840 Feather with CircuitPython, you can access the code and necessary libraries by downloading the Project Bundle.
To do this, click the Download Project Bundle button in the window below. It will download all needed files as a zipped folder.
# SPDX-FileCopyrightText: 2023 Trevor Beaton for Adafruit Industries
# SPDX-License-Identifier: MIT


import time
import board
import displayio
import framebufferio
import rgbmatrix
import terminalio
from adafruit_display_text import label
from adafruit_ble import BLERadio
from adafruit_ble.advertising.standard import ProvideServicesAdvertisement
from adafruit_ble.services.nordic import UARTService

SEND_RATE = 10  # how often in seconds to send text

count = 0

SCROLL_DELAY = 0.05  # delay between scrolls, in seconds

ble = BLERadio()
uart_server = UARTService()
advertisement = ProvideServicesAdvertisement(uart_server)

# Release any previously allocated displays
displayio.release_displays()

matrix = rgbmatrix.RGBMatrix(
    width=64, height=32, bit_depth=1,
    rgb_pins=[board.D6, board.A5, board.A1, board.A0, board.A4, board.D11],
    addr_pins=[board.D10, board.D5, board.D13, board.D9],
    clock_pin=board.D12, latch_pin=board.RX, output_enable_pin=board.TX,
)
display = framebufferio.FramebufferDisplay(matrix, auto_refresh=True)

main_group = displayio.Group()

def scroll(line):
    line.x -= 1
    line_width = line.bounding_box[2]
    if line.x < -line_width:
        line.x = display.width

def update_display(text, color=0xFFFFFF):
    """Update the display with the provided text and color."""
    if len(main_group) > 0:
        main_group.pop()
    text_area = label.Label(terminalio.FONT, text=text, color=color)
    text_area.x = display.width
    text_area.y = 13
    main_group.append(text_area)
    display.root_group = main_group

while True:
    print("WAITING...")
    update_display("WAITING...")
    ble.start_advertising(advertisement)

    while not ble.connected:
        scroll(main_group[0])
        display.refresh(minimum_frames_per_second=0)
        time.sleep(SCROLL_DELAY)

    # Connected
    ble.stop_advertising()
    print("CONNECTED")
    update_display("CONNECTED")

    # Loop and read packets
    last_send = time.monotonic()
    while ble.connected:
        if uart_server.in_waiting:
            raw_bytes = uart_server.read(uart_server.in_waiting)
            received_text = raw_bytes.decode().strip()
            print("RX:", received_text)
            update_display(received_text, color=0x26B7FF)

        if time.monotonic() - last_send > SEND_RATE:
            transmit_text = "COUNT = {}".format(count)
            print("TX:", transmit_text)
            uart_server.write((transmit_text + "\r\n").encode())
            count += 1
            last_send = time.monotonic()

        scroll(main_group[0])
        display.refresh(minimum_frames_per_second=0)
        time.sleep(SCROLL_DELAY)

print("DISCONNECTED")Text Editor
Adafruit recommends using the Mu editor for editing your CircuitPython code. You can get more info in this guide.
Alternatively, you can use any text editor that saves simple text files.
Upload the Code and Libraries to the Adafruit nRF52840 Feather
After downloading the Project Bundle, plug your Adafruit nRF52840 Express into the computer's USB port. You should see a new flash drive in the computer's File Explorer or Finder (depending on your operating system) called CIRCUITPY. Unzip the folder and copy the following items to the Adafruit nRF52840 Express's CIRCUITPY drive.
lib folder
code.py
Your Adafruit nRF52840 Express CIRCUITPY drive should look like this after copying the lib folders and the code.py file.
code.py Review
Initialization and Configuration
SEND_RATE = 10
count = 0
SCROLL_DELAY = 0.05
ble = BLERadio()
uart_server = UARTService()
advertisement = ProvideServicesAdvertisement(uart_server)
END_RATE: Sets how frequently the program sends text over Bluetooth (every 10 seconds)
count: A variable initialized to 0, likely used for counting something (such as messages sent)
SCROLL_DELAY: Time delay between each scroll movement on the display, set to 0.05 seconds
Bluetooth Setup: Initializes a BLE (Bluetooth Low Energy) radio, a UART service for Bluetooth communication, and an advertisement for that service
Display Setup
displayio.release_displays()

matrix = rgbmatrix.RGBMatrix(
    width=64, height=32, bit_depth=1,
    rgb_pins=[board.D6, board.A5, board.A1, board.A0, board.A4, board.D11],
    addr_pins=[board.D10, board.D5, board.D13, board.D9],
    clock_pin=board.D12, latch_pin=board.RX, output_enable_pin=board.TX,
)
display = framebufferio.FramebufferDisplay(matrix, auto_refresh=True)

main_group = displayio.Group()
Display Release: Releases any previously allocated displays to avoid conflicts
Matrix Initialization: Sets up the RGB matrix display with specific configurations (size, pins, etc.)
Display Initialization: Creates a framebuffer display from the RGB matrix
Display Group: Initializes a Group object, a container for display elements
Function Definitions
def scroll(line):
    line.x -= 1
    line_width = line.bounding_box[2]
    if line.x < -line_width:
        line.x = display.width

def update_display(text, color=0xFFFFFF):
    if len(main_group) > 0:
        main_group.pop()
    text_area = label.Label(terminalio.FONT, text=text, color=color)
    text_area.x = display.width
    text_area.y = 13
    main_group.append(text_area)
    display.root_group = main_group
scroll() Function: Defines how to scroll text across the display. It moves the text to the left and wraps around it when it reaches the edge
update_display() Function: Updates the display with new text. It removes the old text (if any) and adds new text to the display group.
The Main Loop
while True:
    print("WAITING...")
    update_display("WAITING...")
    ble.start_advertising(advertisement)

    while not ble.connected:
        scroll(main_group[0])
        display.refresh(minimum_frames_per_second=0)
        time.sleep(SCROLL_DELAY)

    # Connected
    ble.stop_advertising()
    print("CONNECTED")
    update_display("CONNECTED")

    # Loop and read packets
    last_send = time.monotonic()
    while ble.connected:
        if uart_server.in_waiting:
            raw_bytes = uart_server.read(uart_server.in_waiting)
            received_text = raw_bytes.decode().strip()
            print("RX:", received_text)
            update_display(received_text, color=0x26B7FF)

        if time.monotonic() - last_send > SEND_RATE:
            transmit_text = "COUNT = {}".format(count)
            print("TX:", transmit_text)
            uart_server.write((transmit_text + "\r\n").encode())
            count += 1
            last_send = time.monotonic()

        scroll(main_group[0])
        display.refresh(minimum_frames_per_second=0)
        time.sleep(SCROLL_DELAY)

    print("DISCONNECTED")
Outer While Loop: The main loop that runs forever
Waiting for Connection: The display shows "WAITING..." and starts advertising for a Bluetooth connection
Scrolling Text: Continuously scrolls text on the display while not connected
BLE Connection Established: Stops advertising once connected and updates the display
Inner While Loop: While connected, it reads data from the UART service, displays it, and sends back a count message at regular intervals defined by SEND_RATE
Scrolling and Refreshing Display: Continuously updates the display while connected
Disconnect Handling: Prints "DISCONNECTED" to the console when the connection is lost
Usage
It's time to display text on the Matrix panel with the code uploaded to your Adafruit nRF52840. Start by opening the Bluefruit Connect app if you don't already have it open.
From there, select the UART terminal module in the features list. Once in the UART terminal, you can just add whatever text you want to display.
Get creative!