Mfr Part # 6003
METRO RP2350 WITHOUT PSRAM
Adafruit Industries LLC
License: See Original Project Displays LCD / TFT Arduino
Courtesy of Adafruit
Guide by Anne Barela and Tim C
Overview
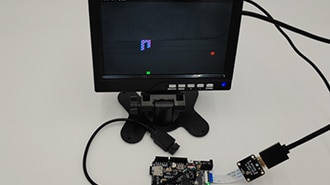
Return to The Matrix with this project recreation. The falling streams of green characters are strange yet calming.
From Quora, the significance of The Matrix computer screen
Representation of Reality: The screen symbolizes the digital nature of the Matrix itself. It reflects how the simulated world is constructed and manipulated by the machines controlling humanity.
Alternative Perception: Characters like Neo and Morpheus use the screen to perceive the underlying code of the Matrix. It represents the ability to see beyond the illusion of the real world and understand the truth of their existence.
Coding Language: The characters are able to read the screen because it displays the Matrix's code, which is a visual representation of the program that constructs their reality. This code is often depicted in green characters on a black background, reminiscent of classic computer interfaces.
Or, it just makes a cool visualization.
This project displays high resolution video generated by an Adafruit Metro RP2350. The HSTX bus outputs DVI video which can be shown on an HDMI monitor. The Adafruit-DVI-HSTX library makes the project easy to write programs like this in Arduino, while displayio makes it easy in CircuitPython. No soldering required.
Parts
Adafruit RP2350 22-pin FPC HSTX to DVI Adapter for HDMI Displays
22-pin 0.5mm pitch FPC Flex Cable for DSI CSI or HSTX - 20cm
You likely have an HDMI cable and monitor. If not, you can look to get these:
Preparing the Metro RP2350
HSTX Connection to DVI
Get the HSTX cable. Any length Adafruit sells is fine. CAREFULLY lift the dark grey bar up on the Metro, insert the cable silver side down, blue side up, then put the bar CAREFULLY down, ensuring it locks in. If it feels like it doesn't want to go, do not force it.
Do the same with the other end on the DVI breakout. Note that the DVI breakout will be inverted/upside down when compared to the Metro - this is normal for these boards and the Adafruit cables.
That's it - no soldering, easy!
Arduino Version
The first version uses Arduino. If you'd just like to run the program without using Arduino, you can download the .UF2 file below in the green box. Save the file to your computer. Plug the Metro RP2350 into your computer with a known good USB cable (data + power, not a charge only cable).
Hold down the BOOT/BOOTSEL button (highlighted in red above), and while continuing to hold it (don't let go!), press and release the reset button (highlighted in blue above). Continue to hold the BOOT/BOOTSEL button until the RP2350 drive appears on your computer! Copy the .UF2 file you saved previously to the RP2350 drive and The Matrix should appear if you have the display connected.
Arduino
Please refer to the Arduino IDE setup in the Adafruit Metro RP2350 guide.
Adafruit Metro RP2350
By Tim C
You will want to add the library Adafruit DVI HSTX (version 1.10 or later, likely the latest version) to your Arduino environment. Select Sketch - > Include Library -> Manage Libraries... Search for "Adafruit DVI HSTX" by Jeff Epler. You will want version 1.1.0 or later, likely the newest version. Click Install and accept installing libraries that Adafruit DVI HSTX is dependent on. Those are the only libraries which need to be loaded.
For the main program, get the code by clicking the "Download Project Bundle" button below. Extract the file Metro_HSTX_Matrix.ino from the zip archive. Load it into the Arduino IDE.
// SPDX-FileCopyrightText: 2021 Anne Barela for Adafruit Industries
//
// SPDX-License-Identifier: MIT
//
// Based on Adafruit-DVI-HSTX library code written by Jeff Epler
// and use of Claude 3.7 Sonnet on 3/2/2025
// https://claude.site/artifacts/cf022b66-50c3-43eb-b334-17fbf0ed791c

#include <Adafruit_dvhstx.h>

// Display configuration for text mode in Adafruit-DVI-HSTX
const int SCREEN_WIDTH = 91;
const int SCREEN_HEIGHT = 30;

// Animation speed (lower = faster)
// Adjust this value to change the speed of the animation
const int ANIMATION_SPEED = 70; // milliseconds between updates

// Initialize display for Adafruit Metro RP2350
DVHSTXText display({14, 18, 16, 12});  // Adafruit Metro HSTX Pinout

// Define structures for character streams
struct CharStream {
  int x;          // X position
  int y;          // Y position (head of the stream)
  int length;     // Length of the stream
  int speed;      // How many frames to wait before moving
  int countdown;  // Counter for movement
  bool active;    // Whether this stream is currently active
  char chars[30]; // Characters in the stream
};

// Array of character streams - increased for higher density
// To fill 60-75% of the screen width (91 chars), we need around 55-68 active streams
CharStream streams[250]; // Allow for decent density

// Stream creation rate (higher = more frequent new streams)
const int STREAM_CREATION_CHANCE = 65; // % chance per frame to create new stream

// Initial streams to create at startup
const int INITIAL_STREAMS = 30;

// Random characters that appear in the streams
const char matrixChars[] = "ABCDEFGHIJKLMNOPQRSTUVWXYZ0123456789!@#$%^&*()-_=+[]{}|;:,.<>?/\\";
const int numMatrixChars = sizeof(matrixChars) - 1;

// Function declarations
void initStreams();
void updateStreams();
void drawStream(CharStream &stream);
void createNewStream();
char getRandomChar();

void setup() {
  // Initialize the display
  display.begin();
  display.clear();

  // Seed the random number generator
  randomSeed(analogRead(A0));

  // Initialize all streams
  initStreams();
}

void loop() {
  // Update and draw all streams
  updateStreams();

  // Randomly create new streams at a higher rate
  if (random(100) < STREAM_CREATION_CHANCE) {
    createNewStream();
  }

  // Control animation speed
  delay(ANIMATION_SPEED);
}

void initStreams() {
  // Initialize all streams as inactive
  for (int i = 0; i < sizeof(streams) / sizeof(streams[0]); i++) {
    streams[i].active = false;
  }

  // Create more initial streams for immediate visual impact
  for (int i = 0; i < INITIAL_STREAMS; i++) {
    createNewStream();
  }
}

void createNewStream() {
  // Find an inactive stream
  for (int i = 0; i < sizeof(streams) / sizeof(streams[0]); i++) {
    if (!streams[i].active) {
      // Initialize the stream
      streams[i].x = random(SCREEN_WIDTH);
      streams[i].y = random(5) - 5; // Start above the screen
      streams[i].length = random(5, 20);
      streams[i].speed = random(1, 4);
      streams[i].countdown = streams[i].speed;
      streams[i].active = true;

      // Fill with random characters
      for (int j = 0; j < streams[i].length; j++) {
        streams[i].chars[j] = getRandomChar();
      }

      return;
    }
  }
}

void updateStreams() {
  display.clear();

  // Count active streams (for debugging if needed)
  int activeCount = 0;

  for (int i = 0; i < sizeof(streams) / sizeof(streams[0]); i++) {
    if (streams[i].active) {
      activeCount++;
      streams[i].countdown--;

      // Time to move the stream down
      if (streams[i].countdown <= 0) {
        streams[i].y++;
        streams[i].countdown = streams[i].speed;

        // Change a random character in the stream
        int randomIndex = random(streams[i].length);
        streams[i].chars[randomIndex] = getRandomChar();
      }

      // Draw the stream
      drawStream(streams[i]);

      // Check if the stream has moved completely off the screen
      if (streams[i].y - streams[i].length > SCREEN_HEIGHT) {
        streams[i].active = false;
      }
    }
  }
}

void drawStream(CharStream &stream) {
  for (int i = 0; i < stream.length; i++) {
    int y = stream.y - i;

    // Only draw if the character is on screen
    if (y >= 0 && y < SCREEN_HEIGHT) {
      display.setCursor(stream.x, y);

      // Set different colors/intensities based on position in the stream
      if (i == 0) {
        // Head of the stream is white (brightest)
        display.setColor(TextColor::TEXT_WHITE, TextColor::BG_BLACK, TextColor::ATTR_NORMAL_INTEN);
      } else if (i < 3) {
        // First few characters are bright green
        display.setColor(TextColor::TEXT_GREEN, TextColor::BG_BLACK, TextColor::ATTR_NORMAL_INTEN);
      } else if (i < 6) {
        // Next few are medium green
        display.setColor(TextColor::TEXT_GREEN, TextColor::BG_BLACK, TextColor::ATTR_LOW_INTEN);
      } else {
        // The rest are dim green
        display.setColor(TextColor::TEXT_GREEN, TextColor::BG_BLACK, TextColor::ATTR_V_LOW_INTEN);
      }

      // Draw the character
      display.write(stream.chars[i]);
    }
  }

  // Occasionally change a character in the stream
  if (random(100) < 25) { // 25% chance
    int idx = random(stream.length);
    stream.chars[idx] = getRandomChar();
  }
}

char getRandomChar() {
  return matrixChars[random(numMatrixChars)];
}
Select Adafruit Metro RP2350 as the board in the box in the toolbar.
Plug your Metro into your computer via a known good USB data + power cable (not the tiny power-only cables that come with battery packs). The Metro should show up as a new serial port. Select that serial port under Tools -> Port.
Click the arrow key -> on the toolbar to compile the program and upload it to the Metro.
Changing the Code
You can change how many streams are on the screen at the same time by changing the STREAM_CREATION_CHANCE variable. It should be from 10 (lowest) to 99 (highest).
Using Pico 2 or Fruit Jam instead of Metro RP2350
The HSTX pins for Metro RP2350 are defined as:
DVHSTXText display({14, 18, 16, 12});
But for other boards you may need to use
DVHSTXText display({12, 14, 16, 18});
It's all depending how you wired your HSTX bus - the wire pairs can be swapped IF your code knows it. It would help if the Pico 2 had an HSTX connector on top. Oh well.
CircuitPython Version
This code was written for CircuitPython 9.2.x and not 10.0.0. Please use CircuitPython 9.x until a dual code version is available.
With some help from the friendly robot Claude.ai, Tim ported the Matrix rain Arduino code to a CircuitPython.
All of the same functions from the Arduino version of the code have counterparts in the CircuitPython version. In order to render glyphs, a TileGrid is used along with a spritesheet containing some Japanese Katakana characters from Unifoundry, as well as the letters used to spell "Adafruit", "jam" and "matrix".
All characters are rendered mirrored horizontally by using the flip_x property of the TileGrid as was done in the movie graphics.
For coloring the glyphs, a TilePaletteMapper is used. This class is a special kind of pixel_shader that allows us to re-map color indexes for individual tiles within a TileGrid. The code uses 16 shades of green in the shader_palette. As it renders the falling glyphs, their colors are set by adjusting the mapping at their x,y location within the grid to a color index for a green that has brightness relative to their position in the stream.
Project Setup
Are you new to using CircuitPython? No worries, there is a full getting-started guide here.
Plug the device into your computer with a known good USB cable (not a charge-only cable). The device will appear to your computer in File Explorer or Finder (depending on your operating system) as a flash drive named CIRCUITPY. If the drive does not appear, you can install CircuitPython on your device and then return here.
Download the project files with the Download Project Bundle button below. Unzip the file and copy/paste the code.py and other project files to your CIRCUITPY drive using File Explorer or Finder (depending on your operating system).
# SPDX-FileCopyrightText: 2025 Tim Cocks for Adafruit Industries
# SPDX-License-Identifier: MIT
"""
Matrix rain visual effect

Largely ported from Arduino version in Metro_HSTX_Matrix to
CircuitPython by claude with some additional tweaking to the
colors and refresh functionality.
"""
import sys
import random
import time
import displayio
import supervisor
from displayio import Group, TileGrid
from tilepalettemapper import TilePaletteMapper
from adafruit_fruitjam.peripherals import request_display_config
import adafruit_imageload


# use the built-in HSTX display
request_display_config(320, 240)
display = supervisor.runtime.display

# screen size in tiles, tiles are 16x16
SCREEN_WIDTH = display.width // 16
SCREEN_HEIGHT = display.height // 16

# disable auto_refresh, we'll call refresh() after each frame
display.auto_refresh = False

# group to hold visual elements
main_group = Group()

# show the group on the display
display.root_group = main_group

# Color gradient list from white to dark green
COLORS = [
    0xFFFFFF,
    0x88FF88,
    0x00FF00,
    0x00DD00,
    0x00BB00,
    0x009900,
    0x007700,
    0x006600,
    0x005500,
    0x005500,
    0x003300,
    0x003300,
    0x002200,
    0x002200,
    0x001100,
    0x001100,
]

# Palette to use with the mapper. Has 1 extra color
# so it can have black at index 0
shader_palette = displayio.Palette(len(COLORS) + 1)
# set black at index 0
shader_palette[0] = 0x000000

# set the colors from the gradient above in the
# remaining indexes
for i in range(0, len(COLORS)):
    shader_palette[i + 1] = COLORS[i]

# mapper to change colors of tiles within the grid
if sys.implementation.version[0] == 9:
    grid_color_shader = TilePaletteMapper(
        shader_palette, 2, SCREEN_WIDTH, SCREEN_HEIGHT
    )
elif sys.implementation.version[0] >= 10:
    grid_color_shader = TilePaletteMapper(shader_palette, 2)

# load the spritesheet
katakana_bmp, katakana_pixelshader = adafruit_imageload.load("matrix_characters.bmp")

# how many characters are in the sprite sheet
char_count = katakana_bmp.width // 16

# grid to display characters within
display_text_grid = TileGrid(
    bitmap=katakana_bmp,
    width=SCREEN_WIDTH,
    height=SCREEN_HEIGHT,
    tile_height=16,
    tile_width=16,
    pixel_shader=grid_color_shader,
)

# flip x to get backwards characters
display_text_grid.flip_x = True

# add the text grid to main_group, so it will be visible on the display
main_group.append(display_text_grid)


# Define structures for character streams
class CharStream:
    def __init__(self):
        self.x = 0  # X position
        self.y = 0  # Y position (head of the stream)
        self.length = 0  # Length of the stream
        self.speed = 0  # How many frames to wait before moving
        self.countdown = 0  # Counter for movement
        self.active = False  # Whether this stream is currently active
        self.chars = [" "] * 30  # Characters in the stream


# Array of character streams
streams = [CharStream() for _ in range(250)]

# Stream creation rate (higher = more frequent new streams)
STREAM_CREATION_CHANCE = 65  # % chance per frame to create new stream

# Initial streams to create at startup
INITIAL_STREAMS = 30


def init_streams():
    """Initialize all streams as inactive"""
    for _ in range(len(streams)):
        streams[_].active = False

    # Create initial streams for immediate visual impact
    for _ in range(INITIAL_STREAMS):
        create_new_stream()


def create_new_stream():
    """Create a new active stream"""
    # Find an inactive stream
    for _ in range(len(streams)):
        if not streams[_].active:
            # Initialize the stream
            streams[_].x = random.randint(0, SCREEN_WIDTH - 1)
            streams[_].y = random.randint(-5, -1)  # Start above the screen
            streams[_].length = random.randint(5, 20)
            streams[_].speed = random.randint(0, 3)
            streams[_].countdown = streams[_].speed
            streams[_].active = True

            # Fill with random characters
            for j in range(streams[_].length):
                # streams[i].chars[j] = get_random_char()
                streams[_].chars[j] = random.randrange(0, char_count)
            return


def update_streams():
    """Update and draw all streams"""
    # Clear the display (we'll implement this by looping through display grid)
    for x in range(SCREEN_WIDTH):
        for y in range(SCREEN_HEIGHT):
            display_text_grid[x, y] = 0  # Clear character

    # Count active streams (for debugging if needed)
    active_count = 0

    for _ in range(len(streams)):
        if streams[_].active:
            active_count += 1
            streams[_].countdown -= 1

            # Time to move the stream down
            if streams[_].countdown <= 0:
                streams[_].y += 1
                streams[_].countdown = streams[_].speed

                # Change a random character in the stream
                random_index = random.randint(0, streams[_].length - 1)
                # streams[i].chars[random_index] = get_random_char()
                streams[_].chars[random_index] = random.randrange(0, char_count)

            # Draw the stream
            draw_stream(streams[_])

            # Check if the stream has moved completely off the screen
            if streams[_].y - streams[_].length > SCREEN_HEIGHT:
                streams[_].active = False


def draw_stream(stream):
    """Draw a single character stream"""
    for _ in range(stream.length):
        y = stream.y - _

        # Only draw if the character is on screen
        if 0 <= y < SCREEN_HEIGHT and 0 <= stream.x < SCREEN_WIDTH:
            # Set the character
            display_text_grid[stream.x, y] = stream.chars[_]

            if _ + 1 < len(COLORS):
                grid_color_shader[stream.x, y] = [0, _ + 1]
            else:
                grid_color_shader[stream.x, y] = [0, len(COLORS) - 1]
    # Occasionally change a character in the stream
    if random.randint(0, 99) < 25:  # 25% chance
        idx = random.randint(0, stream.length - 1)
        stream.chars[idx] = random.randrange(0, 112)


def setup():
    """Initialize the system"""
    # Seed the random number generator
    random.seed(int(time.monotonic() * 1000))

    # Initialize all streams
    init_streams()


def loop():
    """Main program loop"""
    # Update and draw all streams
    update_streams()

    # Randomly create new streams at a higher rate
    if random.randint(0, 99) < STREAM_CREATION_CHANCE:
        create_new_stream()

    display.refresh()
    available = supervisor.runtime.serial_bytes_available
    if available:
        c = sys.stdin.read(available)
        if c.lower() == "q":
            supervisor.reload()


# Main program
setup()
while True:
    loop()
Usage
Plug the Metro into a HDMI monitor via an HDMI cable.
Power the Metro RP2350 either via USB C (5 volts) or the barrel power connection (5.5 to 17 volts DC, center positive).
The Matrix animation will automatically start!
Changing the Number of Streams
See the Arduino and CircuitPython pages for the variable you'll want to change to get more or fewer streams.