Mfr Part # 6003
METRO RP2350 WITHOUT PSRAM
Adafruit Industries LLC
License: General Public License Displays HDMI LCD / TFT Raspberry Pi MCU
Courtesy of Adafruit
Guide by Tim C
Overview
The Metro RP2350 makes a perfect little game console. The on-board HSTX combined with a DVI breakout can output to a standard television or computer monitor for the display. The USB host connection makes it easy to take input from a keyboard to control the game.
This game is an implementation of the classic arcade game Snake. The WASD keys on the keyboard control the snake by changing directions (up, left, right, down). The player's goal is to eat apples to score points. Each apple eaten grows the snake by an additional segment length.
You must avoid sending the snake out of the bounds of the display and avoid wrapping around and hitting its own tail. This version provides a twist with both red and green apples. The red slows the snake down, and the green speed it up. With faster speeds come higher risk of a harder to control snake, and higher rewards in the form of more points awarded the faster the snake is moving.
Parts
Or
Adafruit RP2350 22-pin FPC HSTX to DVI Adapter for HDMI Displays
22-pin 0.5mm pitch FPC Flex Cable for DSI CSI or HSTX - 20cm
Short Feather Male Headers - 12-pin and 16-pin Male Header Set
Preparing the Metro RP2350
The USB Host port is the only part of this project that required soldering.
The USB Host pin connections are highlighted on the Metro image to the left. You will need a small piece of standard 0.1-inch male header, with 4 pins, to fit the holes.
You can cut header with diagonal cutters or break them with pliers or even your fingers. Just be sure to wear eye protection as they can fly when cut.
Put the short end of the header into the holes in the Metro marked USB Host and secure them with putty, blutack, tape, etc. Turn the Metro over and you should see the header barely poking out of the bottom of the board. If the pins stick through a great deal, you may have the header pins upside down, double check the short end is sticking into the board.
Solder the 4 pin "nubbins" to the board.
Turn the board over and remove the material securing the pins. Now there is a new 4-pin header.
Get the USB Host cable and wire as follows:
GRD to Black
D+ to Green
D- to White
5V to Red
HSTX Connection to DVI
Get the HSTX cable. Any length Adafruit sells is fine. CAREFULLY lift the dark grey bar up on the Metro, insert the cable silver side down, blue side up, then put the bar CAREFULLY down, ensuring it locks. If it feels like it doesn't want to go, do not force it.
Do the same with the other end and the DVI breakout. Note that the DVI breakout will be inverted/upside down when compared to the Metro - this is normal for these boards and the Adafruit cables.
Install CircuitPython
CircuitPython is a derivative of MicroPython designed to simplify experimentation and education on low-cost microcontrollers. It makes it easier than ever to get prototyping by requiring no upfront desktop software downloads. Simply copy and edit files on the CIRCUITPY drive to iterate.
CircuitPython QuickStart
Follow this step-by-step to quickly get CircuitPython running on your board.
Download the latest version of CircuitPython for this board via circuitpython.org
Click the link above to download the latest CircuitPython UF2 file.
Save it wherever is convenient for you.
To enter the bootloader, hold down the BOOT/BOOTSEL button (highlighted in red above), and while continuing to hold it (don't let go!), press and release the reset button (highlighted in red or blue above). Continue to hold the BOOT/BOOTSEL button until the RP2350 drive appears!
If the drive does not appear, release all the buttons, and then repeat the process above.
You can also start with your board unplugged from USB, press, and hold the BOOTSEL button (highlighted in red above), continue to hold it while plugging it into USB, and wait for the drive to appear before releasing the button.
A lot of people end up using charge-only USB cables and it is very frustrating! Make sure you have a USB cable you know is good for data sync.
You will see a new disk drive appear called RP2350.
Drag the adafruit_circuitpython_etc.uf2 file to RP2350.
The RP2350 drive will disappear, and a new disk drive called CIRCUITPY will appear.
That's it, you're done! :)
Safe Mode
You want to edit your code.py or modify the files on your CIRCUITPY drive but find that you can't. Perhaps your board has gotten into a state where CIRCUITPY is read-only. You may have turned off the CIRCUITPY drive altogether. Whatever the reason, safe mode can help.
Safe mode in CircuitPython does not run any user code on startup and disables auto-reload. This means a few things. First, safe mode bypasses any code in boot.py (where you can set CIRCUITPY read-only or turn it off completely). Second, it does not run the code in code.py. And finally, it does not automatically soft-reload when data is written to the CIRCUITPY drive.
Therefore, whatever you may have done to put your board in a non-interactive state, safe mode gives you the opportunity to correct it without losing all of the data on the CIRCUITPY drive.
Entering Safe Mode
To enter safe mode when using CircuitPython, plug in your board or hit reset (highlighted in red above). Immediately after the board starts up or resets, it waits 1000ms. On some boards, the onboard status LED (highlighted in green above) will blink yellow during that time. If you press reset during that 1000ms, the board will start up in safe mode. It can be difficult to react to the yellow LED, so you may want to think of it simply as a slow double click of the reset button. (Remember, a fast double click of reset enters the bootloader.)
In Safe Mode
If you successfully enter safe mode on CircuitPython, the LED will intermittently blink yellow three times.
If you connect to the serial console, you'll find the following message.
Auto-reload is off.
Running in safe mode! Not running saved code.

CircuitPython is in safe mode because you pressed the reset button during boot. Press again to exit safe mode.

Press any key to enter the REPL. Use CTRL-D to reload.
You can now edit the contents of the CIRCUITPY drive. Remember, your code will not run until you press the reset button, or unplug and plug in your board, to get out of safe mode.
Flash Resetting UF2
If your board ever gets into a really weird state and CIRCUITPY doesn't show up as a disk drive after installing CircuitPython, try loading this 'nuke' UF2 to RP2350. which will do a 'deep clean' on your Flash Memory. You will lose all the files on the board, but at least you'll be able to revive it! After loading this UF2, follow the steps above to re-install CircuitPython.
Download flash erasing "nuke" UF2
Code
CircuitPython Usage
To use the game, you need to update code.py with the game program to the CIRCUITPY drive.
Thankfully, we can do this in one go. In the example below, click the Download Project Bundle button below to download the necessary libraries and the code.py file in a zip file.
Connect your board to your computer via a known good data+power USB cable. The board should show up in your File Explorer/Finder (depending on your operating system) as a flash drive named CIRCUITPY.
Extract the contents of the zip file, copy the lib directory files to CIRCUITPY/lib. Copy the code.py file to your CIRCUITPY drive. The program should self-start.
Drive Structure
After copying the files, your drive should look like the listing below. It can contain other files as well but must contain these at a minimum.
Code
The code.py for the project is shown below.
# SPDX-FileCopyrightText: 2025 Tim Cocks for Adafruit Industries
# SPDX-License-Identifier: MIT
import sys
import time
from micropython import const
import board
import picodvi
import framebufferio
import supervisor
import displayio
import terminalio
from adafruit_display_text.text_box import TextBox
from snake_helpers import World, Snake, GameOverException, SpeedAdjuster
# state machine constant
STATE_TITLE = const(0)
STATE_PLAYING = const(1)
STATE_PAUSED = const(2)
STATE_GAME_OVER = const(3)
# begin in the title state
CURRENT_STATE = STATE_TITLE
# movement key bindings, change to different letters if you want.
KEY_UP = "w"
KEY_LEFT = "a"
KEY_DOWN = "s"
KEY_RIGHT = "d"
KEY_PAUSE = "t"
# how many segments the snake will start with
INITIAL_SNAKE_LEN = 3
# variable for the players score
score = 0
# initialize display
displayio.release_displays()
fb = picodvi.Framebuffer(
320,
240,
clk_dp=board.CKP,
clk_dn=board.CKN,
red_dp=board.D0P,
red_dn=board.D0N,
green_dp=board.D1P,
green_dn=board.D1N,
blue_dp=board.D2P,
blue_dn=board.D2N,
color_depth=16,
)
display = framebufferio.FramebufferDisplay(fb)
# In future release the default HSTX display
# will get initialized by default by circuitpython
# display = supervisor.runtime.display
# load title splash screen bitmap
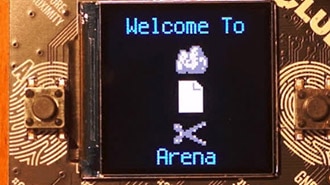
title_bmp = displayio.OnDiskBitmap("snake_splash.bmp")
# create a tilegrid for the title splash screen
title_tg = displayio.TileGrid(bitmap=title_bmp, pixel_shader=title_bmp.pixel_shader)
instructions_txt = TextBox(
terminalio.FONT,
text=f"Move: {KEY_UP}{KEY_LEFT}{KEY_DOWN}{KEY_RIGHT} Pause: {KEY_PAUSE}".upper(),
width=title_bmp.width,
height=16,
align=TextBox.ALIGN_CENTER,
)
instructions_txt.anchor_point = (0, 0)
instructions_txt.anchored_position = (0, title_bmp.height + 1)
# create a group for the title splash screen and put it in the center of the display
title_group = displayio.Group()
title_group.append(title_tg)
title_group.append(instructions_txt)
title_group.x = display.width // 2 - title_bmp.width // 2
title_group.y = display.height // 2 - title_bmp.height // 2
# initialize SpeedAdjuster to control how fast the snake is moving
speed_adjuster = SpeedAdjuster(12)
# initialize the world with enough room unused at the top for the score bar
world = World(height=28, width=40)
# move the world down to make room for the score bar
world.y = 16
# initialize a Snake instance and grow it to the appropriate size
snake = Snake(starting_location=[10, 10])
for i in range(INITIAL_SNAKE_LEN - 1):
snake.grow()
# add one of each type of apple to the world
world.add_apple(snake=snake, apple_sprite_index=World.APPLE_RED_SPRITE_INDEX)
world.add_apple(snake=snake, apple_sprite_index=World.APPLE_GREEN_SPRITE_INDEX)
# create a group to hold everything for the game
game_group = displayio.Group()
# add the world to the game group
game_group.append(world)
# create TextBox to hold the score in a bar at the top of the display
score_txt = TextBox(
terminalio.FONT, text=f"Score: {score}", color=0xFFFFFF, width=320, height=16
)
score_txt.anchor_point = (0, 0)
score_txt.anchored_position = (0, 2)
# add the score text to the game group
game_group.append(score_txt)
# create a TextBox to hold the game over message
game_over_label = TextBox(
terminalio.FONT,
text="",
color=0xFFFFFF,
background_color=0x000000,
width=display.width // 2,
height=80,
align=TextBox.ALIGN_CENTER,
)
# move it to the center of the display
game_over_label.anchor_point = (0, 0)
game_over_label.anchored_position = (
display.width // 2 - game_over_label.width // 2,
40,
)
# make it hidden, we'll show it when the game is over.
game_over_label.hidden = True
# add it to the game group
game_group.append(game_over_label)
# set the title group to show on the display
display.root_group = title_group
# draw the snake in it's starting location
world.draw_snake(snake)
# timpstamp of the game step render
prev_step_time = time.monotonic()
# variable to hold string read from the keyboard to get button presses
cur_btn_val = None
while True:
# current timestamp
now = time.monotonic()
# check if there is any keyboard input
available = supervisor.runtime.serial_bytes_available
# if there is some keyboard input
if available:
# read it into cur_btn_val
cur_btn_val = sys.stdin.read(available)
# change to lower-case before comparison
# so that it's case-insensitive.
cur_btn_val = cur_btn_val.lower()
else: # no keyboard input
# set to None to clear out previous value
cur_btn_val = None
# if the current state is title screen
if CURRENT_STATE == STATE_TITLE:
# if any button was pressed
if cur_btn_val is not None:
# set the visible group on the display to the game group
display.root_group = game_group
# update the current state to playing
CURRENT_STATE = STATE_PLAYING
# if game is being played
elif CURRENT_STATE == STATE_PLAYING:
# if up button was pressed
if cur_btn_val == KEY_UP.lower():
# if the snake is not already moving up or down
if snake.direction not in (snake.DIRECTION_DOWN, snake.DIRECTION_UP):
# change the direction to up
snake.direction = snake.DIRECTION_UP
# if down button was pressed
if cur_btn_val == KEY_DOWN.lower():
# if the snake is not already moving up or down
if snake.direction not in (snake.DIRECTION_DOWN, snake.DIRECTION_UP):
# change the direction to down
snake.direction = snake.DIRECTION_DOWN
# if right button was pressed
if cur_btn_val == KEY_RIGHT.lower():
# if the snake is not already moving left or right
if snake.direction not in (snake.DIRECTION_LEFT, snake.DIRECTION_RIGHT):
# change the direction to right
snake.direction = snake.DIRECTION_RIGHT
# if left button was pressed
if cur_btn_val == KEY_LEFT.lower():
# if the snake is not already moving left or right
if snake.direction not in (snake.DIRECTION_LEFT, snake.DIRECTION_RIGHT):
# change direction to left
snake.direction = snake.DIRECTION_LEFT
# if the pause button was pressed
if cur_btn_val == KEY_PAUSE.lower():
# change the state to paused
CURRENT_STATE = STATE_PAUSED
# if it's time to render a step of the game
if now >= prev_step_time + speed_adjuster.delay:
try:
# move the snake in the direction it's going
result = world.move_snake(snake)
# if a red apple was eaten
if result == World.APPLE_RED_SPRITE_INDEX:
# decrease the speed to slow down movement
speed_adjuster.decrease_speed()
# award score based on current speed and snake size
score += ((20 - speed_adjuster.speed) // 3) + snake.size
# update the score text in the top bar
score_txt.text = f"Score: {score}"
# if a green apple was eaten
elif result == World.APPLE_GREEN_SPRITE_INDEX:
# increase the speed to speed up movement
speed_adjuster.increase_speed()
# award score based on current speed and snake
# size plus bonus points for green apple
score += ((20 - speed_adjuster.speed) // 3) + 3 + snake.size
# update the score text in the top bar
score_txt.text = f"Score: {score}"
# if the game is over due to snake running into the edge or itself
except GameOverException as e:
# update the game over message with the score
output_str = (
f"Game Over\nScore: {score}\nPress P to play again\nPress Q to quit"
)
# set the message into the game over label
game_over_label.text = output_str
# make the game over label visible
game_over_label.hidden = False
# update the state to game over
CURRENT_STATE = STATE_GAME_OVER
# store the timestamp to compare with next iteration
prev_step_time = now
# if the game is paused
elif CURRENT_STATE == STATE_PAUSED:
# if the pause button was pressed
if cur_btn_val == KEY_PAUSE.lower():
# change the state to playing so the game resumes
CURRENT_STATE = STATE_PLAYING
# if the current state is game over
elif CURRENT_STATE == STATE_GAME_OVER:
# if the p button is pressed for play again
if cur_btn_val in {"p", "P"}:
# set next code file to this one
supervisor.set_next_code_file(__file__)
# reload
supervisor.reload()
# if the q button is pressed for exit
if cur_btn_val in {"q", "Q"}:
# break out of main while True loop.
break
Usage
Ensure a USB keyboard is plugged into the USB Host port wired up previously. Reset the board by cycling power or pressing the Reset button if you happen to plug in a keyboard after power up.
Be sure you connect the DVI breakout to an HDMI monitor and the monitor is on. You might need a long cable if your monitor is not near the Metro RP2350 (like a television). The cables are standard and may be obtained from any trusted retail outlet. Also reset the Metro if you plug in HDMI after powering the Metro.
Once connections are all set, power the Metro RP2350 either via USB C (5 volts) or the barrel connection (5.5 to 17 volts DC, center positive).
Gameplay
The default controls for the game are as follows:
any key: Press any key to start the game when the title screen is visible.
W: Change the snakes direction to up.
A: Change the snakes direction to left.
S: Change the snakes direction to down.
D: Change the snakes direction to right.
T: Pause the game.
P: After game over, press P to play again.
Q: After game over, press Q to quit.
The controls for movement and pause can be reconfigured by simply changing the values in the KEY_UP, KEY_LEFT, KEY_DOWN, and KEY_RIGHT variables near the top of the code.py file.
The goal is to move the snake around the screen eating as many apples as you can. Eating a green apple will speed up the snakes movement making it quicker to get to the next apple, but at the cost of being harder to control once it starts moving faster. Eating a red apple slows the movement speed down.
Points are awarded to the player for each apple that is eaten, bonus points are given based on the length of the snake and the speed it's currently moving, the green apples also have a built-in extra bonus points compared to the red.
Code Explanation
The code for the game is thoroughly commented with explanations of what each line or section are for. This page will provide a higher-level summary of the major components.
Hardware Principals
This game is designed around two primary hardware peripherals: the HSTX connector with a DVI breakout for the display, and a basic USB keyboard for the player control input.
HSTX Display
To initialize the display the built-in core modules picodvi, and framebufferio are used. These modules support a few different resolutions and color depths. This project is made for the 320x240 resolution with 16-bit color depth. The pixels are automatically doubled before being pushed to the display so it will come out as 640x480, depending on your monitor or TV, it may further upscale it to fit the screen.
USB Keyboard
USB Host is relatively new to CircuitPython, first coming on Raspberry Pi RP2040-based boards.
Typically, one would access a USB port by:
Establishing the USB connection
Reading USB Reports, sections of bytes sent when an action occurs on the peripheral like a key is pressed or joystick moved.
Parsing the reports and providing meaningful input to the program.
Python has the concept of standard input and output streams, similar to those in Linux/Unix and other operating systems. CircuitPython has this capability and through a lot of behind-the-scenes code, presents a USB keyboard as a stdin input device. The code to get USB Host Keyboard characters and echo them to serial out is as follows:
import supervisor
import sys

while True:
    available = supervisor.runtime.serial_bytes_available
    if available:
        c = sys.stdin.read(available)
        print(c, end='')
Helper Classes
The game code has 4 helper classes which contain behavior for various parts of the game bundled together as easy-to-use component objects.
Snake
The Snake class doesn't extend any other class and isn't responsible for any visual elements directly. It holds a list of x,y locations within the world grid for each segment of the snake's body, and the direction that the snake is currently moving in. It has a function to grow by one segment size. It also has some convenience functions to access the snake length, and the head and tail segments.
World
The World class extends TileGrid and represents the playing field for this game. It handles all of the visual elements directly related to game play. It is responsible for:
Spawning apples into the world.
Drawing the snake by setting the appropriate sprite indexes for each snake segment.
Moving the snake by updating the list of segment locations.
Checking whether the snake has hit an edge or an apple.
SpeedAdjuster
SpeedAdjuster is responsible for mapping a speed rating from 0-20 to a timing delay ranging from 0.05 to 0.4. Smaller speed ratings map to lower delay times which in turn make the snake move faster. The delay time is how long the game will wait before rendering each from, so less delay means faster rendering and movement. SpeedAdjuster contains convenience functions for increasing and decreasing the speed by 1 unit, which are used when the two different colors of apples are eaten.
GameOverException
This is a basic custom exception that will raise when the player loses by running into the edge of the world or wrapping around and running the snake into itself. code.py will catch this exception and show the game over message.
code.py
The code.py script is based upon a state machine. There are 4 states that it can be in:
Title - This is the state that the code begins in. It displays the title splash and the controls that are currently mapped. While this state is active, the code waits for any key to be pressed and when that occurs it changes the displays root_group to the game_group and changes the state to playing.
Playing - The playing state is for active game play the snake moves around and the keyboard input is polled looking for the movement keys or the pause key. When movement keys are detected the direction of the snake is updated, when the pause key is pressed, the state is changed to paused. If the snake runs into an edge or itself then the GameOverException is raised, and the state is changed to gameover.
Paused - During the paused state the main game loop does not run, instead the code just waits for keyboard input, and when the pause key is pressed the state is changed back to playing.
Gameover - When the game has ended the game over message is updated to include the players score and then made visible on the screen. Keyboard input is polled, if the P key is pressed the game launches itself again, if the Q key is pressed then the code exits by breaking out of the main loop.
Display Elements
The graphical elements are split into two main Groups. The title_group holds the title splash screen image and the instructions text that go beneath it. It's set as the root group when the code first runs to make it visible.
The game_group contains the World instance which is the TileGrid representing the game play area. It also holds the score_txt for the top bar, and the game_over_label which is made visible when the player loses. When the state is changed from title state to playing state the root_group of the display is updated to the game_group.