製造商零件編號 5038
KITRONIK AIR QUALITY CONTROL HAT
Kitronik Ltd.
Single Board Computers Environmental Air Pressure Air Quality Humidity Temperature Real Time Clocks (RTCs) Raspberry Pi SBC
Guide by Kitronik Maker
This resource offers an introduction and quick start guide for the Kitronik Air Quality Control HAT for Raspberry Pi. We will take a look at the general features of the board and how to get up and running/monitoring fast.
There is also a follow up guide that serves as an introduction to the free resources that are available for this board, the link to which can be found in the 'What Next' section at the foot of this guide.

The Air Quality Control HAT for Raspberry Pi allows you to monitor, log, and react to gathered sensory data. It provides a variety of sensor inputs and connection points for the Raspberry Pi and provides the ability to log, store and display data effectively with the Pi filesystem and an OLED screen. There are also connection points for external devices, such as analogue sensors, servos, motors, and heater pads that allow for additional monitoring and reading-based actions.
This HAT is compatible with all Raspberry Pi versions that feature the 40-pin GPIO connector. (Pi 2, 3, 4, 5, Zero, Zero 2). It has been tested with Pi 2, 3, 4, Zero 2. More general information can be found on the product page, via the button below.

The Air Quality Control HAT complies with the official Raspberry Pi HAT Specifications and as such, it connects to the Raspberry Pi GPIO pins in the usual HAT way (See /hat-board-mechanical.pdf for more dimension information).

Please see the image above the dimension drawing, which shows the HAT in place ready to be pushed down. Once the HAT is firmly in place, the Pi can be powered on in the usual way. The Air Quality and Environmental HAT is powered via the Raspberry Pi GPIO connector – either 5V or 3.3V depending on the requirement for the section on the HAT.

Enabling the Pi serial connection: First we need to enable serial0 from the Raspberry Pi to connect to the HAT. We need to edit the Raspberry Pi configuration by executing the following command:
sudo raspi-config
Inside of the configuration helper, select the following options:
Install the library: Kitronik has created a package for the Air Quality Control HAT, which is hosted on PyPi, to run this command the Pi will need an active internet connection. This package can be installed very simply on the Pi with the following command:
pip install KitronikAirQualityControlHAT
Once the install command has been run, we can then take control of the boards features via code. The code, along with a README and example programs, can be found on the Kitronik GitHub repo.
This example code below will help get you started quickly. When you save the code, ensure to save it with the .py extension (e.g., boardtest.py). You will then be able to run it from the terminal with the following command.
python boardtest.py
1| from time import sleep
2| from KitronikAirQualityControlHAT import *
3|
4| zipLEDs = KitronikZIPLEDs(autoShow = False) # Setup ZIP LED class
5| rtc = KitronikRTC() # Setup RTC class
6| buzzer = KitronikBuzzer() # Setup buzzer class
7| hpo1 = KitronikHighPowerOut(1) # Setup high-power output class
8| servo = KitronikServo() # Setup servo class
9| adc0 = KitronikADC(0) # Setup analogue input class
10|
11| bme688 = KitronikBME688() # Setup BME688 class
12| oled = KitronikOLED() # Setup OLED class
13| bme688.calcBaselines(oled)
14|
15| bme688.measureData()
16| sleep(1)
17| oled.clear()
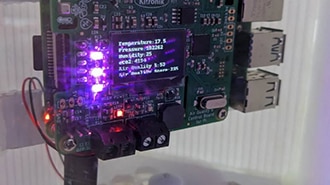
18| oled.displayText("Temperature:" + str(bme688.readTemperature()), 1)
19| oled.displayText("Pressure:" + str(bme688.readPressure()), 2)
20| oled.displayText("Humidity:"+ str(bme688.readHumidity()), 3)
21| oled.displayText("eCO2:" + str(bme688.readeCO2()), 4)
22| oled.displayText("Air Quality %:" + str(bme688.getAirQualityPercent()), 5)
23| oled.displayText("Air Quality Score:" + str(bme688.getAirQualityScore()), 6)
24| oled.show()
The code on line 2 imports all the individual classes from the ‘KitronikAirQualityControlHAT’ module and then lines 4 to 12 create instances of all these classes.
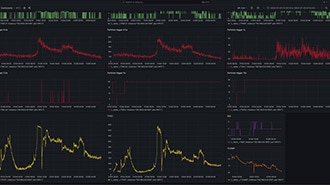
The BME688 gas sensor is setup on line 11, and line 13 carries out the required baseline readings and calculations ready for taking measurements. From line 15 we measure all the sensor readings from the BME688 and output the readings on the HAT’s OLED display.
Now you have the hardware and software setup, and you also know how to write, save, and run programs, what next? The first of the two buttons below, takes you to our GitHub repo for the board which has more information and more coding examples. The second button takes you to a follow up guide which details all of our free resources for this board, which contains everything from basic information to a custom enclosure design.
©Kitronik Ltd – You may print this page & link to it but must not copy the page or part thereof without Kitronik's prior written consent.