Mfr Part # 6003
METRO RP2350 WITHOUT PSRAM
Adafruit Industries LLC
License: See Original Project 3D Printing CNC Accessories Motors Qwiic STEMMA
Courtesy of Adafruit
Guide by Liz Clark
Overview
Robot instrument builds are always fun, but the wiring can be cumbersome. However, this robot friend, built around a toy piano xylophone, requires zero soldering. It runs CircuitPython code on a Metro RP2350 with an I2C to 8 Channel Solenoid Driver breakout connected with a STEMMA QT cable. The 8 solenoids screw into the breakout terminal blocks.
The xylophone has two modes: live MIDI and music box. For live MIDI, it can listen to incoming MIDI messages over USB. For music box mode, it can playback MIDI files (.mid) on the CIRCUITPY drive.
3D printed parts help to position the solenoids so that they are perfectly centered above the keys and have enough height to strike the keys. The entire assembly slides over the xylophone so it can return to its non-robotic form easily.
The solenoids require 12V. For this project to work, you will need to provide 12V via the Metro RP2350 DC jack. This is detailed in the Circuit Diagram.
Toy Piano Xylophone
This toy piano xylophone was used for this project. It seems to be a popular white label product at the time of writing, so it should hopefully be available for quite some time
Parts
8x Solenoids
1 x M3 Thread Screws
1 x USB A to C Cable
Circuit Diagram
The breakout connects to the Metro RP2350 over I2C with a STEMMA QT cable. Each solenoid connects to the breakout with the screw block terminals. The solenoids are powered by 12V via Vin and GND on the Metro from the DC jack input.
Solenoid 0 positive to breakout + (red wire)
Solenoid 0 negative to breakout 0 (black wire)
Solenoid 1 positive to breakout + (red wire)
Solenoid 1 negative to breakout 1 (black wire)
Solenoid 2 positive to breakout + (red wire)
Solenoid 2 negative to breakout 2 (black wire)
Solenoid 3 positive to breakout + (red wire)
Solenoid 3 negative to breakout 3 (black wire)
Solenoid 4 positive to breakout + (red wire)
Solenoid 4 negative to breakout 4 (black wire)
Solenoid 5 positive to breakout + (red wire)
Solenoid 5 negative to breakout 5 (black wire)
Solenoid 6 positive to breakout + (red wire)
Solenoid 6 negative to breakout 6 (black wire)
Solenoid 7 positive to breakout + (red wire)
Solenoid 7 negative to breakout 7 (black wire)
Breakout STEMMA QT to Metro STEMMA QT
Breakout terminal power + to Metro Vin (red wire)
Breakout terminal power - to Metro GND (black wire)
12V power supply to Metro DC In
3D Printing
You can 3D print all of the parts for this project. They are designed to fit over the keys on this toy piano xylophone, which at the time of writing appears to be a popular design available from multiple vendors.
The STL files can be downloaded directly here or from Printables.
Print two of the columns and then one each of the electronics mount, front solenoid mount and back solenoid mount. All of the parts print without supports.
The solenoid mounts are spaced to have the solenoid motors be centered over each key.
The Metro RP2350 and solenoid breakout have their own electronics mount that attaches to the front solenoid mount.
Install CircuitPython
CircuitPython is a derivative of MicroPython designed to simplify experimentation and education on low-cost microcontrollers. It makes it easier than ever to get prototyping by requiring no upfront desktop software downloads. Simply copy and edit files on the CIRCUITPY drive to iterate.
CircuitPython QuickStart
Follow this step-by-step to quickly get CircuitPython running on your board.
Download the latest version of CircuitPython for this board via circuitpython.org
Click the link above to download the latest CircuitPython UF2 file.
Save it wherever is convenient for you.
To enter the bootloader, hold down the BOOT/BOOTSEL button (highlighted in red above), and while continuing to hold it (don't let go!), press and release the reset button (highlighted in red or blue above). Continue to hold the BOOT/BOOTSEL button until the RP2350 drive appears!
If the drive does not appear, release all the buttons, and then repeat the process above.
You can also start with your board unplugged from USB, press, and hold the BOOTSEL button (highlighted in red above), continue to hold it while plugging it into USB, and wait for the drive to appear before releasing the button.
A lot of people end up using charge-only USB cables and it is very frustrating! Make sure you have a USB cable you know is good for data sync.
You will see a new disk drive appear called RP2350.
Drag the adafruit_circuitpython_etc.uf2 file to RP2350.
The RP2350 drive will disappear, and a new disk drive called CIRCUITPY will appear.
That's it, you're done! :)
Safe Mode
You want to edit your code.py or modify the files on your CIRCUITPY drive but find that you can't. Perhaps your board has gotten into a state where CIRCUITPY is read-only. You may have turned off the CIRCUITPY drive altogether. Whatever the reason, safe mode can help.
Safe mode in CircuitPython does not run any user code on startup and disables auto-reload. This means a few things. First, safe mode bypasses any code in boot.py (where you can set CIRCUITPY read-only or turn it off completely). Second, it does not run the code in code.py. And finally, it does not automatically soft-reload when data is written to the CIRCUITPY drive.
Therefore, whatever you may have done to put your board in a non-interactive state, safe mode gives you the opportunity to correct it without losing all of the data on the CIRCUITPY drive.
Entering Safe Mode
To enter safe mode when using CircuitPython, plug in your board or hit reset (highlighted in red above). Immediately after the board starts up or resets, it waits 1000ms. On some boards, the onboard status LED (highlighted in green above) will blink yellow during that time. If you press reset during that 1000ms, the board will start up in safe mode. It can be difficult to react to the yellow LED, so you may want to think of it simply as a slow double click of the reset button. (Remember, a fast double click of reset enters the bootloader.)
In Safe Mode
If you successfully enter safe mode on CircuitPython, the LED will intermittently blink yellow three times.
If you connect to the serial console, you'll find the following message.
Auto-reload is off.
Running in safe mode! Not running saved code.

CircuitPython is in safe mode because you pressed the reset button during boot. Press again to exit safe mode.

Press any key to enter the REPL. Use CTRL-D to reload.
You can now edit the contents of the CIRCUITPY drive. Remember, your code will not run until you press the reset button, or unplug and plug in your board, to get out of safe mode.
Flash Resetting UF2
If your board ever gets into a really weird state and CIRCUITPY doesn't show up as a disk drive after installing CircuitPython, try loading this 'nuke' UF2 to RP2350. which will do a 'deep clean' on your Flash Memory. You will lose all the files on the board, but at least you'll be able to revive it! After loading this UF2, follow the steps above to re-install CircuitPython.
Download flash erasing "nuke" UF2
Code the Xylophone
Once you've finished setting up your Metro RP2350 with CircuitPython, you can access the code, MIDI files and necessary libraries by downloading the Project Bundle.
To do this, click on the Download Project Bundle button in the window below. It will download to your computer as a zipped folder.
# SPDX-FileCopyrightText: 2025 Liz Clark for Adafruit Industries
#
# SPDX-License-Identifier: MIT

import os
from random import randint
import board
import usb_midi
import keypad
from adafruit_mcp230xx.mcp23017 import MCP23017
import adafruit_midi
from adafruit_midi.note_on import NoteOn
from adafruit_midi.note_off import NoteOff
import adafruit_midi_parser

# music_box plays back MIDI files on CP drive
# set to false for live MIDI over USB control
music_box = True
# define the notes that correspond to each solenoid
notes = [48, 50, 52, 53, 55, 57, 59, 60]

key = keypad.Keys((board.BUTTON,), value_when_pressed=False, pull=True)

i2c = board.STEMMA_I2C()
mcp = MCP23017(i2c)
noids = []
for i in range(8):
    noid = mcp.get_pin(i)
    noid.switch_to_output(value=False)
    noids.append(noid)
# pylint: disable=used-before-assignment, unused-argument, global-statement, no-self-use
if not music_box:
    midi = adafruit_midi.MIDI(
        midi_in=usb_midi.ports[0], in_channel=0, midi_out=usb_midi.ports[1], out_channel=0
    )
else:
    midi_files = []
    for filename in os.listdir('/'):
        if filename.lower().endswith('.mid') and not filename.startswith('.'):
            midi_files.append("/"+filename)
    print(midi_files)

    class Custom_Player(adafruit_midi_parser.MIDIPlayer):
        def on_note_on(self, note, velocity, channel):  # noqa: PLR6301
            for z in range(len(notes)):
                if notes[z] == note:
                    print(f"Playing note: {note}")
                    noids[z].value = True

        def on_note_off(self, note, velocity, channel):  # noqa: PLR6301
            for z in range(len(notes)):
                if notes[z] == note:
                    noids[z].value = False

        def on_end_of_track(self, track):  # noqa: PLR6301
            print(f"End of track {track}")
            for z in range(8):
                noids[z].value = False

        def on_playback_complete(self):  # noqa: PLR6301
            global now_playing
            now_playing = False
            for z in range(8):
                noids[z].value = False
    parser = adafruit_midi_parser.MIDIParser()
    parser.parse(midi_files[randint(0, (len(midi_files) - 1))])
    player = Custom_Player(parser)
    new_file = False
    now_playing = False

while True:
    if music_box:
        event = key.events.get()
        if event:
            if event.pressed:
                now_playing = not now_playing
                if now_playing:
                    new_file = True
        if new_file:
            parser.parse(midi_files[randint(0, (len(midi_files) - 1))])
            print(f"Successfully parsed! Found {len(parser.events)} events.")
            print(f"BPM: {parser.bpm:.1f}")
            print(f"Note Count: {parser.note_count}")
            new_file = False
        if now_playing:
            player.play(loop=False)

    else:
        msg = midi.receive()
        if msg is not None:
            for i in range(8):
                noid_output = noids[i]
                notes_played = notes[i]
                if isinstance(msg, NoteOn) and msg.note == notes_played:
                    noid_output.value = True
                elif isinstance(msg, NoteOff) and msg.note == notes_played:
                    noid_output.value = False
Upload the Code and Libraries to the Metro RP2350
After downloading the Project Bundle, plug your Metro RP2350 into the computer's USB port with a known good USB data+power cable. You should see a new flash drive appear in the computer's File Explorer or Finder (depending on your operating system) called CIRCUITPY. Unzip the folder and copy the following items to the Metro RP2350's CIRCUITPY drive.
lib folder
code.py
song_1.mid
song_2.mid
song_3.mid
song_4.mid
Your Metro RP2350 CIRCUITPY drive should look like this after copying the lib folder, MIDI files and code.py file:
How the Code Works
At the top of the code is the music_box variable. This determines the mode for the robot xylophone. If music_box is set to True, then it will playback MIDI files (.mid) files on the CIRCUITPY drive. If it is set to False, then it will act as a USB MIDI output device. The MIDI note numbers assigned to each solenoid are defined in the notes array.
# music_box plays back MIDI files on CP drive
# set to false for live MIDI over USB control
music_box = True
# define the notes that correspond to each solenoid
notes = [48, 50, 52, 53, 55, 57, 59, 60]
Button and I2C
The BOOT button is passed as a keypad button. Then, the MCP23017 is instantiated over I2C, and the 8 solenoid pins are created and added to the noids array.
key = keypad.Keys((board.BUTTON,), value_when_pressed=False, pull=True)

i2c = board.STEMMA_I2C()
mcp = MCP23017(i2c)
noids = []
for i in range(8):
    noid = mcp.get_pin(i)
    noid.switch_to_output(value=False)
    noids.append(noid)
Live MIDI Mode
If music_box is False, then the Metro is setup as a USB MIDI device.
if not music_box:
    midi = adafruit_midi.MIDI(
        midi_in=usb_midi.ports[0], in_channel=0, midi_out=usb_midi.ports[1], out_channel=0
    )
Music Box Mode
If music_box is True, then the Metro is setup to playback MIDI files on the CIRCUITPY drive. First, all of the .mid files on the drive are found and added to the midi_files array. Then, a MIDIPlayer class is created to define what is done in the code when certain MIDI messages are read from a MIDI file. In the case of the xylophone, if a NoteOn message is received, the solenoid is triggered. When a NoteOff message is received, the solenoid retracts. At the end of the MIDI file, all solenoids are set to False to make sure none of them are stuck on.
else:
    midi_files = []
    for filename in os.listdir('/'):
        if filename.lower().endswith('.mid') and not filename.startswith('.'):
            midi_files.append("/"+filename)
    print(midi_files)

    class Custom_Player(adafruit_midi_parser.MIDIPlayer):
        def on_note_on(self, note, velocity, channel):  # noqa: PLR6301
            for z in range(len(notes)):
                if notes[z] == note:
                    print(f"Playing note: {note}")
                    noids[z].value = True

        def on_note_off(self, note, velocity, channel):  # noqa: PLR6301
            for z in range(len(notes)):
                if notes[z] == note:
                    noids[z].value = False

        def on_end_of_track(self, track):  # noqa: PLR6301
            print(f"End of track {track}")
            for z in range(8):
                noids[z].value = False

        def on_playback_complete(self):  # noqa: PLR6301
            global now_playing
            now_playing = False
            for z in range(8):
                noids[z].value = False
    parser = adafruit_midi_parser.MIDIParser()
    parser.parse(midi_files[randint(0, (len(midi_files) - 1))])
    player = Custom_Player(parser)
    new_file = False
    now_playing = False
The Loop
When you press the BOOT button in music box mode, a MIDI file on the CIRCUITPY drive is chosen and queued up to be parsed. As it is read back, the file is played on the xylophone.
while True:
    if music_box:
        event = key.events.get()
        if event:
            if event.pressed:
                now_playing = not now_playing
                if now_playing:
                    new_file = True
        if new_file:
            parser.parse(midi_files[randint(0, (len(midi_files) - 1))])
            print(f"Successfully parsed! Found {len(parser.events)} events.")
            print(f"BPM: {parser.bpm:.1f}")
            print(f"Note Count: {parser.note_count}")
            new_file = False
        if now_playing:
            player.play(loop=False)
In live MIDI mode, whenever a NoteOn or NoteOff message is received, the solenoids strike a note.
else:
        msg = midi.receive()
        if msg is not None:
            for i in range(8):
                noid_output = noids[i]
                notes_played = notes[i]
                if isinstance(msg, NoteOn) and msg.note == notes_played:
                    noid_output.value = True
                elif isinstance(msg, NoteOff) and msg.note == notes_played:
                    noid_output.value = False
Assembly
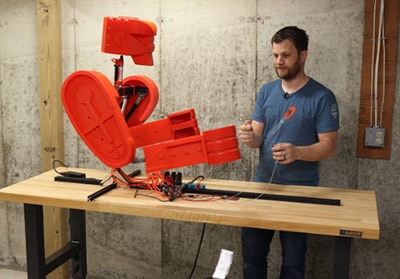
Solenoid Mounts
Attach four solenoid motors to the back solenoid mount with M3 screws and nuts. Leave the solenoid on the right end's top mounting hole unattached.
Attach one of the columns to the back mount with an M3 screw and nut. The screw should go through the last solenoid's mounting hole.
Attach four solenoid motors to the top solenoid mount with M3 screws and nuts. Leave the solenoid on the right end's top mounting hole unattached.
Attach the second column to the front mount with an M3 screw and nut. The screw should go through the last solenoid's mounting hole.
Electronics Mount
Attach M2.5 standoffs and nuts to the electronics mounting holes on the electronics mount.
Use three 20 mm long M3 screws to attach the electronics mount to the front solenoid mount.
Use M2.5 screws to attach the Metro RP2350 and solenoid breakout to the M2.5 standoffs on the electronics mount.
Bring It All Together
The two solenoid mounts allow the solenoid motors to nest together. Both solenoid mounting plates are held up with the columns.
Slide the two mounts to nest the solenoids while inserting the ends of the mounts into the columns.
Use M3 screws and nuts to each solenoid mount to the columns.
That finishes the assembly! Next up: wiring.
Wiring
You can reference the Fritzing diagram for a more detailed look at the wiring
Solenoid Wire Haircut
The solenoids have fairly long wires, approximately 11 inches each. You can leave them as-is, but it can make for messy wiring. To neaten things up, you can cut each solenoid's wires to the following lengths:
Solenoids 1 and 2 (far left): 7 inches/17.78 cm
Solenoids 3 and 4: 6 inches/15.24 cm
Solenoids 5 and 6: 5 inches/12.7 cm
Solenoids 7 and 8 (far right): 3 inches/7.62 cm
After cutting the wires, splice them to insert into the terminal blocks on the breakout.
Solenoid Terminal Blocks
Attach each solenoid's black wire into one of the numbered terminal blocks and each solenoid's red wire into one of the + terminal blocks:
Solenoid 1 black wire (far left) to terminal block 0
Solenoid 1 red wire to terminal block +
Solenoid 2 black wire to terminal block 1
Solenoid 2 red wire to terminal block +
Solenoid 3 black wire to terminal block 2
Solenoid 3 red wire to terminal block +
Solenoid 4 black wire to terminal block 3
Solenoid 4 red wire to terminal block +
Solenoid 5 black wire to terminal block 4
Solenoid 5 red wire to terminal block +
Solenoid 6 black wire to terminal block 5
Solenoid 6 red wire to terminal block +
Solenoid 7 black wire to terminal block 6
Solenoid 7 red wire to terminal block +
Solenoid 8 black wire (far right) to terminal block 7
Solenoid 8 red wire to terminal block +
Solenoid Power
Insert wires into the center power terminal block on the breakout. Attach the GND (-) wire to GND on the Metro. Attach the + wire to Vin on the Metro. This will allow the DC jack input on the Metro to power the solenoids with 12V.
STEMMA QT
Plug a 100 mm STEMMA QT cable into the STEMMA QT port on the Metro. Plug in the other end into the breakout.
Wired for Sound
That completes the wiring. You're ready to start up your robot band.
Use
The solenoids require 12V. For this project to work, you will need to provide 12V via the Metro RP2350 DC jack.
Plug a 12V power supply into the DC jack on the Metro RP2350 to power up the toy robot xylophone. The xylophone has two modes: live MIDI mode and music box mode. The mode is defined by the variable music_box at the top of the code.
Live MIDI mode lets you send MIDI messages over USB MIDI to the xylophone. If you're using this mode, you'll also need a data USB C cable for MIDI input.
Music box mode lets you load MIDI files (.mid) onto the CIRCUITPY drive and play them back with the xylophone. You don't need a USB cable for this mode to work.
The xylophone only has the notes of a C major scale, so any notes that are sent to it outside of C major will not play.
A few simple MIDI files are included in the project bundle for music box mode. To play a file, press the BOOT button on the Metro. A file will be randomly chosen and played back on the xylophone. The code adapts to however many MIDI files you have on the CIRCUITPY drive, so you can create your own files for playback.
For live MIDI mode, you can connect the xylophone to your computer or a USB host device and send it MIDI messages to playback.