Mfr Part # PIM607
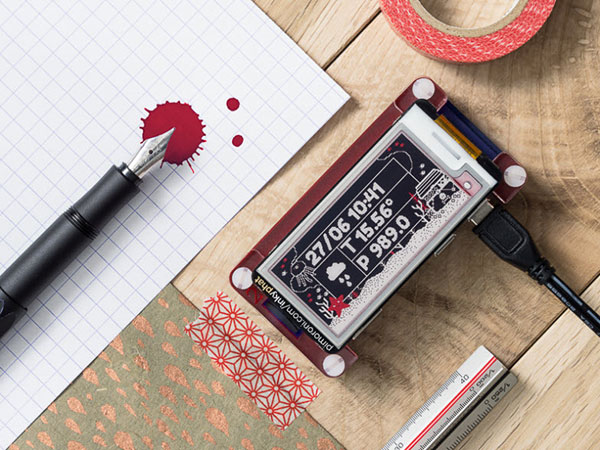
BADGER 2040
Pimoroni Ltd
License: See Original Project Wearables
Courtesy of Pimoroni
Guide by Pimoroni
Badger 2040 is a low cost, RP2040-powered eInk/ePaper/EPD programmable badge. We've designed it to be an friendly introduction into the myriad joys of eInk , but flexible and expandable enough to be of interest to intrepid RP2040 haxxors- let’s take a look at what it can do.
This tutorial will show you how to plug things in, how to get to grips with the built-in demo programs and how to start programming your Badger with MicroPython.
What You'll Need
A USB-C cable (for programming)
Some sort of battery if you want to disconnect Badger from your computer and update the display on the go - we'll discuss a few options and their pros and cons!
A computer to program from (Windows, Mac, or Linux/Raspberry Pi)
Batteries
AA AND AAA BATTERIES
The easiest way to supply your Badger with power is via some good old-fashioned double or triple A batteries. We like a 2 x AAA setup the best, as the battery pack sticks onto the back of Badger without being too heavy and unwieldy. You'll need a battery holder with a JST-PH connector to be able to plug it in.
2x AAA rechargeable (NiMH) batteries only put out 2.4V which is, strictly speaking, not enough for Badger. However, in our tests it keeps on truckin' down to an input voltage of 2.05V (without the LED), so if you want to use rechargeable batteries that should be fine.
ASSEMBLING THE BADGER ACCESSORY KIT
If you have our Badger accessory kit, it will come with some Velcro for sticking the battery pack to the back of Badger. Before you start sticking things down, experiment a little bit with the positioning of the battery pack:
If you're hanging Badger from a lanyard, you'll want to make sure the battery pack is balanced in the middle to avoid your badge hanging lopsided. We've put our square in the middle of Badger, but if you wanted you could cut it in half and stick half at each end of the battery pack
If you have a on/off switch on your battery bank and want to be able to use it, make sure to position it where it's accessible
Once you're ready to stick the bits of Velcro down, press em down and then wait 10 minutes for the adhesive to set. Then you're ready to go!
USB BATTERY PACK
USB battery packs are probably a bit heavy for dangling round your neck, but they might be useful for powering Badger from your pocket or your bag, if you don't want to stick a battery pack to Badger itself. You'll need one that's capable of powering low powered devices - a lot of power banks will automatically shut off if really low amounts of current are being drawn.
Our fancy new USB-C power banks have a super-secret low power mode - once you've plugged everything in, hold down the button until the blue LEDs light up one at a time. It's now in low power mode - perfect to supply the modest power needs of our Badger friend (you'll need to plug the power bank in to charge to reset it and return it to normal behaviour).
LIPO/LIION BATTERIES (WITH CAUTION!)
If the person wearing the badge is an adult who knows what they're doing with LiPo batteries, it's possible to power Badger from a LiPo battery (we like this 500mAh one).
LiPos like these are squishy and vulnerable, so a solid enclosure or backplate to protect the battery from impacts and damage whilst being worn is essential. We stuck our LiPo to the back of Badger with a Velcro square to stop it from rattling around...
... and 3D printed a backplate, secured in place with M2 nuts and bolts (if you'd like to print one of your own, you can find the STL here!).
Alternatively, you could use a hard case LiPo with Badger 2040 - we really like this tiny Galleon one.
A few more things you should consider if you're using a LiPo:
There's no battery protection included on Badger 2040, so you should only use it with LiPo batteries that include internal protection (all ours do)
If you've sourced a battery from elsewhere, check that the connector has the red wire going to + and the black wire going to - on our board. Not all batteries have their connectors attached the same way up!
Unlike some of our other boards, Badger 2040 doesn't have battery charging circuitry onboard. You'll need to plug your battery into an external LiPo charger (like a LiPo Amigo) to charge it
MicroPython and Badger 2040
The custom display drivers in our C++/MicroPython build let us do a bunch of cool stuff with the E Ink display. There are simple drawing and text functions to make it straightforward to display things on the display. You can also change how quickly you update the display - faster updates will mean less saturated blacks and more ghosting on your display, so you'll need to decide whether speed or quality is more important for your application (our demos use a variety of update speeds, so you can see how they behave).
INSTALLING BADGER FLAVOURED MICROPYTHON
Your Badger will come preloaded with MicroPython and a suite of examples, but for the all the latest features, tweaks and fixes, you should download yourself the newest version.
These instructions will assume you're using version 1.18.5 or later (released 25/03/2022) - there have been quite a few changes so if something's not working as it's should, try updating your MicroPython version!
If you're brand new to Raspberry Pi Pico/RP2040s, you might find the step by step instructions in our Getting Started with Raspberry Pi Pico tutorial useful - it will show you how to install our custom MicroPython build and goes into more detail about how to use Thonny. Here's a quick TLDR!
Download the most recent MicroPython .uf2 from the Releases page of our pimoroni-pico Github repository. You'll want the special version for Badger 2040, which has the BadgerOS launcher and demos built in
Hold down the BOOT button of Badger 2040, and then press, and release, the RESET button. This will put it into bootloader mode, and it should appear as a drive on your computer called RPI-RP2
Copy the .uf2 file to the RPI-RP2 drive - once you've done that Badger 2040 will reboot running BadgerOS!
USING BADGER OS
You can navigate around the launcher using the up and down arrows, and select an example by pressing A, B, or C. To return to the launcher when you're done with an example, press buttons A and C at the same time.
Hold BOOT whilst pressing up or down to adjust the font size or hold BOOT whilst pressing A to toggle dark mode.
RUNNING BADGER OS ON BATTERY POWER
If you're running version 1.18.5 or later, the launcher and most of the examples now turn off automatically to conserve battery power. Whilst running on battery power the LED will light up when Badger is awake and consuming power and turn off to let you know when the board is asleep. Press any front button to wake it up where you left off or press A and C together to return to the launcher.
Programming Badger with Thonny
Once MicroPython is installed, your Badger won't show up as a drive anymore. To program it, you'll need to talk to it through an interpreter - we're using Thonny, which is available for Windows, Mac or Linux.
Install the latest version of Thonny. We recommend downloading it from the Thonny website as package managers do not always have the newest version
Open up Thonny. Make sure the interpreter (shown in the box on the bottom right corner) is set to 'MicroPython (Raspberry Pi Pico)'
Plug your Badger into your computer if it's not plugged in already. Because the launcher will already be running, you'll need to stop it with the stop button in Thonny before sending it any instructions
After you press stop, you should get something like this a MicroPython prompt that looks something like this. The flashing cursor next to the >>> in the 'Shell' box tells you that Badger 2040 is talking to your computer and is ready to accept instructions! (If you don't get a prompt or if you get an error, you might have interrupted Badger at a weird point in the program, try pressing reset on your Badger and pressing stop again)
LIGHTING UP THE ONBOARD LED
As a test that the board is working properly and you have the correct version of MicroPython installed, you can light up the white onboard LED with the following code - enter it line by line in the REPL (that's the bottom 'Shell' box in Thonny).
import badger2040
badger = badger2040.Badger2040()

badger.led(255)
(Those first two lines are boilerplate code that you'll need at the beginning of any code you run on Badger).
Let's turn off the LED again, to be tidy!
badger.led(0)
WRITING TEXT ON THE SCREEN
Here's how to display text on the screen, in its most basic form. You'll need to enter the boilerplate, as before (unless you're still using the same Thonny session).
import badger2040
badger = badger2040.Badger2040()

badger.pen(0)
badger.text("Hello Badger", 20, 20)
badger.update()
The rest of the code does this:
Picks a pen colour to write with - 0 is black and 15 is white. This display will only show black or white, but if you pick a number in between 0 and 15 it will dither it to approximate a shade of grey
Writes text to the screen buffer - the '20, 20' is the x/y co-ordinates of the left middle of the text
Updates the E Ink screen (you can draw multiple things to your screen buffer before triggering an update)
If you try writing more text to the screen, you will find that things you've drawn to the screen buffer will stick around until you overwrite them. To clear the screen and start with a clean slate:
badger.pen(15)
badger.clear()
MORE DRAWING FUNCTIONS
There are more functions in the library for changing the font, size, and thickness of text, as well as functions for drawing individual pixels, lines, and rectangles. Check out the function reference for more info!
Customising the BadgerOS Examples
When you run them, some of the examples will create their own data files that you can edit. If you don't have it open already, you will want to have the Files window visible, you can do this with View > Files.
The top box can be used to browse the local files in on your computer, and the bottom box shows the files on your Badger. You can copy files from your computer to your Badger by right clicking on them in the top window and choosing 'Upload to/' (or open up a file by clicking on it in the bottom window, and then press 'save' when you're done). When you're finished editing/uploading data files, hit the reset button on your Badger to start the launcher again.
The data files are created the first time you run the relevant examples on your Badger, so if you plug in a fresh Badger and start browsing files you won't see them yet.
E-READER.PY
This example comes with an excerpt from Wind in the Willows - replace the contents of 'book.txt' with another text file of your choosing for it to show up in the e-reader. You can find more free books (with text versions) at Project Gutenberg!
When running the example, you can press A and B to change the font style and size.
LIST.PY
To swap the demo checklist with one of your own, edit the contents of checklist.txt. Each list item should be on a separate line.
cake
biscuits
bees
mashed potato
IMAGE.PY AND ADDING YOUR OWN IMAGES
To get your own images onto Badger using MicroPython, you will first need to convert them into a 1-bit byte array that represents the monochrome image. We've made a Python script that you can run on your computer to take care of the conversion. The script will convert a bmp, jpg, or png image into a black and white 296 x 128, formatted .bin file that Badger can read.
Here's a few different ways you can run it!
CONVERTING IMAGES FROM A RASPBERRY PI
(Or other Linux command line; Ubuntu, Mac, WSL etc.)
Open up a terminal
Download the pimoroni-pico repo to your computer:
git clone https://github.com/pimoroni/pimoroni-pico
Navigate to the image converter tool:
cd pimoroni-pico/examples/badger2040/image_converter
Then, assuming your starting image file is in the same directory as 'convert.py', you can convert it like this (adding in your own file names):
python3 convert.py --binary --resize image_file_1.png
Or convert multiple images like this:
python3 convert.py --binary --resize image_file_1.png image_file_2.png image_file_3.png
If you get a 'No module named PIL' error, you might need to
pip3 install pillow, and then try again.
CONVERTING IMAGES FROM WITHIN THONNY
(This may be an easier option if you're using Windows)
Switch your interpreter to 'The same interpreter who runs Thonny (default)' using the box at the bottom right. This tells it to use Thonny's full fat version of Python, instead of Badger's version of MicroPython
Install PIL (Python Image Library) in Thonny, with Tools > Manage Packages. Search for Pillow, click on it, and then 'Install'
Click 'new' and copy and paste the contents of convert.py into the blank tab. 'Save' it somewhere on your computer, named convert.py (you'll probably want it to save it to the same place as the images you want to convert)
In the bottom shell box at the Python prompt, you can then run convert.py from within Thonny like this (adding in your own filenames):
%Run convert.py --resize --binary image_file_1.png
Make sure you press enter after typing that in - if you press the green run button it will only run the first part of the command
Remember to switch your interpreter back to MicroPython (Raspberry Pi Pico) when you're done converting!
Once you've generated your .bin file, you can copy it to Badger using the Files menu in Thonny:
Browse to your file in the top 'This computer' window
In the bottom box, double click on the images directory on your Badger to open it up
Right click on your .bin file in the top window and select 'Upload to /images'
Your new images should show up in the image example after a board reset. For more control over dithering etc. (and a preview of what they're going to look like), try converting your images into 1 bit black and white with a graphics program such as GIMP before running them through the script.
BADGE.PY
To change the text on the name badge example, edit 'badge.txt'. You can double click on badge.txt in the Files menu to open it up in Thonny (remember to 'save' the file when you're done).
To change the image, you'll need to convert your image as above, with the following changes:
The name badge image needs to be named 'badge-image.bin' and in the root directory of your Badger alongside badge.txt (not in the /images directory)
This image needs to be exactly 104 pixels in width and 128 pixels in height, so you'll need to resize it with a graphics program like GIMP before you run it through the conversion script. When you come to convert it, don't use the --resize flag as this will stretch it to 296 x 128, instead use
python3 convert.py --binary badge-image.png
or from Thonny: %Run convert.py --binary badge-image.png
Running Your Own Examples
If you want to modify the examples further (or write your own from scratch), you can find the Python code for all the baked in examples (plus a few extras) on Github.
The built-in examples won't show up as Python files that you can edit on Badger - you'll need to copy and paste the example code into a new file in Thonny (clicking the raw button first makes it easier to copy) and press the green 'run' button to run it on your Badger.
You'll be prompted for a file name to save it with. If you give it the same filename as one of the built-in examples (badge.py, clock.py etc.) the launcher will run your version of the example instead of the built in one. If you want to go back to the original, just delete your copy from Badger.
Next Steps
Once you've got to grips with Thonny and our examples, why not add one of our breakouts into the mix to give your Badger some sensor smarts. If your breakout has a Qw/ST connector, you can plug it straight into Badger with a Qw/ST cable (if not, you can use one of these adaptors). There's a list of which of our breakouts are currently supported in our MicroPython build here.
As always, drop us a line on Twitter to tell us what you and your Badger get up to - we'd love to know!
Troubleshooting
'THONNY CAN'T SEE MY BADGER / DEVICE IS BUSY'
Double check you've got your interpreter set to 'Raspberry Pi Pico' and check you've pressed 'stop' to stop the launcher from running! You need the >>> prompt to be visible in the 'shell' window to be able to transfer files or send Python instructions to Badger.
Please note that you only need to hold down the BOOT button whilst putting Badger into bootloader mode so you can copy MicroPython to it, you don't need it to be in bootloader mode after that (unless you want to upload new firmware).
'THE BATTERY INDICATOR IN THE LAUNCHER ISN'T WORKING!'
The battery icon in the top left of the launcher uses voltage values that are reasonable for a LiPo battery, so if you're using AA/AAA batteries it might show as empty, even when there's plenty of juice left. To make the battery icon represent your battery situation better, save your own copy of launcher.py to your Badger and alter the min/max values to something more appropriate - something like this should work better for 2 x (non-rechargeable) AAAs:
MAX_BATTERY_VOLTAGE = 3.2
MIN_BATTERY_VOLTAGE = 2.0
If you want to know more about how you can use Badger to monitor the voltage from your battery, check out this example.
HOW DO I FACTORY RESET?
If you need to delete all your programs from Badger's flash memory and start again from scratch, you can do that by downloading this special .uf2 file and copying it to your Badger whilst it's in bootloader mode. Once you've done that, you'll need to copy the Badger MicroPython image across again.
You may also find clearing the flash to be useful if you encounter problems after upgrading to the newest version of MicroPython - just make sure you save any code you've been working on to your computer first!
That's all folks!