Don’t Rule Out the Neon Bulb as an AC Power-On Indicator
You’ve got an apparently simple design requirement on your latest AC-line powered project: provide a distinct illuminated indicator to show that the unit is plugged into the line and that power is “on,” meaning that the line is good and the unit is switched on. That’s needed for both user convenience and a quick troubleshooting clue if the unit appears “dead” when presumably switched on.
Your first idea is to keep it simple and just draw a little power from any available DC rail in the product to provide around 20 milliamperes (mA) to drive a red LED. If a suitable rail isn’t available, you could add a small circuit to drive that LED (Figure 1).
 Figure 1: It’s not hard to drive an LED indicator from the AC line, but it requires several active and passive components. (Image source: International Light Technologies, Inc.)
However, there’s a problem with both of these solutions. First, there’s the issue of credibility and confidence, with safety implications. If the circuit driving that DC rail has a fault and the LED doesn’t illuminate, you could have a safety issue where the user thinks the AC line is cut off and the circuit is not live, but it actually is.
Even if that’s not a concern, the separate indicator circuit is relatively costly and complicated for what it does, even if the bill of materials (BOM) is short. If there isn’t a DC rail that you can tap, and you need a step-down transformer or a transformer for regulatory-safety isolation, things are no longer simple and cheap.
So, you figure there must be a lower-cost, all-passive way to directly connect an LED to the AC line – and there is. Among the possibilities is the “capacitor-dropper” (cap-drop) supply which is used in some commercial designs when a low-current DC rail is needed from an AC source (Figure 2). As such, it could be used for driving an LED.
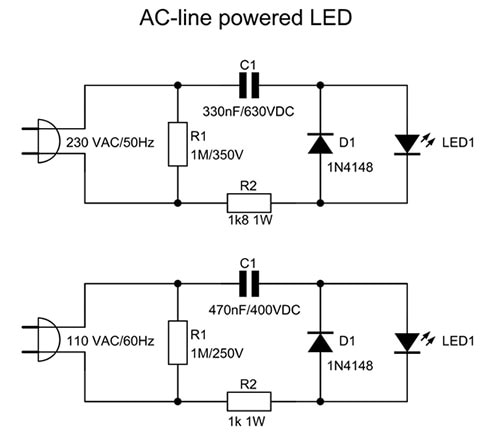 Figure 2: A “capacitor-dropper” circuit can be used to drive an LED directly from the AC line; despite its apparent simplicity, it is actually a circuit with subtleties, and it also has some regulatory/safety issues. (Image source: Turbokeu.com)
Again, these circuits bring regulatory and safety concerns and issues as they would have to be physically separated from other parts of the design. In order to meet safety codes such as those from UL, the entire circuit—and its tiny circuit board (if any)—must be arranged physically so the user is protected if there is a fault to the chassis. Further, this approach requires larger, more costly, higher voltage passive components (especially the capacitors, which must provide a safety margin of about twice the line-voltage peak.)
The reality is that adding an “AC live” subcircuit using LEDs is not as easy in practice as it may appear “on paper.”
Go back to the future with neon lamps
Fortunately, there is a time-tested and highly reliable solution: use a small neon bulb and a current-limiting resistor (Figure 3) which can be connected directly to the AC line (120 or 240 volts AC (VAC)). While this circuit must also be properly insulated, it’s so simple and small that it can be covered in heat shrink tubing or similarly insulated.
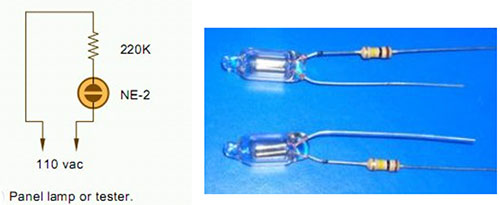 Figure 3: All it takes to use a neon lamp with an AC line as its power source is a current-limiting series resistor, as the schematic indicates (left); the physical implementation of the schematic diagram is also a simple interconnect (right). (Image source: Bristol Watch Co.)
Neon bulbs – more properly called lamps since that is their function – have been around since the early 1900s and come in a variety of sizes and styles. The most common size in general use for indicators by far is generically known as the NE-2 lamp. A good example is the Interlight 4PAK:WX-EGA2-0. It measures 12 millimeters (mm) long and 5 mm in diameter (Figure 4).
 Figure 4: The widely used NE-2 neon lamp measures about 12 mm long and has a diameter of 5 mm. (Image source: Interlight)
The value of the current-limiting resistor depends on the neon lamp size, desired brightness, and its minimum/maximum current ratings. For an NE-2, this value is typically 50 to 220 kilohms (kΩ) for 120 VAC mains, and twice that value for 220 VAC. The power rating for the resistor is on the order of ¼ watt or less. It doesn’t get simpler than that – or more reliable.
The neon bulb has a long lifespan of between 20,000 and 50,000 hours, which is comparable to an LED. Neon lamps are also very rugged and not affected by vibration, mechanical shock, or frequent on/off operation. They generally operate over a wide temperature range from -40°C to +150°C and are not susceptible to damage from voltage transients such as high-voltage static discharges or line transients. In some ways, neon lamps are similar to miniature gas discharge tubes (GDTs) used for circuit protection.
Note that neon lamps are non-polarized DC devices with two symmetrical electrodes. When DC is applied, one electrode glows; if the DC is reversed, the other electrode glows (Figure 5). When connected to an AC source, the electrodes alternate glowing. The eye integrates this and does not see the flicker.
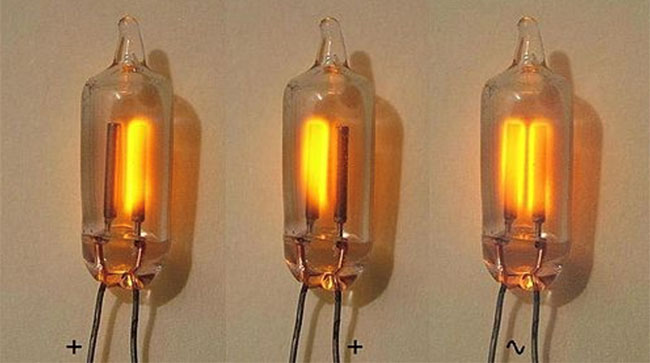 Figure 5: The neon lamp is a polarity agnostic, DC-driven discharge device with a cathode that glows, as can be seen from this “triple” image (left to right) of a positive polarity on the left wire (cathode on right), on the right wire (cathode on left), and driven by an AC waveform (cathode alternating). (Image source: Wikiwand)
This inherent compatibility with DC sources makes the neon indicator a viable choice for higher voltage DC rail designs that are increasingly being used with solar panels, battery energy storage systems (BESSs), and DC distribution.
No need to DIY
There’s an easier way to design in a neon lamp as an AC power-on indicator that doesn’t require wiring up the lamp and resistor and then insulating the assembly. You can get the lamp and resistor as a panel indicator in a ready-to-use, sealed panel-mount housing with a choice of wire leads, solder terminals, or quick-connect terminals. One such device is the Bulgin Limited NL589C2A neon panel indicator (Figure 6).
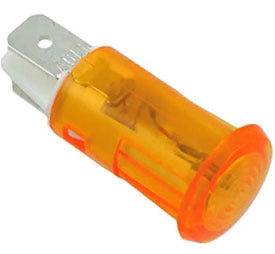 Figure 6: By buying a neon indicator such as the NL589C2A with a series resistor in a panel-mount housing, issues of wiring and safety are greatly minimized. (Image source: Bulgin Limited)
Taking convenience and simplifying physical arrangement even further, many rocker switches are offered with integral neon indicators. The Bulgin H8553VBBR2-B is representative of this approach (Figure 7). It is a 15 ampere (A) double pole, single throw (DPST), 120/240 VAC unit with a snap-in panel mount design which saves space and eases system wiring.
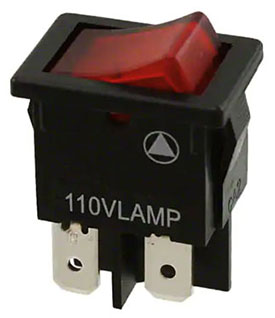 Figure 7: By incorporating the neon lamp and its resistor in the switch’s rocker, designers save space, simplify wiring, and trim their bill of materials. (Image source: Bulgin Limited)
This combination of a rocker switch with an internal lamp also brings an intuitive “human interface” aspect to the design and its operation, since the switch’s action and the associated illumination are visually and physically linked.
The mounting and wiring convenience, plus the logical sensibility of rocker switches with built-in neon power-on indicators, is one of the reasons they are widely used in AC power strips, typified by units such as the Tripp Lite 6SPDX Power Strip, a 6 outlet unit with a 6 foot (ft.) power cord (Figure 8).
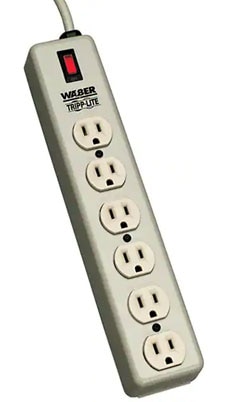 Figure 8: The technical, production, and user-focused benefits of the rocker switch with integral neon indicator lamp make it a good choice for AC power strips, ranging from consumer-oriented (shown) to heavy-duty commercial to industrial units. (Image source: Tripp Lite)
Conclusion
There are many cases where an old technology can still be a legitimate or even the best solution to modern design challenges. While LED indicators have largely obsoleted neon for low-voltage solutions, neon lamps are still a very simple and viable option for AC-line indication. The lamps come with multiple package options, including bare bulb, panel mount, and rocker switch, further enhancing their utility and versatility for many design situations.
External References
- Wikipedia, “Neon lamp” (basic reference)
- Wikiwand, “Neon lamp” (technical with extensive references)
- International Light Technologies, Inc., “Neon Lamps: Application & Technical Notes” (technical and applications)
- Data Sheet Archive, “Chicago Miniature NE-2 Datasheet” (detailed data sheet)
- Science History Institute “A Blaze of Crimson Light: The Story of Neon” (history)
- Neon Library, “Neon History” (history)

Have questions or comments? Continue the conversation on TechForum, DigiKey's online community and technical resource.
Visit TechForum


