Rapid Prototyping of Smart Voice Assistant Applications with Raspberry Pi
Contributed By DigiKey's North American Editors
2018-02-01
Voice assistants have quickly emerged as an important product feature thanks to popular smart voice-based products such as Amazon Echo and Google Home. While providers of voice services provide application programming interface (API) support to developers so they don’t have to become expert in the nuances of speech recognition and parsing, the requirements of combining audio hardware and voice processing software can still be a significant obstacle.
In addition, projects without access to extensive experience in acoustic design, audio engineering, and cloud-based services could face significant delays in working through the details associated with each discipline.
To address these issues, vendors have made available complete voice assistant development kits to greatly simplify matters. This article will introduce two such kits, one from XMOS and one from Seeed Technology, that enable rapid development of custom products based on Amazon Alexa Voice Service (AVS) and Google Assistant, respectively. The boards are designed to interface with the Raspberry Foundation Raspberry Pi 3 (RPi 3) board.
The article will describe how to get each kit up and running and show how each kit makes voice assistant technology readily accessible.
Rapid AVS evaluation
With its Alexa smart speaker, Amazon introduced a product for the home that offered the kind of smart voice assistant capabilities that were largely limited to smartphones in the past. For developers, the availability of the AVS API opened the door to use of these same voice assistants in custom system designs, but still required substantial expertise in audio hardware and software. Now, the availability of the XMOS xCORE VocalFusion 4-Mic Kit for Amazon AVS provides the last piece of the puzzle for implementing voice assistants.
The XMOS kit includes an XVF3000 processor base board, a 100 mm linear array of four Infineon IM69D130 MEMS microphones, xTAG debugger, mounting kit, and cables. Developers need to provide the RPi 3 a powered loudspeaker and a USB power supply, as well as a USB keyboard, mouse, monitor, and Internet connection. Developers can begin evaluating the Amazon Alexa voice assistant quickly after connecting the XMOS board and microphone array into the RPi 3 using the mounting kit (Figure 1).
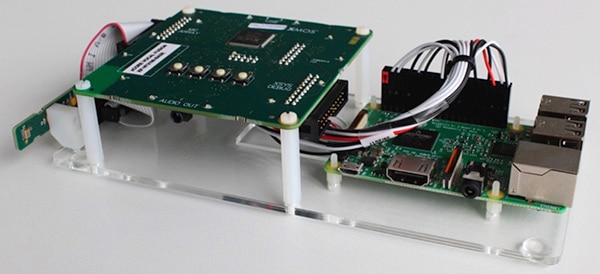
Figure 1: Developers start working with the XMOS xCORE VocalFusion kit by plugging the provided microphone array board (far left) and XMOS processor board (middle) into a Raspberry Pi 3 board (right). (Image source: XMOS)
After connecting the RPi 3 to the USB keyboard, mouse, monitor, and Internet service, the next sequence of steps is to install the Raspbian OS from an SD micro card, open a terminal on the RPi 3, and clone the XMOS VocalFusion repository. With the OS and repo installed, simply run the installation script auto_install.sh located in the cloned vocalfusion-avs-setup directory.
The installation script configures the Raspberry Pi audio system and its connection with the xCORE VocalFusion kit, and installs and configures the AVS Device SDK on the Raspberry Pi. This installation process can take about two hours to complete.
After installation has finished, developers need to perform a simple procedure to load their Amazon developer credentials and begin testing the extensive set of voice commands and built-in features. At this point, the XMOS kit will be able to demonstrate Alexa’s full set of capabilities such as timers, alarms, and calendars, as well as third-party capabilities built with the Alexa Skills Kit.
Reference design
The simple set-up procedure belies the sophisticated hardware and software components at work in the XMOS kit. The kit provides developers with a comprehensive reference design for implementation of custom designs. At the heart of the XMOS kit, the XMOS XVF3000-TQ128 device provides substantial processing capability (Figure 2).
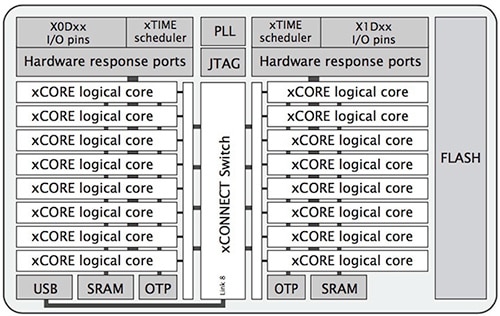
Figure 2: The XMOS XVF3000-TQ128 device integrates two xCORE tiles, each with eight cores, to provide high-performance audio processing. (Image source: XMOS)
Built for parallel processing tasks, the device includes two xCORE tiles, each of which contains eight 32-bit xCORE cores with integrated I/O, 256 Kbytes of SRAM, and 8 Kbytes one-time programmable (OTP) on-chip memory. The xTIME scheduler manages the cores and triggers core operations on hardware events from I/O pins. In turn, each core can independently perform computations, signal processing, or control tasks, taking advantage of the integrated 2MB flash memory pre-flashed in the xCORE VocalFusion kit with code and data for kit setup and execution.
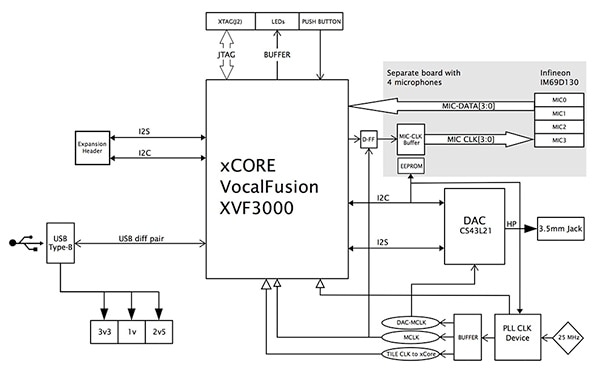
The XMOS processor baseboard needs few additional components beyond the XVF3000-TQ128 device (Figure 3). Along with basic buffers and header connections, the baseboard also includes a Cirrus Logic CS43L21 digital-to-analog converter (DAC) for generating output audio with the external speaker. Finally, the baseboard brings out the XVF3000-TQ128 device’s I2C ports as well as its audio optimized I2S interface for digital audio.
Figure 3: The XMOS kit’s baseboard includes the XVF3000-TQ128 device, DAC, buffers, and headers for connecting to the Raspberry Pi 3 board and the external speaker. (Image source: XMOS)
The kit splits overall function between audio processing on the XMOS board and higher level voice processing services on the RPi 3 (Figure 4). The RPi’s Broadcom quad-core processor runs software that analyzes the audio stream for wake-word recognition and handles interactions with Amazon AVS.
Figure 4: The XMOS VocalFusion kit separates Alexa functionality across the baseboard and Raspberry Pi 3 board, using the former for audio signal processing and the latter for speech recognition and higher level Alexa services. (Image source: XMOS)
The software installation process configures these subsystems and loads the required software packages, including Sensory’s speaker independent wake-word engine and AVS client software, among others.
AVS provides a series of interfaces associated with high-level functions such as speech recognition, audio playback, and volume control. Operations proceed through messages from AVS (directives) and messages from the client (events). For example, in response to some condition, AVS might send a directive to the client indicating that the client should play audio, set an alarm, or turn on a light. Conversely, events from the client notify AVS of some occurrence such as a new speech request from the user.
Developers can use the AVS Device Software Development Kit (SDK) API and C++ software libraries to extend the functionality of their XMOS kit or XMOS custom design. The AVS Device SDK abstracts low-level operations such as audio input processing, communications, and AVS directive management through a series of individual C++ classes and objects that developers can use or extend for their custom applications (Figure 5).
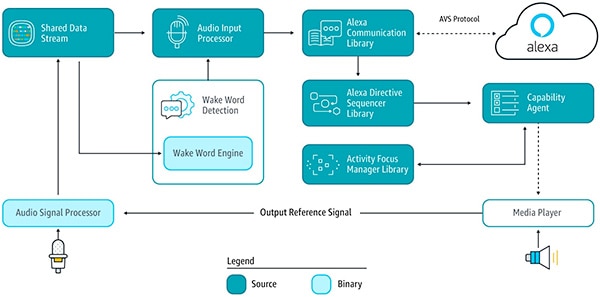
Figure 5: The Amazon AVS Device SDK organizes AVS’s broad capabilities into separate functional areas, each with their own interfaces and libraries. (Image source: AWS)
Included in the AVS Device SDK, a complete sample application illustrates key design patterns including creating a device client and wake-word interaction manager (Listing 1). Along with a full set of sample service routines, the application shows how the main program needs only to instantiate the sample application object sampleApplication and launch it with a simple command: sampleApplication->run().
Copy
    /*
     * Creating the DefaultClient - this component serves as an out-of-box default object that instantiates and "glues"
     * together all the modules.
     */
    std::shared_ptr<alexaClientSDK::defaultClient::DefaultClient> client =
        alexaClientSDK::defaultClient::DefaultClient::create(
            m_speakMediaPlayer,
            m_audioMediaPlayer,
            m_alertsMediaPlayer,
            speakSpeaker,
            audioSpeaker,
            alertsSpeaker,
            audioFactory,
            authDelegate,
            alertStorage,
            settingsStorage,
            {userInterfaceManager},
            {connectionObserver, userInterfaceManager});

 . . .

    // If wake word is enabled, then creating the interaction manager with a wake word audio provider.
    auto interactionManager = std::make_shared<alexaClientSDK::sampleApp::InteractionManager>(
        client,
        micWrapper,
        userInterfaceManager,
        holdToTalkAudioProvider,
        tapToTalkAudioProvider,
        wakeWordAudioProvider);

 . . .

    client->addAlexaDialogStateObserver(interactionManager);

    // Creating the input observer.
    m_userInputManager = alexaClientSDK::sampleApp::UserInputManager::create(interactionManager);

 . . .

void SampleApplication::run() {
    m_userInputManager->run();
}
Listing 1: Developers can extend their device AVS client using the AVS Device SDK C++ sample application, which demonstrates key design patterns for creating the AVS client, wake-word interaction manager, and user input manager, among others. (Listing source: AWS)
Google Assistant rapid prototype
While the XMOS kit speeds development of Amazon Alexa prototypes, the Seeed Technology Google AIY voice kit helps developers build prototypes using Google Assistant. As with the XMOS AVS kit, the Seeed Google AIY voice kit is designed to work with a Raspberry Pi 3 board for building prototypes, and provides the necessary components (Figure 6).
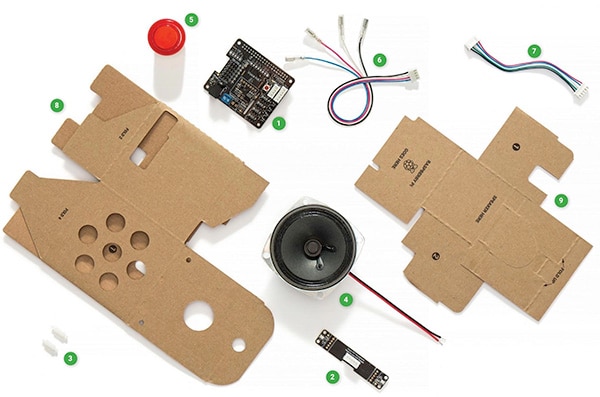
Figure 6: Developers can quickly create a Google Assistant application by combining a Raspberry Pi 3 with the Seeed Technology Google AIY voice kit, which provides the components required to build a prototype. (Image source: Google)
Along with the Seeed Voice HAT add-on board (1 in Figure 6), microphone board (2), and speaker (4), the kit includes a cardboard external housing (8) and internal frame (9) as well as basic components including standoffs (3), cables (6 and 7), and a push button (5).
Developers assemble the kit by first connecting the RPi 3, speaker wires, and microphone cable to the voice HAT. Unlike the AVS kit, the Google kit provides a simple enclosure and interior frame which holds the board assembly and speaker (Figure 7).
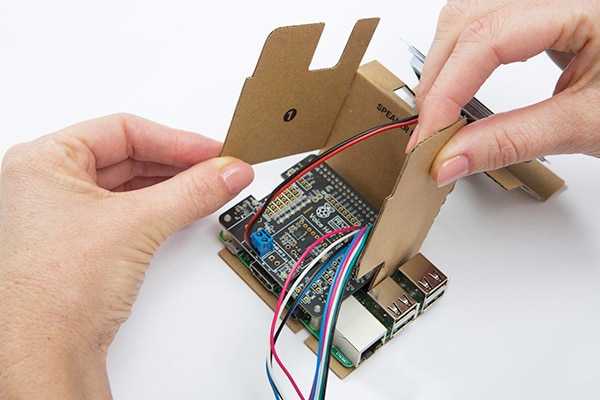
Figure 7: The Seeed Google AIY voice kit includes an interior cardboard frame, which developers fold into a carrier for the board assembly. (Image source: Seeed Technology)
The frame in turn fits inside the exterior enclosure which supports the button and microphone array, completing the assembly (Figure 8).

Figure 8: Besides holding the interior frame and speaker, the Seeed Google AIY voice kit’s exterior enclosure includes the push button and microphones (seen as two holes on the top of the enclosure). (Image source: Seeed Technology)
After downloading the voice kit image and loading it onto an SD card, bring up the kit simply by plugging the SD card into the RPi and powering up the board. After a short initialization process to confirm the operation of each component, developers need to activate the Google Cloud side of the service. To do this, set up a working sandbox area and enable the Google Assistant API, creating and downloading authentication credentials.
Finally, developers need to launch Google Assistant on their kit by opening a terminal console on the RPi 3 and executing a Python script, assistant_library_demo.py. At this point, developers can use the full range of Google Assistant capabilities with no further effort.
Custom Google Assistant devices
Custom development with the Seeed Google AIY voice kit takes full advantage of the Raspberry Pi’s flexibility. The Seeed Voice HAT brings out multiple RPi 3 GPIOs already configured for typical IO functions (Figure 9).
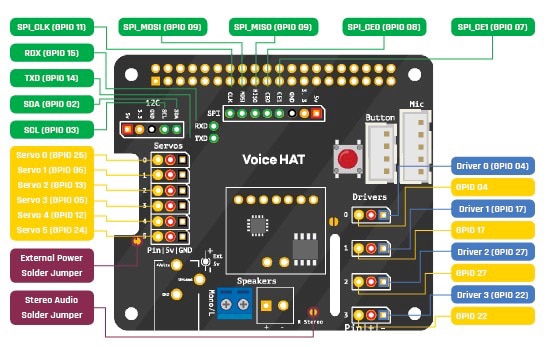
Figure 9: Developers can quickly extend the Seeed Google AIY voice kit’s hardware functionality using I/O ports brought out on the Seeed Voice HAT add-on board. (Image source: Raspberry Pi)
On the software side, developers can easily extend the kit’s baseline features using Google’s voice kit API software. Along with support software and utilities, this software package includes sample application software that demonstrates multiple approaches for implementing voice services through the Google Cloud Speech API and the Google Assistant SDK.
Distinctly different from a smart assistant approach, the Cloud Speech service provides speech recognition capabilities, leaving implementation of specific voice initiated operations to the programmer. Still, for designs that only require voice input features, this service provides a simple solution. Developers simply pass audio to the Cloud Speech service, which converts speech to text and returns the recognized text as demonstrated in a sample Python script included in the voice kit API (Listing 2).
Copy
 . . .

import aiy.audio
import aiy.cloudspeech
import aiy.voicehat


def main():
    recognizer = aiy.cloudspeech.get_recognizer()
    recognizer.expect_phrase('turn off the light')
    recognizer.expect_phrase('turn on the light')
    recognizer.expect_phrase('blink')

    button = aiy.voicehat.get_button()
    led = aiy.voicehat.get_led()
    aiy.audio.get_recorder().start()

    while True:
        print('Press the button and speak')
        button.wait_for_press()
        print('Listening...')
        text = recognizer.recognize()
        if not text:
            print('Sorry, I did not hear you.')
        else:
            print('You said "', text, '"')
            if 'turn on the light' in text:
                led.set_state(aiy.voicehat.LED.ON)
            elif 'turn off the light' in text:
                led.set_state(aiy.voicehat.LED.OFF)
            elif 'blink' in text:
                led.set_state(aiy.voicehat.LED.BLINK)
            elif 'goodbye' in text:
                break


if __name__ == '__main__':
    main()
Listing 2: Among software routines provided in the Google Voice Kit API, this snippet from a sample program demonstrates use of the Google Cloud Speech service to convert speech to text, leaving implementation of any voice directed actions to the programmer. (Listing source: Google)
For developers looking for the broader capabilities of Google Assistant, the Google Assistant SDK provides two implementation options: Google Assistant Library and Google Assistant Service.
The Python-based Google Assistant Library offers a drop-in approach for quickly implementing Google Assistant in prototypes such as the Seeed voice kit. With this approach, prototypes can immediately take advantage of basic Google Assistant services including audio capture, conversation management, and timers.
In contrast to the Cloud Speech approach, the Google Assistant Library manages conversations by processing each one as a series of events related to the state of the conversation and utterance. After speech recognition completes, an instantiated Assistant object provides event objects that include the appropriate result for processing. As demonstrated in another Google sample script, the developer uses a characteristic event processing design pattern and a series of if/else statements to handle the expected event results (Listing 3).
Copy
. . .

import aiy.assistant.auth_helpers
import aiy.audio
import aiy.voicehat
from google.assistant.library import Assistant
from google.assistant.library.event import EventType


def power_off_pi():
    aiy.audio.say('Good bye!')
    subprocess.call('sudo shutdown now', shell=True)


def reboot_pi():
    aiy.audio.say('See you in a bit!')
    subprocess.call('sudo reboot', shell=True)


def say_ip():
    ip_address = subprocess.check_output("hostname -I | cut -d' ' -f1", shell=True)
    aiy.audio.say('My IP address is %s' % ip_address.decode('utf-8'))


def process_event(assistant, event):
    status_ui = aiy.voicehat.get_status_ui()
    if event.type == EventType.ON_START_FINISHED:
        status_ui.status('ready')
        if sys.stdout.isatty():
            print('Say "OK, Google" then speak, or press Ctrl+C to quit...')

    elif event.type == EventType.ON_CONVERSATION_TURN_STARTED:
        status_ui.status('listening')

    elif event.type == EventType.ON_RECOGNIZING_SPEECH_FINISHED and event.args:
        print('You said:', event.args['text'])
        text = event.args['text'].lower()
        if text == 'power off':
            assistant.stop_conversation()
            power_off_pi()
        elif text == 'reboot':
            assistant.stop_conversation()
            reboot_pi()
        elif text == 'ip address':
            assistant.stop_conversation()
            say_ip()

    elif event.type == EventType.ON_END_OF_UTTERANCE:
        status_ui.status('thinking')

    elif event.type == EventType.ON_CONVERSATION_TURN_FINISHED:
        status_ui.status('ready')


def main():
    credentials = aiy.assistant.auth_helpers.get_assistant_credentials()
    with Assistant(credentials) as assistant:
        for event in assistant.start():
            process_event(assistant, event)


if __name__ == '__main__':
    main()
Listing 3: As shown in this sample from the Google voice kit distribution, the main loop in an application using Google Assistant Library starts an assistant object, which in turn generates a series of events for processing by the developer’s code. (Image source: Google)
For more demanding custom requirements, developers can turn to the comprehensive set of interfaces available through the Google Assistant Service (previously known as the Google Assistant gRPC API). Based on Google RPC (gRPC), the Google Assistant Service allows developers to stream audio queries to the cloud, process the recognized speech text, and handle the appropriate response. To implement custom capabilities, developers can access the Google Assistant Service API using various programming languages including C++, Node.js, and Java.
In using the Google Assistant SDK for their own designs, designers can implement hardware specific functionality using Google’s device matching capabilities. As part of the device setup, developers provide information about their custom device, including its functional capabilities and features, called traits. For a user voice request concerning the custom device, the service recognizes valid traits for the device and generates appropriate responses to the device (Figure 10). Developers simply need to include corresponding code associated with the device trait in the device’s event handlers (e.g., def power_off_pi() in Listing 3).

Figure 10: The Google Assistant SDK uses Automatic Speech Recognition (ASR) and Natural Language Processing (NLP) services to match a user request with a specific device and issues a response consistent with the custom device and its recognized traits. (Image source: Google)
Conclusion
Until recently, smart voice assistants have largely remained out of reach of mainstream developers. With the availability of two off-the-shelf kits, developers can rapidly implement Amazon Alexa and Google Assistant in custom designs. Each kit allows developers to rapidly bring up the corresponding smart assistant in a basic prototype, or extend the design with custom hardware and software.

Disclaimer: The opinions, beliefs, and viewpoints expressed by the various authors and/or forum participants on this website do not necessarily reflect the opinions, beliefs, and viewpoints of DigiKey or official policies of DigiKey.


