製造商零件編號 DFR0706-EN
UNIHIKER IOT PROGRAMMING SBC
DFRobot
License: Attribution Arduino ESP32 micro:bit
In the era of rapid technological advancement, artificial intelligence (AI) technology is becoming increasingly widespread across various fields. Among them, the field of computer vision, particularly real-time facial tracking systems, has attracted significant attention. However, traditional facial tracking systems are limited by hardware resources and algorithm accuracy, failing to meet the high demands of facial tracking. Therefore, this article will introduce a real-time facial tracking system based on UNIHIKER, micro:bit expansion board, and a camera. This system combines hardware control with software algorithms to achieve precise facial tracking.


HARDWARE LIST
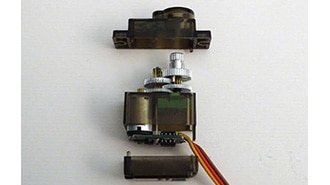
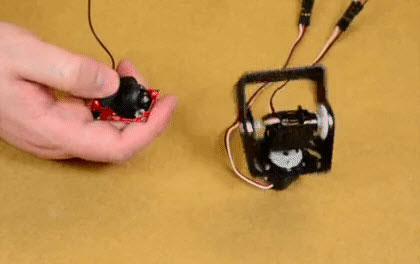
1 micro:Driver - Driver Expansion Board for micro:bit / UNIHIKER
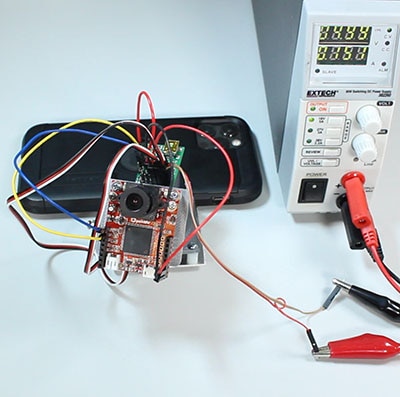
1 UNIHIKER - IoT Python Single Board Computer with Touchscreen
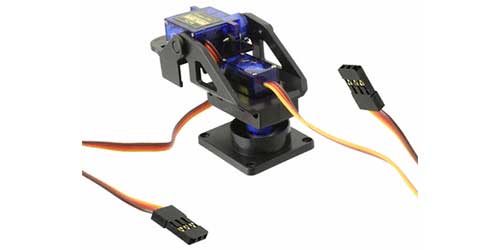
- Camera Gimbal Control: Utilizing the combination of UNIHIKER and micro:bit expansion board, the camera gimbal is driven by the servo pins on the expansion board, enabling precise control.
- Facial Recognition and Tracking: Utilizing the Mediapipe library for facial recognition, the system obtains the central coordinates of faces and optimizes the recognition results using filtering algorithms to reduce jitter.
- PID Algorithm for Servo Motor Control: The PID algorithm is employed to control servo motor movements, ensuring real-time facial tracking with stability and smoothness.
- Preparation of Servo Motor Control Files: Obtain the file named microbit_motor.py from the Pinpong library and upload it to UNIHIKER, ensuring it is in the same folder as the main file.

CODE
# -*- coding: utf-8 -*-

import time

from pinpong.board import Board

from microbit_motor import Microbit_Motor

Board("microbit").begin()

#Board("microbit","COM36").begin()

#Board("microbit","/dev/ttyACM0").begin()

#Board("microbit","/dev/cu.usbmodem14101").begin()

motorbit = Microbit_Motor()

while True:

   motorbit.servo(motorbit.S2, 0)

   time.sleep(1)

   motorbit.servo(motorbit.S2, 90)

   time.sleep(1)

   motorbit.servo(motorbit.S2, 180)

   time.sleep(1)

   motorbit.servo(motorbit.S2, 90)

   time.sleep(1)
- Installation of cvzone Library: Use Jupyter notebook on the UNIHIKER web interface or execute the command pip install cvzone in the terminal to install the cvzone library for full-screen camera operations.
CODE
import cvzone.FaceDetectionModule as face

import cv2

import numpy as np

import time

def main():

    cap = cv2.VideoCapture(0)

    cap.set(cv2.CAP_PROP_FRAME_WIDTH, 320)

    cap.set(cv2.CAP_PROP_FRAME_HEIGHT, 240)

    cap.set(cv2.CAP_PROP_BUFFERSIZE, 1)

    cv2.namedWindow('camera',cv2.WND_PROP_FULLSCREEN)

    cv2.setWindowProperty('camera', cv2.WND_PROP_FULLSCREEN, cv2.WINDOW_FULLSCREEN)

    detector = face.FaceDetector()

# For a 640x480 image center target is 320 and 240

while True:

        success, img = cap.read()

        img, bboxs = detector.findFaces(img)

if bboxs:

            x, y, w, h = bboxs[0]["bbox"]

            cx, cy = bboxs[0]["center"]

            xVal=cx

            yVal=cy

            cv2.putText(img, f'x:{xVal} , y:{yVal} ', (x, y - 100), cv2.FONT_HERSHEY_PLAIN, 3,

                        (255, 0, 0), 3)

        output_image = cv2.rotate(img, cv2.ROTATE_90_COUNTERCLOCKWISE)

        cv2.imshow("camera", output_image)

        cv2.waitKey(1)

if __name__ == "__main__":

    main()

- Facial Center Data Filtering: Apply the recursive averaging filtering method to the obtained facial center coordinates to reduce data jitter.


Method:

Treat the continuous acquisition of N samples as a queue, following the first-in-first-out principle.

The queue length is fixed at N, with each new data entering the queue's tail while the oldest data is removed from the queue's head.

Perform arithmetic averaging on the N data in the queue to obtain new filtered results.

Choose an appropriate N value based on different application scenarios, such as N=12 for flow rate, N=4 for pressure, N=4~12 for liquid level, and N=1~4 for temperature.


Advantages:

Effective suppression of periodic interference, maintaining smoothness.

Suitable for systems with high-frequency oscillations, exhibiting strong stability.


Disadvantages:

Lower sensitivity, potentially resulting in poor suppression of occasional pulse interference.

Difficult to eliminate sample value bias caused by pulse interference.

Inappropriate for scenarios with severe pulse interference.

Larger N values may lead to RAM resource waste.

CODE


import cvzone.FaceDetectionModule as face

import cv2

import numpy as np

import time

def main():

    cap = cv2.VideoCapture(0)

#cap.set(cv2.CAP_PROP_FRAME_WIDTH, 320)

#cap.set(cv2.CAP_PROP_FRAME_HEIGHT, 240)

#cap.set(cv2.CAP_PROP_BUFFERSIZE, 1)

#cv2.namedWindow('camera',cv2.WND_PROP_FULLSCREEN)

#cv2.setWindowProperty('camera', cv2.WND_PROP_FULLSCREEN, cv2.WINDOW_FULLSCREEN)

    detector = face.FaceDetector()

    s=[0,0,0,0,0,0,0,0,0,0,0,0]

while True:

        PTime = time.time()

        success, img = cap.read()

        img, bboxs = detector.findFaces(img)

if bboxs:

            x, y, w, h = bboxs[0]["bbox"]

            cx, cy = bboxs[0]["center"]

            xVal=cx

            yVal=cy

            cv2.putText(img, f'x:{xVal} , y:{yVal} ', (x, y - 100), cv2.FONT_HERSHEY_PLAIN, 3,

                        (255, 0, 0), 3)

#output_image = cv2.rotate(img, cv2.ROTATE_90_COUNTERCLOCKWISE)

            s.pop(0)

            s.append(cx)

            mean=int(np.mean(s))

            cv2.putText(img, f'x:{mean} , y:{yVal} ', (x, y - 50), cv2.FONT_HERSHEY_PLAIN, 3,

                        (255, 0, 0), 3)

        fps = 1 / (time.time() - PTime)

        cv2.putText(img, f'FPS: {int(fps)}', (20,50), cv2.FONT_HERSHEY_PLAIN,

3, (255, 255, 0), 3)

        cv2.imshow("camera", img)

        cv2.waitKey(1)

if __name__ == "__main__":

    main()
- PID Servo Motor Control: Implementing the PID algorithm to control horizontal servo motors for horizontal facial tracking, ensuring stable and responsive movements.
CODE
import cvzone.FaceDetectionModule as face

import cv2

import numpy as np

import time

from pinpong.board import Board

from microbit_motor import Microbit_Motor

Board("microbit").begin()

motorbit = Microbit_Motor()

targetVal=0

pError=0

pTime=0

pidVals=[0.03,0,0.01]

I=0

jd_x=90

def pid(cVal):

global I,pidVals,pTime,pError,targetVal

# Current Value - Target Value

        t = time.time() - pTime

        error = cVal - targetVal

        P = pidVals[0] * error

        I = I + (pidVals[1] * error * t)

        D = (pidVals[2] * (error - pError)) / t

        result = P + I + D

        pError = error

        ptime = time.time()

return result

def main():

global ptime,jd_x

    cap = cv2.VideoCapture(0)

    cap.set(cv2.CAP_PROP_FRAME_WIDTH, 320)

    cap.set(cv2.CAP_PROP_FRAME_HEIGHT, 240)

    cap.set(cv2.CAP_PROP_BUFFERSIZE, 1)

    cv2.namedWindow('camera',cv2.WND_PROP_FULLSCREEN)

    cv2.setWindowProperty('camera', cv2.WND_PROP_FULLSCREEN, cv2.WINDOW_FULLSCREEN)

    detector = face.FaceDetector()

    s=[0,0,0,0,0,0]

    ptime = time.time()

    motorbit.servo(motorbit.S2,jd_x)

    pre_jd_x=0

while True:

        PTime = time.time()

        success, img = cap.read()

        img, bboxs = detector.findFaces(img)

if bboxs:

            x, y, w, h = bboxs[0]["bbox"]

            cx, cy = bboxs[0]["center"]

            xVal=cx

            yVal=cy

            cv2.putText(img, f'x:{xVal} , y:{yVal} ', (x, y - 100), cv2.FONT_HERSHEY_PLAIN, 3,

                        (255, 0, 0), 3)

            s.pop(0)

            s.append(cx)

            mean=int(np.mean(s))

            jd_x=jd_x+int(pid(160-mean))

if jd_x<1:

                jd_x=1

if jd_x>179:

                jd_x=179

            print(jd_x)

if pre_jd_x !=jd_x:

              pre_jd_x =jd_x

              motorbit.servo(motorbit.S2,jd_x)

            cv2.putText(img, f'x:{mean} , y:{yVal} ', (x, y - 50), cv2.FONT_HERSHEY_PLAIN, 3,

                        (255, 0, 0), 3)

        fps = 1 / (time.time() - PTime)

        cv2.putText(img, f'FPS: {int(fps)}', (20,50), cv2.FONT_HERSHEY_PLAIN,

3, (255, 255, 0), 3)

        output_image = cv2.rotate(img, cv2.ROTATE_90_COUNTERCLOCKWISE)

        cv2.imshow("camera", output_image)

        cv2.waitKey(1)

if __name__ == "__main__":

    main()
- Horizontal and Vertical Servo Motor Control: System expansion can further enable tracking in both horizontal and vertical directions, enhancing flexibility and applicability.
Control the horizontal using the PID class
CODE
import cvzone.FaceDetectionModule as face

import cv2

import numpy as np

import time

from pinpong.board import Board

from microbit_motor import Microbit_Motor

Board("microbit").begin()

motorbit = Microbit_Motor()

targetVal=0

pError=0

pTime=0

pidVals=[0.03,0,0.01]

I=0

jd_x=90

class PID:

def __init__(self, pidVals, targetVal,  limit=None):

        self.pidVals = pidVals

        self.targetVal = targetVal

        self.pError = 0

        self.limit = limit

        self.I = 0

        self.pTime = 0

def update(self,cVal):

# Current Value - Target Value

        t = time.time() - self.pTime

        error = cVal - self.targetVal

        P = self.pidVals[0] * error

        self.I = self.I + (self.pidVals[1] * error * t)

        D = (self.pidVals[2] * (error - self.pError)) / t

        result = P + self.I + D

if self.limit is not None:

            result = float(np.clip(result, self.limit[0], self.limit[1]))

        self.pError = error

        self.ptime = time.time()

return result

def main():

    cap = cv2.VideoCapture(0)

    cap.set(cv2.CAP_PROP_FRAME_WIDTH, 320)

    cap.set(cv2.CAP_PROP_FRAME_HEIGHT, 240)

    cap.set(cv2.CAP_PROP_BUFFERSIZE, 1)

    cv2.namedWindow('camera',cv2.WND_PROP_FULLSCREEN)

    cv2.setWindowProperty('camera', cv2.WND_PROP_FULLSCREEN, cv2.WINDOW_FULLSCREEN)

    detector = face.FaceDetector()

    s_x=[0,0,0,0,0,0]

    jd_x=90

    pre_jd_x=0

    motorbit.servo(motorbit.S2,jd_x)

    xPID = PID([0.03, 0.000000000001, 0.01], 320 // 2,  limit=[-90, 90])

while True:

        PTime = time.time()

        success, img = cap.read()

        img, bboxs = detector.findFaces(img)

if bboxs:

            x, y, w, h = bboxs[0]["bbox"]

            cx, cy = bboxs[0]["center"]

            xVal=cx

            yVal=cy

            cv2.putText(img, f'x:{xVal} , y:{yVal} ', (x, y - 100), cv2.FONT_HERSHEY_PLAIN, 3,

                        (255, 0, 0), 3)

            s_x.pop(0)

            s_x.append(cx)

            mean_x=int(np.mean(s_x))

            xVal= int(xPID.update(mean_x))

            jd_x=jd_x-xVal

            print(jd_x)

if pre_jd_x !=jd_x:

              pre_jd_x =jd_x

              motorbit.servo(motorbit.S2,jd_x)

            cv2.putText(img, f'x:{mean_x} , y:{yVal} ', (x, y - 50), cv2.FONT_HERSHEY_PLAIN, 3,

                        (255, 0, 0), 3)

        fps = 1 / (time.time() - PTime)

        cv2.putText(img, f'FPS: {int(fps)}', (20,50), cv2.FONT_HERSHEY_PLAIN,

3, (255, 255, 0), 3)

        output_image = cv2.rotate(img, cv2.ROTATE_90_COUNTERCLOCKWISE)

        cv2.imshow("camera", output_image)

        cv2.waitKey(1)

if __name__ == "__main__":

    main()
- Control the horizontal and vertical servos
CODE
import cvzone.FaceDetectionModule as face

import cv2

import numpy as np

import time

from pinpong.board import Board

from microbit_motor import Microbit_Motor

Board("microbit").begin()

motorbit = Microbit_Motor()

targetVal=0

pError=0

pTime=0

pidVals=[0.03,0,0.01]

I=0

jd_x=90

class PID:

def __init__(self, pidVals, targetVal,  limit=None):

        self.pidVals = pidVals

        self.targetVal = targetVal

        self.pError = 0

        self.limit = limit

        self.I = 0

        self.pTime = 0

def update(self,cVal):

# Current Value - Target Value

        t = time.time() - self.pTime

        error = cVal - self.targetVal

        P = self.pidVals[0] * error

        self.I = self.I + (self.pidVals[1] * error * t)

        D = (self.pidVals[2] * (error - self.pError)) / t

        result = P + I + D

if self.limit is not None:

            result = float(np.clip(result, self.limit[0], self.limit[1]))

        self.pError = error

        self.ptime = time.time()

return result

def main():

    cap = cv2.VideoCapture(0)

    cap.set(cv2.CAP_PROP_FRAME_WIDTH, 320)

    cap.set(cv2.CAP_PROP_FRAME_HEIGHT, 240)

    cap.set(cv2.CAP_PROP_BUFFERSIZE, 1)

    cv2.namedWindow('camera',cv2.WND_PROP_FULLSCREEN)

    cv2.setWindowProperty('camera', cv2.WND_PROP_FULLSCREEN, cv2.WINDOW_FULLSCREEN)

    detector = face.FaceDetector()

    s_x=[0,0,0,0,0,0]

    s_y=[0,0,0,0,0,0]

    jd_x=90

    jd_y=135

    pre_jd_y=0

    motorbit.servo(motorbit.S1,jd_y)

    xPID = PID([0.03, 0.000000000001, 0.01], 320 // 2,  limit=[-90, 90])

    yPID = PID([0.03, 0.000000000001, 0.01], 240 // 2,  limit=[-45, 45])

while True:

        PTime = time.time()

        success, img = cap.read()

        img, bboxs = detector.findFaces(img)

if bboxs:

            x, y, w, h = bboxs[0]["bbox"]

            cx, cy = bboxs[0]["center"]

            xVal=cx

            yVal=cy

            cv2.putText(img, f'x:{xVal} , y:{yVal} ', (x, y - 100), cv2.FONT_HERSHEY_PLAIN, 3,

                        (255, 0, 0), 3)

            s_x.pop(0)

            s_y.pop(0)

            s_x.append(cx)

            s_y.append(cy)

            mean_x=int(np.mean(s_x))

            mean_y=int(np.mean(s_y))

            xVal= int(xPID.update(mean_x))

            yVal= int(yPID.update(mean_y))

            jd_x=jd_x-xVal

            jd_y=jd_y-yVal

            print(jd_x,jd_y)

if pre_jd_x !=jd_x:

              pre_jd_x =jd_x

              motorbit.servo(motorbit.S2,jd_x)

if pre_jd_y !=jd_y:

              pre_jd_y =jd_y

              motorbit.servo(motorbit.S1,jd_y)

            cv2.putText(img, f'x:{mean_x} , y:{mean_y} ', (x, y - 50), cv2.FONT_HERSHEY_PLAIN, 3,

                        (255, 0, 0), 3)

        fps = 1 / (time.time() - PTime)

        cv2.putText(img, f'FPS: {int(fps)}', (20,50), cv2.FONT_HERSHEY_PLAIN,

3, (255, 255, 0), 3)

        output_image = cv2.rotate(img, cv2.ROTATE_90_COUNTERCLOCKWISE)

        cv2.imshow("camera", output_image)

        cv2.waitKey(1)

if __name__ == "__main__":

main()Through the introduction and guide in this article, we can understand how to build a real-time facial tracking system using UNIHIKER, micro:bit expansion board, and a camera, and grasp relevant control methods and algorithm principles. This system can be applied not only in laboratories and educational settings but also provides valuable references and insights for a wider range of artificial intelligence applications.