製造商零件編號 DFR0706-EN
UNIHIKER IOT PROGRAMMING SBC
DFRobot
License: Attribution Arduino ESP32
For various reasons, it may be necessary to modify the background of a video, such as when there are distractions or the background color isn't suitable for the subject. Therefore, we employ real-time background replacement techniques to substitute the background and add the desired content. This project will utilize the UNIHIKER IoT Python Single Board Computer (SBC), along with the MediaPipe and OpenCV libraries, to achieve dynamic modification of video backgrounds. We will explore popular background removal techniques such as image clipping paths, image clipping, image masking, and background erasure to address various challenges. Testing will be conducted using the A and B keys on the UNIHIKER board to assess different background replacement effects. Additionally, multiple background images will be prepared for seamless background switching.

Popular background removal techniques include:
- Image clipping paths: Used when the subject in the image has sharp edges. Elements outside the path will be eliminated.
- Image clipping: Clip the desired area or subject from the frame and remove the background.
- Image masking: If the image has folds or fine edges, image masking techniques can be used.
- Background erasure: Use various tools to erase the background of the image.
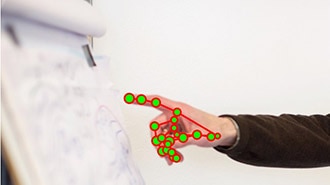
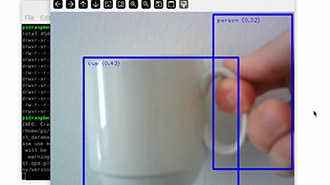
Many well-known applications utilize background removal techniques and replace them with custom backgrounds. Here, we'll implement something similar using OpenCV and MediaPipe. The MediaPipe library enables us to easily perform tasks like face detection, hand tracking, pose estimation, as well as image processing and other AI functionalities.
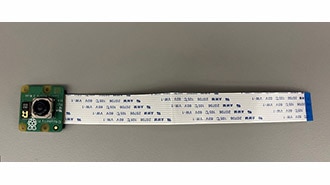
HARDWARE LIST
1UNIHIKER - IoT Python Single Board Computer with Touchscreen
1/Install the MediaPipe library along with the OpenCV library

CODE
import cv2

import mediapipe as mp

import numpy as np

mp_drawing = mp.solutions.drawing_utils

mp_selfie_segmentation = mp.solutions.selfie_segmentation

# For webcam input:

BG_COLOR = (192, 192, 192) # gray

cap = cv2.VideoCapture(0)

cap.set(cv2.CAP_PROP_FRAME_WIDTH, 320)

cap.set(cv2.CAP_PROP_FRAME_HEIGHT, 240)

cap.set(cv2.CAP_PROP_BUFFERSIZE, 1)

cv2.namedWindow('MediaPipe Selfie Segmentation',cv2.WND_PROP_FULLSCREEN)    #Set the windows to be full screen.

cv2.setWindowProperty('MediaPipe Selfie Segmentation', cv2.WND_PROP_FULLSCREEN, cv2.WINDOW_FULLSCREEN)    #Set the windows to be full screen.

with mp_selfie_segmentation.SelfieSegmentation(

    model_selection=1) as selfie_segmentation:

  bg_image = cv2.imread("back.png")

while cap.isOpened():

    success, image = cap.read()

if not success:

      print("Ignoring empty camera frame.")

# If loading a video, use 'break' instead of 'continue'.

continue

# Flip the image horizontally for a later selfie-view display, and convert

# the BGR image to RGB.

    image = cv2.cvtColor(cv2.flip(image, 1), cv2.COLOR_BGR2RGB)

# To improve performance, optionally mark the image as not writeable to

# pass by reference.

    image.flags.writeable = False

    results = selfie_segmentation.process(image)

    image.flags.writeable = True

    image = cv2.cvtColor(image, cv2.COLOR_RGB2BGR)

# Draw selfie segmentation on the background image.

# To improve segmentation around boundaries, consider applying a joint

# bilateral filter to "results.segmentation_mask" with "image".

    condition = np.stack(

      (results.segmentation_mask,) * 3, axis=-1) > 0.1

# The background can be customized.

#   a) Load an image (with the same width and height of the input image) to

#      be the background, e.g., bg_image = cv2.imread('/path/to/image/file')

#   b) Blur the input image by applying image filtering, e.g.,

#      bg_image = cv2.GaussianBlur(image,(55,55),0)

if bg_image is None:

      bg_image = np.zeros(image.shape, dtype=np.uint8)

      bg_image[:] = BG_COLOR

    output_image = np.where(condition, image, bg_image)

    output_image = cv2.rotate(output_image, cv2.ROTATE_90_COUNTERCLOCKWISE)

    cv2.imshow('MediaPipe Selfie Segmentation', output_image)

if cv2.waitKey(5) & 0xFF == 27:

break

cap.release()
CODE
from pinpong.extension.unihiker import *

from pinpong.board import Board,Pin

Board().begin()

while True:

if (button_a.is_pressed()==True):

    buzzer.play(buzzer.DADADADUM,buzzer.Once)

if (button_b.is_pressed()==True):

buzzer.play(buzzer.ENTERTAINER,buzzer.Once)Create a folder named 'BackgroundImages' within the project directory. You can download any number of images and place them in this directory.

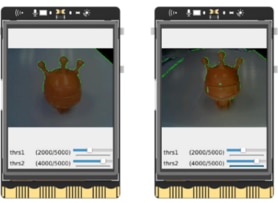
Here, we'll obtain the output of the background replacement image or frame. Then, using a simple “if” statement, we'll assign keys to change the background.
For example, if we have 5 background images, according to the code above, we can use the keys "A" or "B" to change the background of the frame.
CODE
import cv2

import mediapipe as mp

import numpy as np

import os

from pinpong.extension.unihiker import *

from pinpong.board import Board,Pin

Board().begin()

mp_drawing = mp.solutions.drawing_utils

mp_selfie_segmentation = mp.solutions.selfie_segmentation

# For webcam input:

BG_COLOR = (192, 192, 192) # gray

cap = cv2.VideoCapture(0)

cap.set(cv2.CAP_PROP_FRAME_WIDTH, 320)

cap.set(cv2.CAP_PROP_FRAME_HEIGHT, 240)

cap.set(cv2.CAP_PROP_BUFFERSIZE, 1)

cv2.namedWindow('MediaPipe Selfie Segmentation',cv2.WND_PROP_FULLSCREEN)    #Set the windows to be full screen.

cv2.setWindowProperty('MediaPipe Selfie Segmentation', cv2.WND_PROP_FULLSCREEN, cv2.WINDOW_FULLSCREEN)    #Set the windows to be full screen.

listImg = os.listdir("./BackgroundImages")

imgList = []

for imgPath in listImg:

    img = cv2.imread(f'BackgroundImages/{imgPath}')

    imgList.append(img)

indexImg = 0

with mp_selfie_segmentation.SelfieSegmentation(

    model_selection=1) as selfie_segmentation:

while cap.isOpened():

    success, image = cap.read()

if not success:

      print("Ignoring empty camera frame.")

# If loading a video, use 'break' instead of 'continue'.

continue

# Flip the image horizontally for a later selfie-view display, and convert

# the BGR image to RGB.

    image = cv2.cvtColor(cv2.flip(image, 1), cv2.COLOR_BGR2RGB)

# To improve performance, optionally mark the image as not writeable to

# pass by reference.

    image.flags.writeable = False

    results = selfie_segmentation.process(image)

    image.flags.writeable = True

    image = cv2.cvtColor(image, cv2.COLOR_RGB2BGR)

# Draw selfie segmentation on the background image.

# To improve segmentation around boundaries, consider applying a joint

# bilateral filter to "results.segmentation_mask" with "image".

    condition = np.stack(

      (results.segmentation_mask,) * 3, axis=-1) > 0.1

# The background can be customized.

#   a) Load an image (with the same width and height of the input image) to

#      be the background, e.g., bg_image = cv2.imread('/path/to/image/file')

#   b) Blur the input image by applying image filtering, e.g.,

#      bg_image = cv2.GaussianBlur(image,(55,55),0)

if (button_a.is_pressed()==True):

if indexImg>0:

            indexImg -=1

if (button_b.is_pressed()==True):

if indexImg<len(imgList)-1:

            indexImg +=1

    output_image = np.where(condition, image, imgList[indexImg])

    output_image = cv2.rotate(output_image, cv2.ROTATE_90_COUNTERCLOCKWISE)

    cv2.imshow('MediaPipe Selfie Segmentation', output_image)

if cv2.waitKey(5) & 0xFF == 27:

break

cap.release()In this article, we introduced a project that utilizes the UNIHIKER, along with the MediaPipe and OpenCV libraries, to achieve dynamic modification of video backgrounds. Through this project, we not only learned how to utilize existing technologies to implement real-time background replacement but also gained the ability to apply it to various real-world scenarios, thereby enhancing our skills in video editing and processing.