製造商零件編號 5723
ADAFRUIT FEATHER RP2040 WITH USB
Adafruit Industries LLC
License: See Original Project 3D Printing Adafruit Feather
Courtesy of Adafruit
Guide by Ruiz Brothers and Liz Clark
Overview
Build a "Not A Typewriter" with I2C Solenoid Driver and Adafruit Feather RP2040 running CircuitPython code. This device is designed to give your modern computer keyboard the essence of a vintage typewriter.
The 3D printed case is designed to look like a classic typewriter and features a real service bell. It has two mini solenoids, one to emulate the loud clack of the typebars, and the other to triumphantly announce the ding of the carriage return.
Inspiration
This project was inspired by Tetora Tech Lab's Fake Typewriter project we saw posted on x.com. Their project is open source and available on GitHub.
Two Flavors of Typewriter
There are two methods that you can choose from to bring your modern typing back to the age of Mad Men.
Bring Your Own Keyboard
You can plug a USB keyboard into the USB host Feather and plug the Feather into your computer. The Feather hosts the keyboard and sends its keystrokes to your computer. And of course, the solenoids trigger depending on the keys that are pressed.
Computer Accessory
But what if you're on a laptop, writing the next great American novel in the spirit of Jack Kerouac or pushing the boundaries of gonzo journalism like Hunter S. Thompson? You can run a CPython script on your computer that sends your keystrokes to the Feather over serial. The Feather runs CircuitPython code that listens for the incoming keystrokes and triggers the solenoids.
Parts from Adafruit
1 x Red Wire
1 x Black Wire
Parts from Amazon
1 x Small Bell
2 PCS 2.56 Inch Service Bell
Hardware
M2 size screw tap
4x M2 x 6mm long screws
6x M2.5 x 6mm long machine screws
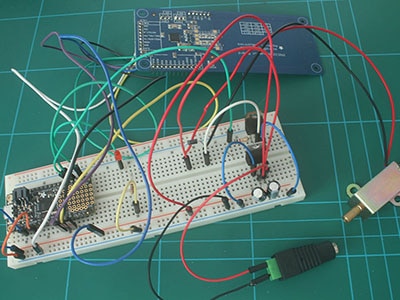
Circuit Diagram
The diagram below provides a general visual reference for wiring of the components once you get to the Assembly page. This diagram was created using the software package Fritzing.
Adafruit Library for Fritzing
Adafruit uses the Adafruit Fritzing parts library to create circuit diagrams for projects. You can download the library or just grab individual parts. Get the library and parts from GitHub - Adafruit Fritzing Parts.
Wired Connections
Solenoid A ground wire to 0 pin on Solenoid Driver
Solenoid A voltage wire to + pin on Solenoid Driver
Solenoid B ground wire to 1 pin on Solenoid Driver
Solenoid B voltage wire to + pin on Solenoid Driver
STEMMA QT on Solenoid Driver to Feather RP2040 USB Host STEMMA QT port
The Feather RP2040 USB Host is powered via USB.
CAD Files
CAD Assembly
The main assembly is available in Fusion 360 and STEP file formats. This includes all of the 3D printed parts and electronic components used in the project. Use the main assembly to create any edits, updates, or modifications.
3D Printed Parts
Individual 3MF files for 3D printing are oriented and ready to print on FDM machines using PLA filament. Original design source may be downloaded using the links below.
Design Source Files
The project assembly was designed in Fusion 360. Once opened in Fusion 360, It can be exported in different formats like STEP, STL and more.
Electronic components like Adafruit's boards, displays, connectors and more can be downloaded from the Adafruit CAD parts GitHub Repo.
Wiring
All Parts
Gather up the parts needed for this build.
Feather RP2040 USB Host
8 Channel I2C Solenoid Driver
2x 5V mini solenoids
2x JST-PH 2-pin cables
STEMMA QT cable - 50mm long
2x short (2") stranded hook-up wires
Wires for Feather
Use the red and black colored spool of wires to create two wires that are approximately 2 inches (50mm) long.
Solder the black wire to the ground pin on the Feather and the red wire to the USB pin.
Cables for Driver
Cut the wires from the JST-PH cables so they're approximately 2.5 inches long (64mm). Use wire strippers to remove a bit of insulation from the tips of each wire.
Insert the black wire from the first JST cable to pin 0 and red wire to + positive pin.
Insert the black wire from the second JST cable to pin 1 and red wire on + positive pin.
Use a small flat head screwdriver to secure the wires to the screw-block terminals.
Connect Feather to Solenoid Driver
Insert the red wire from the USB pin on the Feather to the positive terminal on the solenoid driver's power screw block.
Insert the black wire from the GND pin on the Feather to the negative terminal on the solenoid driver's ground screw block.
Use a small flat head screwdriver to secure the wires to the screw-block terminals.
Connect STEMMA QT
Plug in the STEMMA QT cable to the STEMMA QT connector on the solenoid driver.
Plug in the other end of the STEMMA QT cable to the STEMMA QT connector on the Feather RP2040 USB Host.
Assembly
Bell Disassembly
Start by pulling out the actuator from the tip of the bell.
Then, pull out the collar from the bell.
Lastly, pull out the base from the bell.
Set the plastic parts aside, they won't be used in this project.
Secure PCBs
Gather up the hardware screws needed to secure the two PCBs to the 3D printed bottom cover.
Place the Feather over the standoffs with the USB A port fitted over the tab. Insert and fasten M2.5 x 6mm long screws to secure the PCB.
Place the solenoid driver over the remaining standoffs with the orientation matching the assembly photo. Insert and fasten M2.5 x 6mm long screws to secure the PCB.
PCBs Secured
Double check the PCBs are fully secured to the 3D printed bottom cover in the correct orientation.
Top Cover Solenoid Mounting Plate
Gather up the 3D printed top cover and bell mounting plate.
Orient the two parts together so the mounting holes are lined up.
Join the two parts together using two M2.5 x 6mm long machine screws.
Assembled Top Cover
Take a moment to ensure the top cover and bell mounting plate are secured correctly.
Screw Tap Solenoids
Use a M2 size screw tap to create threads in the mounting holes on the two solenoids.
Be careful not to screw too far in and damage the wire core.
Secure Solenoid Bell Ringer
Fit the JST-PH connector from one of the solenoids through the square hole on the top cover assembly.
Orient the mounting holes on the solenoid with the holes on the 3D printed mounting plate.
Insert and fasten two M2 x 6mm long machine screws to secure the solenoid.
Test Solenoid
Ensure the solenoid is secured and mounted to the 3D printed part correctly. Push on the plunger to ensure its pushing in the correct orientation.
Secure Typing Solenoid
Gather up the 3D printed case, M2 screws, and solenoid.
Place the solenoid inside the 3D printed case with the mounting holes lined up.
Insert and fasten two M2 x 6mm long machine screws to secure the solenoid.
Snap Bottom Cover
Get the bottom cover and the case ready to join together.
Orient the bottom cover with the case so the USB A port from the Feather is lined up with the USB cutout on the case.
Firmly press the two parts to snap fit them together.
Ensure the wires are not pinched or kinked.
Connect Cables
Grab the JST cable from the solenoid inside the case and connect it to the JST cable that is connected to the 0 pin on the solenoid driver.
Connect the remaining JST cable to the solenoid that is secured to the top cover mounting plate.
Snap Top
Orient the top cover with the case so it matches the assembly photo. Firmly press the top onto the case so the two-parts snap fit together.
Ensure none of the wires are pinched or kinked.
Install Bell
Place the bell over the post on the top cover.
Press the 3D printed top pin into the post until its fully seated.
Install Keys
Press the 3D printed faux keyboard onto the cavity on the case. Firmly press the edges into the cavity so it snap fits.
Assembled Case
Take a moment to ensure the case has been assembled correctly.
Connect USB Keyboard
Plug in the USB cable from the keyboard to the USB A port on the Feather RP2040.
Plug in the USB-C cable to the USB-C port on the Feather. Then, plug it into your computer or mobile device.
Install CircuitPython
CircuitPython is a derivative of MicroPython designed to simplify experimentation and education on low-cost microcontrollers. It makes it easier than ever to get prototyping by requiring no upfront desktop software downloads. Simply copy and edit files on the CIRCUITPY drive to iterate.
CircuitPython Quickstart
Follow this step-by-step to quickly get CircuitPython running on your board.
Download the latest version of CircuitPython for this board via circuitpython.org
Click the link above to download the latest CircuitPython UF2 file.
Save it wherever is convenient for you.
To enter the bootloader, hold down the BOOT/BOOTSEL button (highlighted in red above), and while continuing to hold it (don't let go!), press and release the reset button (highlighted in red or blue above). Continue to hold the BOOT/BOOTSEL button until the RPI-RP2 drive appears!
If the drive does not appear, release all the buttons, and then repeat the process above.
You can also start with your board unplugged from USB, press and hold the BOOTSEL button (highlighted in red above), continue to hold it while plugging it into USB, and wait for the drive to appear before releasing the button.
A lot of people end up using charge-only USB cables and it is very frustrating! Make sure you have a USB cable you know is good for data sync.
You will see a new disk drive appear called RPI-RP2.
Drag the adafruit_circuitpython_etc.uf2 file to RPI-RP2.
The RPI-RP2 drive will disappear, and a new disk drive called CIRCUITPY will appear.
That's it, you're done! :)
Safe Mode
You want to edit your code.py or modify the files on your CIRCUITPY drive but find that you can't. Perhaps your board has gotten into a state where CIRCUITPY is read-only. You may have turned off the CIRCUITPY drive altogether. Whatever the reason, safe mode can help.
Safe mode in CircuitPython does not run any user code on startup and disables auto-reload. This means a few things. First, safe mode bypasses any code in boot.py (where you can set CIRCUITPY read-only or turn it off completely). Second, it does not run the code in code.py. And finally, it does not automatically soft-reload when data is written to the CIRCUITPY drive.
Therefore, whatever you may have done to put your board in a non-interactive state, safe mode gives you the opportunity to correct it without losing all of the data on the CIRCUITPY drive.
Entering Safe Mode
To enter safe mode when using CircuitPython, plug in your board or hit reset (highlighted in red above). Immediately after the board starts up or resets, it waits 1000ms. On some boards, the onboard status LED (highlighted in green above) will blink yellow during that time. If you press reset during that 1000ms, the board will start up in safe mode. It can be difficult to react to the yellow LED, so you may want to think of it simply as a slow double click of the reset button. (Remember, a fast double click of reset enters the bootloader.)
In Safe Mode
If you successfully enter safe mode on CircuitPython, the LED will intermittently blink yellow three times.
If you connect to the serial console, you'll find the following message.
Auto-reload is off.
Running in safe mode! Not running saved code.

CircuitPython is in safe mode because you pressed the reset button during boot. Press again to exit safe mode.

Press any key to enter the REPL. Use CTRL-D to reload.
You can now edit the contents of the CIRCUITPY drive. Remember, your code will not run until you press the reset button, or unplug and plug in your board, to get out of safe mode.
Flash Resetting UF2
If your board ever gets into a really weird state and CIRCUITPY doesn't show up as a disk drive after installing CircuitPython, try loading this 'nuke' UF2 to RPI-RP2. which will do a 'deep clean' on your Flash Memory. You will lose all the files on the board, but at least you'll be able to revive it! After loading this UF2, follow the steps above to re-install CircuitPython.
Download flash erasing "nuke" UF2
Use the USB Host Code
This version of the code lets you plug a USB keyboard into the USB-A port on the Feather RP2040 USB Host. The Feather hosts the keyboard and sends its keystrokes over USB to your computer. The solenoids are triggered whenever you type on the attached keyboard.
There are two code options for this project. This page goes overusing the Not A Typewriter as a USB Host.
Once you've finished setting up your Feather RP2040 USB Host with CircuitPython, you can access the code and necessary libraries by downloading the Project Bundle.
To do this, click on the Download Project Bundle button in the window below. It will download to your computer as a zipped folder.
# SPDX-FileCopyrightText: 2025 Liz Clark for Adafruit Industries
#
# SPDX-License-Identifier: MIT

import array
import time
import board
from adafruit_mcp230xx.mcp23017 import MCP23017

import usb
import adafruit_usb_host_descriptors
import usb_hid
from adafruit_hid.keyboard import Keyboard
from adafruit_hid.keycode import Keycode

# Typewriter configuration
KEYSTROKE_BELL_INTERVAL = 25  # Ring bell every 25 keystrokes
SOLENOID_STRIKE_TIME = 0.03   # Duration in seconds for solenoid activation (reduced)
SOLENOID_DELAY = 0.01         # Small delay between solenoid operations (reduced)
ENTER_KEY_CODE = 0x28         # HID code for Enter key
ESCAPE_KEY_CODE = 0x29        # HID code for Escape key
BACKSPACE_KEY_CODE = 0x2A     # HID code for Backspace key
TAB_KEY_CODE = 0x2B           # HID code for Tab key
bell_keys = {ENTER_KEY_CODE, ESCAPE_KEY_CODE, TAB_KEY_CODE}

# Set up USB HID keyboard
hid_keyboard = Keyboard(usb_hid.devices)

# HID to Keycode mapping dictionary
hid_to_keycode = {
    0x04: Keycode.A,
    0x05: Keycode.B,
    0x06: Keycode.C,
    0x07: Keycode.D,
    0x08: Keycode.E,
    0x09: Keycode.F,
    0x0A: Keycode.G,
    0x0B: Keycode.H,
    0x0C: Keycode.I,
    0x0D: Keycode.J,
    0x0E: Keycode.K,
    0x0F: Keycode.L,
    0x10: Keycode.M,
    0x11: Keycode.N,
    0x12: Keycode.O,
    0x13: Keycode.P,
    0x14: Keycode.Q,
    0x15: Keycode.R,
    0x16: Keycode.S,
    0x17: Keycode.T,
    0x18: Keycode.U,
    0x19: Keycode.V,
    0x1A: Keycode.W,
    0x1B: Keycode.X,
    0x1C: Keycode.Y,
    0x1D: Keycode.Z,
    0x1E: Keycode.ONE,
    0x1F: Keycode.TWO,
    0x20: Keycode.THREE,
    0x21: Keycode.FOUR,
    0x22: Keycode.FIVE,
    0x23: Keycode.SIX,
    0x24: Keycode.SEVEN,
    0x25: Keycode.EIGHT,
    0x26: Keycode.NINE,
    0x27: Keycode.ZERO,
    0x28: Keycode.ENTER,
    0x29: Keycode.ESCAPE,
    0x2A: Keycode.BACKSPACE,
    0x2B: Keycode.TAB,
    0x2C: Keycode.SPACE,
    0x2D: Keycode.MINUS,
    0x2E: Keycode.EQUALS,
    0x2F: Keycode.LEFT_BRACKET,
    0x30: Keycode.RIGHT_BRACKET,
    0x31: Keycode.BACKSLASH,
    0x33: Keycode.SEMICOLON,
    0x34: Keycode.QUOTE,
    0x35: Keycode.GRAVE_ACCENT,
    0x36: Keycode.COMMA,
    0x37: Keycode.PERIOD,
    0x38: Keycode.FORWARD_SLASH,
    0x39: Keycode.CAPS_LOCK,
    0x3A: Keycode.F1,
    0x3B: Keycode.F2,
    0x3C: Keycode.F3,
    0x3D: Keycode.F4,
    0x3E: Keycode.F5,
    0x3F: Keycode.F6,
    0x40: Keycode.F7,
    0x41: Keycode.F8,
    0x42: Keycode.F9,
    0x43: Keycode.F10,
    0x44: Keycode.F11,
    0x45: Keycode.F12,
    0x4F: Keycode.RIGHT_ARROW,
    0x50: Keycode.LEFT_ARROW,
    0x51: Keycode.DOWN_ARROW,
    0x52: Keycode.UP_ARROW,
}

# Modifier mapping
modifier_to_keycode = {
    0x01: Keycode.LEFT_CONTROL,
    0x02: Keycode.LEFT_SHIFT,
    0x04: Keycode.LEFT_ALT,
    0x08: Keycode.LEFT_GUI,
    0x10: Keycode.RIGHT_CONTROL,
    0x20: Keycode.RIGHT_SHIFT,
    0x40: Keycode.RIGHT_ALT,
    0x80: Keycode.RIGHT_GUI,
}

#interface index, and endpoint addresses for USB Device instance
kbd_interface_index = None
kbd_endpoint_address = None
keyboard = None

i2c = board.STEMMA_I2C()

mcp = MCP23017(i2c)

noid_2 = mcp.get_pin(0)  # Key strike solenoid
noid_1 = mcp.get_pin(1)  # Bell solenoid
noid_1.switch_to_output(value=False)
noid_2.switch_to_output(value=False)

# Typewriter state tracking
keystroke_count = 0
previous_keys = set()  # Track previously pressed keys to detect new presses
previous_modifiers = 0  # Track modifier state

#interface index, and endpoint addresses for USB Device instance
kbd_interface_index = None
kbd_endpoint_address = None
keyboard = None

# scan for connected USB devices
for device in usb.core.find(find_all=True):
    # check for boot keyboard endpoints on this device
    kbd_interface_index, kbd_endpoint_address = (
        adafruit_usb_host_descriptors.find_boot_keyboard_endpoint(device)
    )
    # if a boot keyboard interface index and endpoint address were found
    if kbd_interface_index is not None and kbd_interface_index is not None:
        keyboard = device

        # detach device from kernel if needed
        if keyboard.is_kernel_driver_active(0):
            keyboard.detach_kernel_driver(0)

        # set the configuration so it can be used
        keyboard.set_configuration()

if keyboard is None:
    raise RuntimeError("No boot keyboard endpoint found")

buf = array.array("b", [0] * 8)

def strike_key_solenoid():
    """Activate the key strike solenoid briefly"""
    noid_1.value = True
    time.sleep(SOLENOID_STRIKE_TIME)
    noid_1.value = False

def ring_bell_solenoid():
    """Activate the bell solenoid briefly"""
    noid_2.value = True
    time.sleep(SOLENOID_STRIKE_TIME)
    noid_2.value = False

def get_pressed_keys(report_data):
    """Extract currently pressed keys from HID report"""
    pressed_keys = set()

    # Check bytes 2-7 for key codes (up to 6 simultaneous keys)
    for i in range(2, 8):
        k = report_data[i]
        # Skip if no key (0) or error rollover (1)
        if k > 1:
            pressed_keys.add(k)

    return pressed_keys

def print_keyboard_report(report_data):
    # Dictionary for modifier keys (first byte)
    modifier_dict = {
        0x01: "LEFT_CTRL",
        0x02: "LEFT_SHIFT",
        0x04: "LEFT_ALT",
        0x08: "LEFT_GUI",
        0x10: "RIGHT_CTRL",
        0x20: "RIGHT_SHIFT",
        0x40: "RIGHT_ALT",
        0x80: "RIGHT_GUI",
    }

    # Dictionary for key codes (main keys)
    key_dict = {
        0x04: "A",
        0x05: "B",
        0x06: "C",
        0x07: "D",
        0x08: "E",
        0x09: "F",
        0x0A: "G",
        0x0B: "H",
        0x0C: "I",
        0x0D: "J",
        0x0E: "K",
        0x0F: "L",
        0x10: "M",
        0x11: "N",
        0x12: "O",
        0x13: "P",
        0x14: "Q",
        0x15: "R",
        0x16: "S",
        0x17: "T",
        0x18: "U",
        0x19: "V",
        0x1A: "W",
        0x1B: "X",
        0x1C: "Y",
        0x1D: "Z",
        0x1E: "1",
        0x1F: "2",
        0x20: "3",
        0x21: "4",
        0x22: "5",
        0x23: "6",
        0x24: "7",
        0x25: "8",
        0x26: "9",
        0x27: "0",
        0x28: "ENTER",
        0x29: "ESC",
        0x2A: "BACKSPACE",
        0x2B: "TAB",
        0x2C: "SPACE",
        0x2D: "MINUS",
        0x2E: "EQUAL",
        0x2F: "LBRACKET",
        0x30: "RBRACKET",
        0x31: "BACKSLASH",
        0x33: "SEMICOLON",
        0x34: "QUOTE",
        0x35: "GRAVE",
        0x36: "COMMA",
        0x37: "PERIOD",
        0x38: "SLASH",
        0x39: "CAPS_LOCK",
        0x4F: "RIGHT_ARROW",
        0x50: "LEFT_ARROW",
        0x51: "DOWN_ARROW",
        0x52: "UP_ARROW",
    }

    # Add F1-F12 keys to the dictionary
    for i in range(12):
        key_dict[0x3A + i] = f"F{i + 1}"

    # First byte contains modifier keys
    modifiers = report_data[0]

    # Print modifier keys if pressed
    if modifiers > 0:
        print("Modifiers:", end=" ")

        # Check each bit for modifiers and print if pressed
        for b, name in modifier_dict.items():
            if modifiers & b:
                print(name, end=" ")

        print()

    # Bytes 2-7 contain up to 6 key codes (byte 1 is reserved)
    keys_pressed = False

    for i in range(2, 8):
        k = report_data[i]

        # Skip if no key or error rollover
        if k in {0, 1}:
            continue

        if not keys_pressed:
            print("Keys:", end=" ")
            keys_pressed = True

        # Print key name based on dictionary lookup
        if k in key_dict:
            print(key_dict[k], end=" ")
        else:
            # For keys not in the dictionary, print the HID code
            print(f"0x{k:02X}", end=" ")

    if keys_pressed:
        print()
    elif modifiers == 0:
        print("No keys pressed")


print("USB Typewriter starting...")
print(f"Bell will ring every {KEYSTROKE_BELL_INTERVAL} keystrokes or when Enter is pressed")

while True:
    # try to read data from the keyboard
    try:
        count = keyboard.read(kbd_endpoint_address, buf, timeout=10)

    # if there is no data it will raise USBTimeoutError
    except usb.core.USBTimeoutError:
        # Nothing to do if there is no data for this keyboard
        continue

    # Get currently pressed keys and modifiers
    current_keys = get_pressed_keys(buf)
    current_modifiers = buf[0]

    # Find newly pressed keys (not in previous scan)
    new_keys = current_keys - previous_keys

    # Find released keys for HID pass-through
    released_keys = previous_keys - current_keys

    # Handle modifier changes
    if current_modifiers != previous_modifiers:
        # Build list of modifier keycodes to press/release
        for bit, keycode in modifier_to_keycode.items():
            if current_modifiers & bit and not previous_modifiers & bit:
                # Modifier newly pressed
                hid_keyboard.press(keycode)
            elif not (current_modifiers & bit) and (previous_modifiers & bit):
                # Modifier released
                hid_keyboard.release(keycode)

    # Release any keys that were let go
    for key in released_keys:
        if key in hid_to_keycode:
            hid_keyboard.release(hid_to_keycode[key])

    # Process each newly pressed key
    for key in new_keys:
        # Increment keystroke counter
        keystroke_count += 1
        # Strike the key solenoid for typewriter effect
        strike_key_solenoid()
        # Pass through the key press via USB HID
        if key in hid_to_keycode:
            hid_keyboard.press(hid_to_keycode[key])

        # Check if special keys were pressed
        if key == ENTER_KEY_CODE:
            ring_bell_solenoid()
            keystroke_count = 0  # Reset counter for new line
        elif key == ESCAPE_KEY_CODE:
            ring_bell_solenoid()
            keystroke_count = 0  # Reset counter
        elif key == TAB_KEY_CODE:
            ring_bell_solenoid()
            keystroke_count = 0  # Reset counter
        elif key == BACKSPACE_KEY_CODE:
            keystroke_count = 0  # Reset counter but no bell
        elif keystroke_count % KEYSTROKE_BELL_INTERVAL == 0:
            print(f"\n*** DING! ({keystroke_count} keystrokes) ***\n")
            ring_bell_solenoid()
    # Special handling for bell keys that are still held
    # check if they were released and re-pressed
    # This handles rapid double-taps where the key might not fully release

    for key in bell_keys:
        if key in current_keys and key in previous_keys and key not in new_keys:
            # Key is being held, check if it was briefly released by looking at the raw state
            # For held keys, we'll check if this is a repeat event
            if len(current_keys) != len(previous_keys) or current_keys != previous_keys:
                # Something changed, might be a repeat
                continue

    # Update previous keys and modifiers for next scan
    previous_keys = current_keys
    previous_modifiers = current_modifiers

    # Still print the keyboard report for debugging
    if new_keys:  # Only print if there are new key presses
        print_keyboard_report(buf)
        print(f"Total keystrokes: {keystroke_count}")
Upload the Code and Libraries to the Feather RP2040 USB Host
After downloading the Project Bundle, plug your Feather RP2040 USB Host into the computer's USB port with a known good USB data+power cable. You should see a new flash drive appear in the computer's File Explorer or Finder (depending on your operating system) called CIRCUITPY. Unzip the folder and copy the following items to the Feather RP2040 USB Host's CIRCUITPY drive.
lib folder
code.py
Your Feather RP2040 USB Host CIRCUITPY drive should look like this after copying the lib folder and code.py file:
Use
Plug in your USB keyboard into the USB-A port on the Feather. Then, plug the Feather into your computer. As you type on the keyboard, you'll hear the solenoids trigger. The Feather also sends the keystrokes to your computer from the keyboard.
Use the Desktop Python Code
This version of the code lets you plug in the Not A Typewriter to your computer without having to plug your keyboard into the Feather USB host port. A CPython script runs on your computer sending your keyboard inputs via serial to the attached Feather. The Feather runs CircuitPython code that is listening for those key presses. When a key press is received, the solenoids are triggered.
There are two code options for this project. This page goes overusing the Not A Typewriter as a keyboard listener.
Once you've finished setting up your Feather RP2040 USB Host with CircuitPython, you can access the code and necessary libraries by downloading the Project Bundle.
To do this, click on the Download Project Bundle button in the window below. It will download to your computer as a zipped folder.
# SPDX-FileCopyrightText: 2025 Liz Clark for Adafruit Industries
#
# SPDX-License-Identifier: MIT

"""
USB Typewriter Feather-side Script
Converts incoming keystrokes to solenoid clicks
"""

import time
import struct
import usb_cdc
import board
from adafruit_mcp230xx.mcp23017 import MCP23017

# Typewriter configuration
KEYSTROKE_BELL_INTERVAL = 25  # Ring bell every 25 keystrokes
SOLENOID_STRIKE_TIME = 0.03   # Duration in seconds for solenoid activation
ENTER_KEY_CODE = 0x28         # HID code for Enter key
ESCAPE_KEY_CODE = 0x29        # HID code for Escape key
BACKSPACE_KEY_CODE = 0x2A     # HID code for Backspace key
TAB_KEY_CODE = 0x2B           # HID code for Tab key

# Key name mapping for debug output
key_names = {
    0x04: "A", 0x05: "B", 0x06: "C", 0x07: "D",
    0x08: "E", 0x09: "F", 0x0A: "G", 0x0B: "H",
    0x0C: "I", 0x0D: "J", 0x0E: "K", 0x0F: "L",
    0x10: "M", 0x11: "N", 0x12: "O", 0x13: "P",
    0x14: "Q", 0x15: "R", 0x16: "S", 0x17: "T",
    0x18: "U", 0x19: "V", 0x1A: "W", 0x1B: "X",
    0x1C: "Y", 0x1D: "Z",
    0x1E: "1", 0x1F: "2", 0x20: "3", 0x21: "4",
    0x22: "5", 0x23: "6", 0x24: "7", 0x25: "8",
    0x26: "9", 0x27: "0",
    0x28: "ENTER", 0x29: "ESC", 0x2A: "BACKSPACE",
    0x2B: "TAB", 0x2C: "SPACE", 0x2D: "MINUS",
    0x2E: "EQUAL", 0x2F: "LBRACKET", 0x30: "RBRACKET",
    0x31: "BACKSLASH", 0x33: "SEMICOLON", 0x34: "QUOTE",
    0x35: "GRAVE", 0x36: "COMMA", 0x37: "PERIOD",
    0x38: "SLASH", 0x39: "CAPS_LOCK",
    0x4F: "RIGHT", 0x50: "LEFT", 0x51: "DOWN", 0x52: "UP",
}

# Add F1-F12 keys
for i in range(12):
    key_names[0x3A + i] = f"F{i + 1}"

# Set up I2C and MCP23017
i2c = board.STEMMA_I2C()
mcp = MCP23017(i2c)

# Configure solenoid pins
noid_1 = mcp.get_pin(0)  # Bell solenoid
noid_2 = mcp.get_pin(1)  # Key strike solenoid
noid_1.switch_to_output(value=False)
noid_2.switch_to_output(value=False)

# Typewriter state tracking
keystroke_count = 0
current_keys = set()  # Track currently pressed keys

# Check if USB CDC data is available
if usb_cdc.data is None:
    print("ERROR: USB CDC data not enabled!")
    print("Please create a boot.py file with:")
    print("  import usb_cdc")
    print("  usb_cdc.enable(console=True, data=True)")
    print("\nThen reset the board.")
    while True:
        time.sleep(1)

serial = usb_cdc.data

def strike_key_solenoid():
    """Activate the key strike solenoid briefly"""
    noid_2.value = True
    time.sleep(SOLENOID_STRIKE_TIME)
    noid_2.value = False

def ring_bell_solenoid():
    """Activate the bell solenoid briefly"""
    noid_1.value = True
    time.sleep(SOLENOID_STRIKE_TIME)
    noid_1.value = False

def process_key_event(mod, code, p): # pylint: disable=too-many-branches
    """Process a key event from the computer"""
    global keystroke_count # pylint: disable=global-statement

    # Debug output
    key_name = key_names.get(code, f"0x{code:02X}")
    action = "pressed" if p else "released"

    # Handle modifier display
    if mod > 0:
        mod_str = []
        if mod & 0x01:
            mod_str.append("L_CTRL")
        if mod & 0x02:
            mod_str.append("L_SHIFT")
        if mod & 0x04:
            mod_str.append("L_ALT")
        if mod & 0x08:
            mod_str.append("L_GUI")
        if mod & 0x10:
            mod_str.append("R_CTRL")
        if mod & 0x20:
            mod_str.append("R_SHIFT")
        if mod & 0x40:
            mod_str.append("R_ALT")
        if mod & 0x80:
            mod_str.append("R_GUI")
        print(f"[{'+'.join(mod_str)}] {key_name} {action}")
    else:
        print(f"{key_name} {action}")

    # Only process key presses (not releases) for solenoid activation
    if p and code > 0:  # key_code 0 means modifier-only update
        # Check if this is a new key press
        if code not in current_keys:
            current_keys.add(code)

            # Increment keystroke counter
            keystroke_count += 1

            # Strike the key solenoid
            strike_key_solenoid()

            # Check for special keys
            if code == ENTER_KEY_CODE:
                ring_bell_solenoid()
                keystroke_count = 0  # Reset counter for new line
            elif code == ESCAPE_KEY_CODE:
                ring_bell_solenoid()
                keystroke_count = 0  # Reset counter
            elif code == TAB_KEY_CODE:
                ring_bell_solenoid()
                keystroke_count = 0  # Reset counter
            elif code == BACKSPACE_KEY_CODE:
                keystroke_count = 0  # Reset counter but no bell
            elif keystroke_count % KEYSTROKE_BELL_INTERVAL == 0:
                print(f"\n*** DING! ({keystroke_count} keystrokes) ***\n")
                ring_bell_solenoid()

            print(f"Total keystrokes: {keystroke_count}")

    elif not p and code > 0:
        # Remove key from pressed set when released
        current_keys.discard(code)

print("USB Typewriter Receiver starting...")
print(f"Bell will ring every {KEYSTROKE_BELL_INTERVAL} keystrokes or on special keys")
print("Waiting for key events from computer...")
print("-" * 40)

# Buffer for incoming data
buffer = bytearray(4)
buffer_pos = 0

while True:
    # Check for incoming serial data
    if serial.in_waiting > 0:
        # Read available bytes
        data = serial.read(serial.in_waiting)

        for byte in data:
            # Look for start marker
            if buffer_pos == 0:
                if byte == 0xAA:
                    buffer[0] = byte
                    buffer_pos = 1
            else:
                # Fill buffer
                buffer[buffer_pos] = byte
                buffer_pos += 1

                # Process complete message
                if buffer_pos >= 4:
                    # Unpack the message
                    _, modifier, key_code, pressed = struct.unpack('BBBB', buffer)

                    # Process the key event
                    process_key_event(modifier, key_code, pressed)

                    # Reset buffer
                    buffer_pos = 0

    # Small delay to prevent busy-waiting
    time.sleep(0.001)
Upload the Code and Libraries to the Feather RP2040 USB Host
After downloading the Project Bundle, plug your Feather RP2040 USB Host into the computer's USB port with a known good USB data+power cable. You should see a new flash drive appear in the computer's File Explorer or Finder (depending on your operating system) called CIRCUITPY. Unzip the folder and copy the following items to the Feather RP2040 USB Host's CIRCUITPY drive.
lib folder
code.py
boot.py
Your Feather RP2040 USB Host CIRCUITPY drive should look like this after copying the lib folder, boot.py file and code.py file:
CPython Keyboard Sender Code
To run the script, you will need a desktop or laptop computer with Python 3 installed.
# SPDX-FileCopyrightText: 2025 Liz Clark for Adafruit Industries
#
# SPDX-License-Identifier: MIT

#!/usr/bin/env python3
"""
USB Typewriter Computer-side Script
Captures keyboard input and sends it to the Feather via serial
"""

import struct
import time
import threading
import queue
import sys
import serial
import serial.tools.list_ports
from pynput import keyboard

class TypewriterSender:
    def __init__(self):
        self.serial_port = None
        self.key_queue = queue.Queue()
        self.running = True
        self.modifier_state = 0

        # Map pynput keys to HID keycodes
        self.key_to_hid = {
            # Letters
            'a': 0x04, 'b': 0x05, 'c': 0x06, 'd': 0x07,
            'e': 0x08, 'f': 0x09, 'g': 0x0A, 'h': 0x0B,
            'i': 0x0C, 'j': 0x0D, 'k': 0x0E, 'l': 0x0F,
            'm': 0x10, 'n': 0x11, 'o': 0x12, 'p': 0x13,
            'q': 0x14, 'r': 0x15, 's': 0x16, 't': 0x17,
            'u': 0x18, 'v': 0x19, 'w': 0x1A, 'x': 0x1B,
            'y': 0x1C, 'z': 0x1D,
            # Numbers
            '1': 0x1E, '2': 0x1F, '3': 0x20, '4': 0x21,
            '5': 0x22, '6': 0x23, '7': 0x24, '8': 0x25,
            '9': 0x26, '0': 0x27,
            # Special keys
            keyboard.Key.enter: 0x28,
            keyboard.Key.esc: 0x29,
            keyboard.Key.backspace: 0x2A,
            keyboard.Key.tab: 0x2B,
            keyboard.Key.space: 0x2C,
            '-': 0x2D, '=': 0x2E, '[': 0x2F, ']': 0x30,
            '\\': 0x31, ';': 0x33, "'": 0x34, '`': 0x35,
            ',': 0x36, '.': 0x37, '/': 0x38,
            keyboard.Key.caps_lock: 0x39,
            # Arrow keys
            keyboard.Key.right: 0x4F,
            keyboard.Key.left: 0x50,
            keyboard.Key.down: 0x51,
            keyboard.Key.up: 0x52,
        }

        # Add function keys
        for i in range(1, 13):
            self.key_to_hid[getattr(keyboard.Key, f'f{i}')] = 0x3A + i - 1

        # Modifier bits
        self.modifier_bits = {
            keyboard.Key.ctrl_l: 0x01,
            keyboard.Key.shift_l: 0x02,
            keyboard.Key.alt_l: 0x04,
            keyboard.Key.cmd_l: 0x08,  # Windows/Command key
            keyboard.Key.ctrl_r: 0x10,
            keyboard.Key.shift_r: 0x20,
            keyboard.Key.alt_r: 0x40,
            keyboard.Key.cmd_r: 0x80,
        }

    @staticmethod
    def find_feather_port():
        """Find the Feather's serial port"""
        ports = serial.tools.list_ports.comports()

        print("Available serial ports:")
        for i, port in enumerate(ports):
            print(f"{i}: {port.device} - {port.description}")
        feather_port = None

        if not feather_port:
            # Manual selection
            try:
                choice = int(input("\nSelect port number: "))
                if 0 <= choice < len(ports):
                    feather_port = ports[choice].device
                else:
                    print("Invalid selection")
                    return None
            except (ValueError, IndexError):
                print("Invalid input")
                return None

        return feather_port

    def connect(self):
        """Connect to the Feather via serial"""
        port = self.find_feather_port()
        if not port:
            return False

        try:
            self.serial_port = serial.Serial(port, 115200, timeout=0.1)
            time.sleep(2)  # Wait for connection to stabilize
            print(f"Connected to {port}")
            return True
        except Exception as e: # pylint: disable=broad-except
            print(f"Failed to connect: {e}")
            return False

    def send_key_event(self, hid_code, pressed):
        """Send a key event to the Feather"""
        if self.serial_port and self.serial_port.is_open:
            try:
                # Protocol: [0xAA][modifier_byte][key_code][pressed]
                # 0xAA is a start marker
                data = struct.pack('BBBB', 0xAA, self.modifier_state, hid_code, 1 if pressed else 0)
                self.serial_port.write(data)
                self.serial_port.flush()
            except Exception as e: # pylint: disable=broad-except
                print(f"Error sending data: {e}")

    def on_press(self, key):
        """Handle key press events"""
        # Check for modifier keys
        if key in self.modifier_bits:
            self.modifier_state |= self.modifier_bits[key]
            self.send_key_event(0, True)  # Send modifier update
            return

        # Get HID code for the key
        hid_code = None

        # Check if it's a special key
        if hasattr(key, 'value') and key in self.key_to_hid:
            hid_code = self.key_to_hid[key]
        # Check if it's a regular character
        elif hasattr(key, 'char') and key.char:
            hid_code = self.key_to_hid.get(key.char.lower())

        if hid_code:
            self.key_queue.put((hid_code, True))

    def on_release(self, key):
        """Handle key release events"""
        # Check for modifier keys
        if key in self.modifier_bits:
            self.modifier_state &= ~self.modifier_bits[key]
            self.send_key_event(0, False)  # Send modifier update
            return None

        # Get HID code for the key
        hid_code = None

        # Check if it's a special key
        if hasattr(key, 'value') and key in self.key_to_hid:
            hid_code = self.key_to_hid[key]
        # Check if it's a regular character
        elif hasattr(key, 'char') and key.char:
            hid_code = self.key_to_hid.get(key.char.lower())

        if hid_code:
            self.key_queue.put((hid_code, False))

        # Check for escape to quit
        if key == keyboard.Key.esc:
            print("\nESC pressed - exiting...")
            self.running = False
            return False

        return None

    def process_queue(self):
        """Process queued key events"""
        while self.running:
            try:
                hid_code, pressed = self.key_queue.get(timeout=0.1)
                self.send_key_event(hid_code, pressed)

                # Debug output
                action = "pressed" if pressed else "released"
                print(f"Key {action}: 0x{hid_code:02X}")

            except queue.Empty:
                continue

    def run(self):
        """Main run loop"""
        if not self.connect():
            print("Failed to connect to Feather")
            return

        print("\nNot A Typewriter")
        print("Press keys to send to typewriter")
        print("Press ESC to exit")
        print("-" * 30)

        # Start queue processor thread
        queue_thread = threading.Thread(target=self.process_queue)
        queue_thread.daemon = True
        queue_thread.start()

        # Start keyboard listener
        with keyboard.Listener(
            on_press=self.on_press,
            on_release=self.on_release) as listener:
            listener.join()

        # Cleanup
        if self.serial_port:
            self.serial_port.close()
        print("Disconnected")

if __name__ == "__main__":
    try:
        sender = TypewriterSender()
        sender.run()
    except KeyboardInterrupt:
        print("\nInterrupted")
        sys.exit(0)
CPython Dependencies
You'll use pip to install the Python libraries required to run the script:
pip install pyserial
pip install pynput
Use
First, you'll plug the Feather running the CircuitPython code into a USB port on your computer. This mounts the USB CDC port to your computer, which the CPython script needs to access.
To run the CPython script, open a terminal window and navigate to the directory where you have the script. Run the script with:
python keyboard_sender.py
When you launch the script, you'll be prompted to select the USB CDC port on the Feather. The boot.py file on the Feather allows for two COM ports to be opened on the Feather. These ports are numbered consecutively, and the CDC port will always be the second one. For example, in the screenshot you can see ports COM53 and COM54 are available. The CDC port is COM54.
As you type, you'll hear the solenoids begin triggering. In the terminal where you launched the script, you'll see the keycodes printed out as you type.