Mfr Part # 5325
STEMMA QT QT PY ESP32-S2 WIFI
Adafruit Industries LLC
License: See Original Project 3D Printing Addressable LEDs Programmers
Courtesy of Adafruit
Guide by Ruiz Brothers
Overview
Inspired by Star Fragments from video games such as Zelda: Breath of the Wild and Animal Crossing: New Horizons, this fully 3D printed star shaped lamp uses a QT Py ESP32-S2 and NeoPixel LEDs to turn on when the sun rises and off when it sets.
The CircuitPython code uses the Open-Meteo weather API to get location data for requesting the sunrise and sunset times. This IoT project knows when to light up and turn off, effectively automating a nightstand lamp.
The core of the star fragment is a dodecahedron that has 12 hollow spikes that snap fit together and are 3D printed without any support material.
A 3D printed mount houses two NeoPixel stick PCBs and snap fits into the bottom of the dodecahedron.
Parts from Adafruit
Following parts are used in this project.
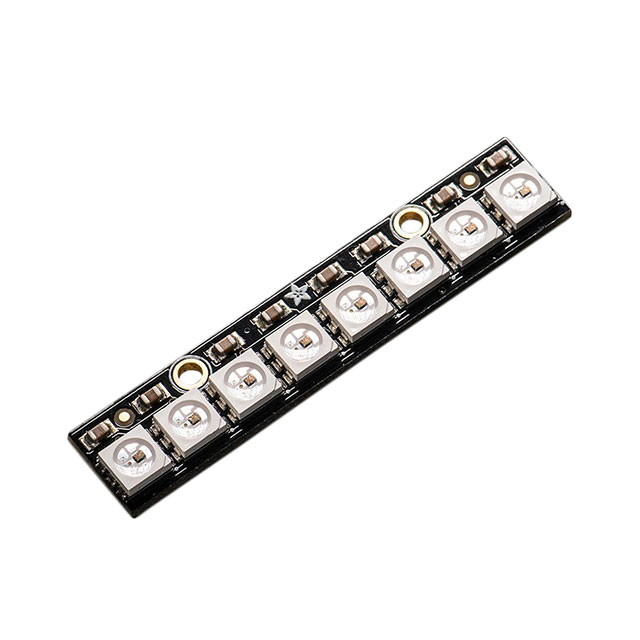
This project requires two 8x NeoPixel LED sticks.
CircuitPython
CircuitPython is a derivative of MicroPython designed to simplify experimentation and education on low-cost microcontrollers. It makes it easier than ever to get prototyping by requiring no upfront desktop software downloads. Simply copy and edit files on the CIRCUITPY drive to iterate.
CircuitPython Quickstart
Follow this step-by-step to quickly get CircuitPython running on your board.
Download the latest version of CircuitPython for this board via circuitpython.org
Click the link above to download the latest CircuitPython UF2 file.
Save it wherever is convenient for you.
Plug your board into your computer, using a known-good data-sync cable, directly, or via an adapter if needed.
Click the reset button once (highlighted in red above), and then click it again when you see the RGB status LED(s) (highlighted in green above) turn red (approximately half a second later). Sometimes it helps to think of it as a "slow double-click" of the reset button.
For this board, tap reset and wait for the LED to turn purple, and as soon as it turns purple, tap reset again. The second tap needs to happen while the LED is still purple.
Once successful, you will see the RGB status LED(s) turn green (highlighted in green above). If you see red, try another port, or if you're using an adapter or hub, try without the hub, or different adapter or hub.
If double-clicking doesn't work the first time, try again. Sometimes it can take a few tries to get the rhythm right!
A lot of people end up using charge-only USB cables and it is very frustrating! Make sure you have a USB cable you know is good for data sync.
If after several tries, and verifying your USB cable is data-ready, you still cannot get to the bootloader, it is possible that the bootloader is missing or damaged. Check out the Install UF2 Bootloader page for details on resolving this issue.
You will see a new disk drive appear called QTPYS2BOOT.
Drag the adafruit_circuitpython_etc.uf2 file to QTPYS2BOOT.
The BOOT drive will disappear, and a new disk drive called CIRCUITPY will appear.
That's it!
Create Your settings.toml File
If you've worked on WiFi projects with CircuitPython before, you're probably familiar with the secrets.py file. This file is a Python file that is stored on your CIRCUITPY drive that contains all of your secret WiFi information, such as your SSID, SSID password and any API keys for IoT services.
As of CircuitPython 8, there is support for a settings.toml file. Similar to secrets.py, the settings.toml file separates your sensitive information from your main code.py file.
Your settings.toml file should be stored in the main directory of your CIRCUITPY drive. It should not be in a folder.
settings.toml File Example
Here is an example on how to format your settings.toml file.
# Comments are supported
CIRCUITPY_WIFI_SSID="guest wifi"
CIRCUITPY_WIFI_PASSWORD="guessable"
CIRCUITPY_WEB_API_PORT=80
CIRCUITPY_WEB_API_PASSWORD="passw0rd"
test_variable="this is a test"
thumbs_up="\U0001f44d"
In a settings.toml file, it's important to keep these factors in mind:
When your settings.toml file is ready, you can save it in your text editor with the .toml extension.
Accessing Your settings.toml Information in code.py
In your code.py file, you'll need to import the os library to access the settings.toml file. Your settings are accessed with the os.getenv() function. You'll pass your settings entry to the function to import it into the code.py file.
import os

print(os.getenv("test_variable"))
In the upcoming CircuitPython WiFi examples, you'll see how the settings.toml file is used for connecting to your SSID and accessing your API keys.
Code the Star Fragment Lamp
Once you've finished setting up your QT Py ESP32-S2 with CircuitPython, you can access the code and necessary libraries by downloading the Project Bundle.
To do this, click on the Download Project Bundle button in the window below. It will download to your computer as a zipped folder.
# SPDX-FileCopyrightText: 2023 Liz Clark for Adafruit Industries
# SPDX-License-Identifier: MIT

import os
import ssl
import time
import microcontroller
import board
import wifi
import socketpool
import adafruit_requests
import neopixel
import simpleio
from adafruit_ticks import ticks_ms, ticks_add, ticks_diff
from adafruit_io.adafruit_io import IO_HTTP

# latitude
lat = 42.36
# longitude
long = -71.06

# neopixel setup
NUMPIXELS = 30  # number of neopixels
BRIGHTNESS = 0.5  # A number between 0.0 and 1.0, where 0.0 is off, and 1.0 is max.
PIN = board.A3  # This is the default pin on the NeoPixel Driver BFF.

pixels = neopixel.NeoPixel(PIN, NUMPIXELS, brightness=BRIGHTNESS, auto_write=False)

# turn on NeoPixels on boot to check wiring
pixels.fill((255, 125, 0))
pixels.show()

# API request to open-meteo
weather_url = "https://api.open-meteo.com/v1/forecast?"
# pass latitude and longitude
# will return sunrise and sunset times
weather_url += "latitude=%d&longitude=%d&timezone=auto&daily=sunrise,sunset" % (lat, long)

#  connect to SSID
wifi.radio.connect(os.getenv('CIRCUITPY_WIFI_SSID'), os.getenv('CIRCUITPY_WIFI_PASSWORD'))

pool = socketpool.SocketPool(wifi.radio)
requests = adafruit_requests.Session(pool, ssl.create_default_context())

pool = socketpool.SocketPool(wifi.radio)

# adafruit IO info
aio_username = os.getenv('aio_username')
aio_key = os.getenv('aio_key')
location = "America/New York"

# io HTTP for getting the time from the internet
io = IO_HTTP(aio_username, aio_key, requests)

def reset_on_error(delay, error):
    print("Error:\n", str(error))
    print("Resetting microcontroller in %d seconds" % delay)
    time.sleep(delay)
    microcontroller.reset()

# function for making http requests with try/except
def get_request(tries, ping):
    for i in range(tries):
        try:
            n = ping
        except Exception as error:
            print(error)
            time.sleep(10)
            if i < tries - 1:
                continue
            raise
        break
    return n

# get the time on start-up
# pylint: disable=broad-except
try:
    now = get_request(5, io.receive_time())
except Exception as e:
    reset_on_error(10, e)
print(now)
today = now.tm_mday

# function to make a request to open-meteo
def sun_clock():
    # make the API request
    response = get_request(5, requests.get(weather_url))
    # packs the response into a JSON
    response_as_json = response.json()
    # gets sunrise
    _rise = response_as_json['daily']['sunrise'][0]
    # gets sunset
    _set = response_as_json['daily']['sunset'][0]
    return _rise, _set

# initial API call
try:
    sunrise, sunset = sun_clock()
except Exception as e:
    reset_on_error(10, e)

print(sunrise)
print(sunset)

# the sunrise/sunset time is returned as a JSON aka a string
# this function chops up the string to get the hours and minutes as integers
def divide_time(z):
    string_time = z.split("-")
    clock_time = string_time[2].split("T")
    int_time = clock_time[1].split(":")
    event_time = time.struct_time(
    (int(string_time[0]), int(string_time[1]), int(clock_time[0]), int(int_time[0]),
    int(int_time[1]), 0, -1, -1, False)
    )
    # print(event_time)
    return event_time

rise_time = divide_time(sunrise)
set_time = divide_time(sunset)

# function that tracks how many hours/minutes until sunrise or sunset
def sun_countdown(sun_event):
    n = get_request(5, io.receive_time())
    remaining = time.mktime(sun_event) - time.mktime(n)
    r = remaining
    # print(remaining)
    # calculate the seconds remaining
    secs_remaining = remaining % 60 # pylint: disable=unused-variable
    remaining //= 60
    # calculate the minutes remaining
    minutes_until = remaining % 60
    remaining //= 60
    # calculate the hours remaining
    hours_until = remaining % 24
    remaining //= 24
    return r, hours_until, minutes_until, n
try:
    total_until_rise, hours_until_sunrise, mins_until_sunrise, now = sun_countdown(rise_time)
except Exception as e:
    reset_on_error(10, e)
try:
    total_until_set, hours_until_sunset, mins_until_sunset, now = sun_countdown(set_time)
except Exception as e:
    reset_on_error(10, e)

# red and yellow color percentage for neopixels
percent_red = 0
percent_yellow = 0

print(total_until_set)
# check to see if the star fragment should be lit up on start-up
if total_until_set < 0:
    print("star glow true")
    star_glow = True
    percent_red = 255
    percent_yellow = 125
    # turn neopixels on using RGB values
    pixels.fill((percent_red, percent_yellow, 0))
    pixels.show()
else:
    print("star glow false")
    star_glow = False
    percent_red = 0
    percent_yellow = 0
    # turn neopixels on using RGB values
    pixels.fill((percent_red, percent_yellow, 0))
    pixels.show()

# ticks time tracker
clock = ticks_ms()

# tracker for initial start-up state
first_run = True

# 15 minutes in milliseconds
time_check = 900000
# state to tell if it's after midnight yet before sunrise
looking_for_sunrise = False

while True:
    try:
        # if it's daytime
        if not star_glow:
            # every 15 minutes...
            if first_run or ticks_diff(ticks_ms(), clock) > time_check:
                print("pinging Open-Meteo")
                sunrise, sunset = sun_clock()
                (total_until_set, hours_until_sunset,
                mins_until_sunset, now) = sun_countdown(set_time)
                print(now)
                print("%d hour(s) until sunset" % hours_until_sunset)
                print("%d minutes(s) until sunset" % mins_until_sunset)
                print(sunset)
                print(percent_red)
                print()
                # less than an hour until sunset...
                if hours_until_sunset in (0, 23):
                    # check every minute
                    time_check = 300000
                    # map color to ramp up in brightness over the course of the final hour
                    percent_red = simpleio.map_range(mins_until_sunset, 59, 0, 0, 255)
                    percent_yellow = simpleio.map_range(mins_until_sunset, 59, 0, 0, 125)
                    # if the sun has set..
                    if total_until_set < 0:
                        percent_red = 255
                        percent_yellow = 125
                        time_check = 900000
                        star_glow = True
                        print("star is glowing")
                # otherwise just keep checking every 15 minutes
                else:
                    time_check = 900000
                    percent_red = 0
                    percent_yellow = 0
                if first_run:
                    first_run = False
                else:
                    # reset clock
                    clock = ticks_add(clock, time_check)
        # if it's nighttime...
        else:
            if first_run or ticks_diff(ticks_ms(), clock) > time_check:
                if today != now.tm_mday or (first_run and now.tm_hour < rise_time.tm_hour):
                    today = now.tm_mday
                    looking_for_sunrise = True
                # begin tracking the incoming sunrise
                if looking_for_sunrise:
                    print("pinging Open-Meteo")
                    sunrise, sunset = sun_clock()
                    (total_until_rise, hours_until_sunrise,
                    mins_until_sunrise, now) = sun_countdown(rise_time)
                    print(now)
                    print("%d hour(s) until sunrise" % hours_until_sunrise)
                    print("%d minutes(s) until sunrise" % mins_until_sunrise)
                    print(sunrise)
                    print(now)
                    print()
                    # less than an hour until sunset...
                    if hours_until_sunrise in (0, 23):
                        # check every minute
                        time_check = 300000
                        # map color to decrease brightness over the course of the final hour
                        percent_red = simpleio.map_range(mins_until_sunrise, 59, 0, 255, 0)
                        percent_yellow = simpleio.map_range(mins_until_sunrise, 59, 0, 125, 0)
                        # if the sun has risen..
                        if total_until_rise < 0:
                            percent_red = 0
                            percent_yellow = 0
                            time_check = 900000
                            star_glow = False
                            looking_for_sunrise = False
                            print("star is off")
                    # otherwise just keep checking every 15 minutes
                    # and keep neopixels on
                    else:
                        time_check = 900000
                        percent_red = 255
                        percent_yellow = 125
                # otherwise just keep checking every 15 minutes
                # and keep neopixels on
                else:
                    now = get_request(5, io.receive_time())
                    print("not looking for sunrise")
                    print(now)
                    print()
                    time_check = 900000
                    percent_red = 255
                    percent_yellow = 125
                if first_run:
                    first_run = False
                else:
                    # reset clock
                    clock = ticks_add(clock, time_check)
        # turn neopixels on using RGB values
        pixels.fill((percent_red, percent_yellow, 0))
        pixels.show()
    except Exception as e:
        reset_on_error(10, e)
Upload the Code and Libraries to the QT Py ESP32-S2
After downloading the Project Bundle, plug your QT Py ESP32-S2 into the computer's USB port with a known good USB data+power cable. You should see a new flash drive appear in the computer's File Explorer or Finder (depending on your operating system) called CIRCUITPY. Unzip the folder and copy the following items to the QT Py ESP32-S2's CIRCUITPY drive.
Your QT Py ESP32-S2 CIRCUITPY drive should look like this after copying the lib folder and the code.py file.
Add Your settings.toml File
As of CircuitPython 8, there is support for Environment Variables. These Environmental Variables are stored in a settings.toml file. Similar to secrets.py, the settings.toml file separates your sensitive information from your main code.py file. Add your settings.toml file as described in the Create Your settings.toml File page earlier in this guide. You'll need to include your CIRCUITPY_WIFI_SSID, CIRCUITPY_WIFI_PASSWORD, aio_username, and aio_key in the file.
CIRCUITPY_WIFI_SSID = "your-wifi-ssid-here"
CIRCUITPY_WIFI_PASSWORD = "your-wifi-password-here"

aio_username = "your-Adafruit-IO-username-here"
aio_key = "your-Adafruit-IO-key-here"
How the CircuitPython Code Works
The Open-Meteo weather API uses latitude and longitude to determine your location when creating an API request. At the top of the code, you can add your latitude and longitude coordinates by editing the lat and long variables.
# latitude
lat = 42.36
# longitude
long = -71.06
weather_url is a string that holds the Open-Meteo API request. It passes the latitude and longitude variables and requests the sunrise and sunset times.
# API request to open-meteo
weather_url = "https://api.open-meteo.com/v1/forecast?"
# pass latitude and longitude
# will return sunrise and sunset times
weather_url += "latitude=%d&longitude=%d&timezone=auto&daily=sunrise,sunset" % (lat, long)
Internet Connect!
The QT Py ESP32-S2 connects to your network by passing your SSID name and SSID password information from the settings.toml file. io is instantiated as an Adafruit IO HTTP object by passing your IO username and password from the settings.toml file as well. Adafruit IO is used to get the current time.
#  connect to SSID
wifi.radio.connect(os.getenv('CIRCUITPY_WIFI_SSID'), os.getenv('CIRCUITPY_WIFI_PASSWORD'))

pool = socketpool.SocketPool(wifi.radio)
requests = adafruit_requests.Session(pool, ssl.create_default_context())

pool = socketpool.SocketPool(wifi.radio)

# adafruit IO info
aio_username = os.getenv('aio_username')
aio_key = os.getenv('aio_key')
location = "America/New York"

# io HTTP for getting the time from the internet
io = IO_HTTP(aio_username, aio_key, requests)
Error Checking
The reset_on_error() function takes an Exception error and resets the QT Py depending on the delay time.
The get_request() function uses a try/except loop to attempt an HTTP request. In the event of an error, the request will be attempted again after a delay. Once the number of tries has been exceeded, then the loop breaks.
def reset_on_error(delay, error):
    print("Error:\n", str(error))
    print("Resetting microcontroller in %d seconds" % delay)
    time.sleep(delay)
    microcontroller.reset()

# function for making http requests with try/except
def get_request(tries, ping):
    for i in range(tries):
        try:
            n = ping
        except Exception as error:
            print(error)
            time.sleep(10)
            if i < tries - 1:
                continue
            raise
        break
    return n
These two functions are utilized together in a try/except loop for each HTTP request. If the try/except loop exceeds the tries in get_request(), then reset_on_error() is called and the QT Py resets itself.
try:
    now = get_request(5, io.receive_time())
except Exception as e:
    reset_on_error(10, e)
When and Where Is The Sun?
The sun_clock() function makes the Open-Meteo API request and returns that day's sunrise and sunset timestamp.
# function to make a request to open-meteo
def sun_clock():
    # make the API request
    response = get_request(5, requests.get(weather_url))
    # packs the response into a JSON
    response_as_json = response.json()
    # gets sunrise
    _rise = response_as_json['daily']['sunrise'][0]
    # gets sunset
    _set = response_as_json['daily']['sunset'][0]
    return _rise, _set
However, the sunrise and sunset timestamps are returned as strings, which isn't very helpful for doing math. The divide_time() function chops up the string and returns a struct_time object.
def divide_time(z):
    string_time = z.split("-")
    clock_time = string_time[2].split("T")
    int_time = clock_time[1].split(":")
    event_time = time.struct_time(
    (int(string_time[0]), int(string_time[1]), int(clock_time[0]), int(int_time[0]),
    int(int_time[1]), 0, -1, -1, False)
    )
    # print(event_time)
    return event_time
Then, the sun_countdown() function calculates the time remaining until either sunrise or sunset.
# function that tracks how many hours/minutes until sunrise or sunset
def sun_countdown(sun_event):
    n = get_request(5, io.receive_time())
    remaining = time.mktime(sun_event) - time.mktime(n)
    r = remaining
    # print(remaining)
    # calculate the seconds remaining
    secs_remaining = remaining % 60 # pylint: disable=unused-variable
    remaining //= 60
    # calculate the minutes remaining
    minutes_until = remaining % 60
    remaining //= 60
    # calculate the hours remaining
    hours_until = remaining % 24
    remaining //= 24
    return r, hours_until, minutes_until, n
Before the loop, it's determined if the sun has already set. This sets the state for star_glow, which is used in the loop to turn the NeoPixels on or off.
# check to see if the star fragment should be lit up on start-up
if total_until_set < 0:
    print("star glow true")
    star_glow = True
    percent_red = 255
    percent_yellow = 125
    # turn neopixels on using RGB values
    pixels.fill((percent_red, percent_yellow, 0))
    pixels.show()
else:
    print("star glow false")
    star_glow = False
    percent_red = 0
    percent_yellow = 0
    # turn neopixels on using RGB values
    pixels.fill((percent_red, percent_yellow, 0))
    pixels.show()
The Loop
In the loop, ticks_ms() is used to track time. Every 15 minutes, requests are sent to Open-Meteo and Adafruit IO to retrieve the sunrise and sunset times and the current time. Depending on whether or not star_glow is True determines if sunrise or sunset is tracked.
while True:
    try:
        # if it's daytime
        if not star_glow:
            # every 15 minutes...
            if first_run or ticks_diff(ticks_ms(), clock) > time_check:
                print("pinging Open-Meteo")
                sunrise, sunset = sun_clock()
                (total_until_set, hours_until_sunset,
                mins_until_sunset, now) = sun_countdown(set_time)
                print(now)
                print("%d hour(s) until sunset" % hours_until_sunset)
                print("%d minutes(s) until sunset" % mins_until_sunset)
                print(sunset)
                print(percent_red)
                print()
Mapping Color to Time
When there is less than an hour until sunrise or sunset, Open-Meteo and Adafruit IO begin to be pinged every 5 minutes. The NeoPixels begin to either dim or brighten during that hour countdown. Their red and green values are mapped to the minutes remaining.
Once the sun event has been reached, the NeoPixels are set to fully yellow or fully off, the time_check is reset to 15 minutes, and the state of star_glow is updated.
# less than an hour until sunset...
if hours_until_sunset in (0, 23):
  # check every minute
  time_check = 300000
  # map color to ramp up in brightness over the course of the final hour
  percent_red = simpleio.map_range(mins_until_sunset, 59, 0, 0, 255)
  percent_yellow = simpleio.map_range(mins_until_sunset, 59, 0, 0, 125)
  # if the sun has set..
  if total_until_set < 0:
    percent_red = 255
    percent_yellow = 125
    time_check = 900000
    star_glow = True
    print("star is glowing")
What Day Is It?
There is some additional logic in place to prevent errors while the star is glowing. Once the day changes (aka once it's past midnight), the looking_for_sunrise state is set to True to begin checking Open-Meteo for the sunrise and sunset times for the new day.
if first_run or ticks_diff(ticks_ms(), clock) > time_check:
  if today != now.tm_mday or (first_run and now.tm_hour < rise_time.tm_hour):
    today = now.tm_mday
    looking_for_sunrise = True
    # begin tracking the incoming sunrise
    if looking_for_sunrise:
      print("pinging Open-Meteo")
      sunrise, sunset = sun_clock()
      (total_until_rise, hours_until_sunrise,
       mins_until_sunrise, now) = sun_countdown(rise_time)
While the code waits for the new day, the time is checked every 15 minutes and the NeoPixels are fully yellow.
# otherwise just keep checking every 15 minutes
# and keep neopixels on
else:
    now = get_request(5, io.receive_time())
    print("not looking for sunrise")
    print(now)
    print()
    time_check = 900000
    percent_red = 255
    percent_yellow = 125
Circuit Diagram
The diagram below provides a general visual reference for wiring of the components once you get to the Assembly page. This diagram was created using the software package Fritzing.
Adafruit Library for Fritzing
Use Adafruit's Fritzing parts library to create circuit diagrams for your projects. Download the library or just grab individual parts. Get the library and parts from GitHub - Adafruit Fritzing Parts.
You'll forgo socket headers in the final assembly and connect the QT Py and BFF directly with header pins.
Wired Connections
The QT Py is powered by a 5V 1A power supply wall adapter.
NeoPixel Stick to NeoPixel Stick
NeoPixel Stick to BFF NeoPixel Drive
The power, data, and ground connections from the first NeoPixel stick connect directly to the 3-pin JST port on the NeoPixel BFF board.
CAD Files
CAD Assembly
The two NeoPixel sticks are secured to the NeoPixel Stick Mount with hardware screws and nuts. The NeoPixel mount snap fits into the bottom side of the star core. Eleven spikes snap fit into the star core. The star bottom piece snap fits into the NeoPixel stick mount. The star fragment assembly rests onto the stand. The stand is secured to the star case top cover with machine screws. The star case top and bottom covers snap fit onto the star case frame.
CAD Parts List
STL files for 3D printing are oriented to print "as-is" on FDM style machines. Parts are designed to 3D print without any support material using PLA filament. Original design source may be downloaded using the links below.
Transparent Filament
For best illumination, we suggest printing the Star-Core and NeoPixel Stick Mount parts in translucent / transparent PLA filament.
The star spikes were 3D printed in a yellow-colored PLA filament.
Build Volume
The parts require a 3D printer with a minimum build volume.
Bed Adhesion
Applying brim to the star spikes can help improve bed adhesion. A minimum of 6 perimeters is suggested to keep the part from coming off the bed of the 3D printer.
Headers Assembly
Headers for QT Py and BFF
Trim the included strip of headers to create two 1x7 headers.
Install Headers to QT Py
Insert the two strips of header pins to the bottom of the QT Py PCB.
Install NeoPixel Driver BFF
Place the NeoPixel Driver BFF board under the QT Py to get a sense of the correct orientation.
Soldering Headers
Use a breadboard to help keep the two strips of header pins straight when soldering them to the QT Py.
Solder NeoPixel Driver BFF to QT Py
Carefully solder the header pins from the QT Py to the NeoPixel Driver BFF.
NeoPixel Wiring
Short Cable for NeoPixels
The two NeoPixel sticks will be daisy chained using a short 3-wire ribbon cable.
Peel three wires from the 10-wire ribbon cable to create a short 3-pin cable for connecting the two NeoPixel sticks together.
JST Cable for NeoPixels
Separate three wires from the 10-wire ribbon cable to create a long cable extension for the 3-pin JST cable.
Cut the 3-wire ribbon cable to the desired length. Make sure it's a has a minimum length of 6in (15cm).
A 3-pin JST cable will connect the NeoPixel sticks to the NeoPixel Driver BFF board.
Solder Short Cable
Connect the short 3-wire ribbon cable to one of the NeoPixel sticks by soldering to the GND, 5VDC and DOUT pads.
Solder Short Cable (Continued)
Connect the other end of the short ribbon cable to the second NeoPixel stick by soldering to the GND, 5VDC and DIN pads.
The connections between the two boards are:
Soldered NeoPixel Sticks
Double check the short cable has been soldered to the correct pads.
Solder 3-pin JST Extension
Connect the long ribbon cable to the 3-pin JST cable by soldering the individual wires to the red, black and white colored wires.
Use pieces of heat shrink tubing to insulate the exposed wire.
3-pin JST Cable
Double check the soldered wires have a good and strong connection.
Connect JST Cable to NeoPixels
Solder the three wires from the JST cable/extension to the NeoPixel stick with the DIN pad. Connect red wire extension to 5VDC, black wire extension to GND and white wire extension to the DIN pad.
Wired NeoPixel Sticks
Take a moment to double check the wired connections have been properly soldered.
Assembly
Hardware for NeoPixel Mount
You'll use the following hardware to secure the NeoPixel sticks to the 3D printed mount.
Install Cable to NeoPixel Mount
Insert the 3-pin JST through the center opening of the 3D printed mount and pull it all the way through.
Mounting NeoPixel
Place both NeoPixel sticks onto the 3D printed mount and line up the mounting holes.
Insert the M2 screws through the NeoPixel sticks and 3D printed mount with the washers fitted in between. The washer will allow airflow to help with heat dissipation to prevent the 3D print from warping.
Secure NeoPixels
Fasten M2 hex nuts onto the threads of the screws and use a screwdriver to secure them together.
Assembled NeoPixel Holder
Take a moment to inspect the NeoPixel holder assembly and ensure it has been properly secured.
Install NeoPixel Holder
Locate the bottom side of the 3D printed star core. It's the surface that touched the 3D printer's bed.
Insert the NeoPixel holder through the bottom side of the star core and firmly press it through the edges.
Install Bottom Spike
Insert the JST cable through the hole on the side of the 3D printed bottom spike and pull it all the way through.
Orient the bottom spike so the protruding lips are lined up with the NeoPixel holder.
Firmly press the bottom spike into the star core until the surfaces sit flush.
Install Top Spike
Insert one of the eleven spikes to the top side of the star core. Firmly press the spike into the star core until the surfaces are flush with each other.
Install Another Spike
Proceed to install one of remaining spikes into another side of the star core ensuring the surfaces are flush.
Install Spikes (Continued)
Continue to install spikes by press fitting them into the remaining sides of the star core.
Installed Spikes
Double check all of the spikes have been properly installed onto the star core.
Connect JST to BFF
Grab the 3-pin JST plug from the NeoPixels and connect it to the NeoPixel Driver BFF.
Connect USB to QT Py
Plug in a USB-C cable to the USB port on QT Py board.
Power Test
Plug the other end of the USB cable into a 5V 1A (minimum, higher current rating is fine to use) USB power supply to turn on the circuit.
Simple Case Setup
Use the simple snap fit case if you prefer to use the star fragment off the stand.
Insert the JST plug from the NeoPixel through the smaller hole on the side of the case.
Insert the USB cable through the bigger hole on the side of the case.
Lamp Stand Setup
Insert the USB-C extension cable through the hole on the side of the lamp stand base. Use the included hex nut to secure the cable.
Lamp Base Bottom Install
Line up the snap fit edges of the bottom cover with the lamp base. Firmly press bottom cover to snap fit them together.
Hardware for Lamp Stand
Use three M3 x 6mm long machine screws to secure the stand to the lamp base top cover.
Secure Lamp Stand to Top Cover
Place the lamp stand over the base top cover and line up the three mounting holes.
Insert and fasten the M3 screws through the bottom of the top cover to secure the stand to the top cover.
Install NeoPixel Cable to Lamp Stand
Insert the NeoPixel cable through the lamp stand and pull it through the other end.
Connect NeoPixel and QT Py
Proceed to connect the 3-pin JST cable to the NeoPixel Driver BFF and the USB-C extension cable to the QT Py.
Install PCBs into Lamp Base
Place the QT Py and NeoPixel Driver BFF into the lamp case with the extension cable neatly coiled.
Install Top Cover to Lamp Base
Line up the snap fit edges of the top cover with the lamp base and firmly press to snap fit them together.
Install Star Fragment to Lamp Stand
Pull on the cable from the NeoPixels through the openings on the bottom cover until the star fragment can rest on the lamp stand.
Orient the star fragment so it can rest over the tapered edges of the lamp stand.
Optionally use glue to permanently adhere the star fragment to the lamp stand.