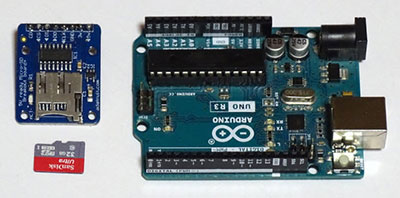
Micro SD Card Module interfacing with Arduino
2025-09-29 | By Rachana Jain
License: General Public License Arduino
Suppose you’re building a weather logger that records temperature and humidity every few seconds, or designing an irrigation system that keeps track of soil moisture levels throughout the day. In such projects, the Arduino’s limited internal memory quickly runs out of space.
The simplest solution? A MicroSD card. With the help of a MicroSD card module, you can give your Arduino projects large storage capacity, making it possible to log and retrieve data reliably.
In this guide, we’ll walk through how a MicroSD card module works, explore its hardware features, and learn how to connect it to an Arduino Uno.
MicroSD Card Module – Hardware Breakdown
A typical MicroSD card module has three important components that make it compatible with Arduino boards:
MicroSD Card Holder
This is the slot where you insert your card.3.3V Voltage Regulator
Since MicroSD cards operate strictly at 3.3V, connecting them directly to Arduino’s 5V supply would damage them. That’s why the module includes an onboard voltage regulator, which safely converts 5V input to a steady 3.3V output for the card.Logic Level Shifter
Many modules use a chip like the 74LVC125A to handle voltage level shifting. It converts Arduino’s 5V signal down to 3.3V, ensuring smooth communication without harming the card.
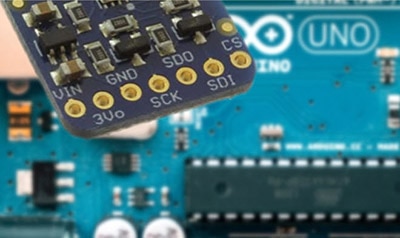
MicroSD Card Module Pinout
Here’s a quick overview of the module’s pins and their functions:
GND → Connects to Arduino GND.
VCC → Power input, usually connected to Arduino’s 5V pin.
MISO (Master In Slave Out) → Data line that sends information from the SD card to the Arduino.
MOSI (Master Out Slave In) → Data line that sends information from the Arduino to the SD card.
SCK (Serial Clock) → Receives clock pulses from Arduino to synchronize data transfer.
CS (Chip Select / Slave Select) → Used by the Arduino to enable or disable the SD card module on the SPI bus.
Connecting the MicroSD Card Module to Arduino
Now that you understand the hardware, the next step is wiring it up. The module communicates over the SPI protocol, so you’ll connect the pins (MISO, MOSI, SCK, and CS) to Arduino’s corresponding SPI pins.
Hardware Required
Arduino UNO R3 × 1
LCD 16x2 (I2C) × 1
Jumper Wires × 1 set
USB Cable Type A to B × 1
12V Supply Adapter × 1
MicroSD Card Module × 1
MicroSD Card × 1
Software Required
Arduino IDE (Version 2.3.4 or above)
LiquidCrystal_I2C Library (by Frank de Brabander, v1.1.2)
SD Card Library
Wiring Connections – MicroSD Card Module with Arduino
The MicroSD card module communicates with Arduino using the SPI protocol, which relies on the MOSI, MISO, SCK, and CS pins.
Here’s how the connections map between the Arduino Uno and the MicroSD card reader module:
CS (Chip Select) → Arduino Pin 10
SCK (Serial Clock) → Arduino Pin 13
MOSI (Master Out Slave In) → Arduino Pin 11
MISO (Master In Slave Out) → Arduino Pin 12
VCC → 5V pin of Arduino
GND → GND pin of Arduino
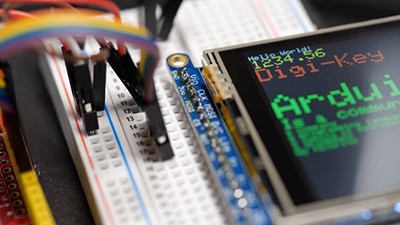
Wiring the I2C LCD with Arduino
Hooking up the I2C LCD is straightforward since it only uses two data lines in addition to power:
VCC → Arduino 5V
GND → Arduino GND
SCL (Clock) → Arduino SCL (Analog Pin A5 on the Uno)
SDA (Data) → Arduino SDA (Analog Pin A4 on the Uno)
⚠️ Note: Ensure that the A0, A1, and A2 address jumpers on the I2C LCD are left open (not shorted). This way, the module will respond to the default I2C address 0x27, which is the one used in the example code.
Code to Read-Write Data on Micro SD Card
/* Code to read and Write data on SD card using library functions
by playwithcircuit.com */
#include "string.h"
#include <SPI.h>
#include <SD.h>
#include <LiquidCrystal_I2C.h>  // I2C LCD
// create an object called datafile
File datafile;
char const dataArray[10] = "0123456789";
char cArray[11] = { 0 };
char index = 0;
// Set the LCD address to 0x27 for a 16 chars and 2 line display
LiquidCrystal_I2C lcd(0x27, 16, 2);
// Define Chip Select or slave select (CS/SS) pin used by library
const int chipSelect = 10;
void setup() {
  // initialize the LCD
  lcd.init();
  // Turn ON the Backlight
  lcd.backlight();
  // Clear the display buffer
  lcd.clear();
  // Print a message to the LCD
  lcd.setCursor(0, 0);
  lcd.print("Initializing");
  lcd.setCursor(0, 1);
  lcd.print("SD Card...");
  delay(2000);
  if (!SD.begin()) {
    lcd.clear();
    lcd.setCursor(0, 0);
    lcd.print("Initialization");
    lcd.setCursor(0, 1);
    lcd.print("Failed");
    while (1)
      return;
  }
  lcd.clear();
  lcd.setCursor(0, 0);
  lcd.print("Initialization");
  lcd.setCursor(0, 1);
  lcd.print("Successfull");
  delay(2000);
  // if the file already exist
  if (SD.exists("myData.txt")) {
    // remove that file
    SD.remove("myData.txt");
  }
  // Creation and opening a file in write mode
  datafile = SD.open("myData.txt", FILE_WRITE);
  // if the file opened okay, write to it:
  if (datafile) {
    datafile.print(dataArray);
    // close the file
    datafile.close();
    lcd.clear();
    lcd.setCursor(0, 0);
    lcd.print("Data Written");
    lcd.setCursor(0, 1);
    lcd.print("Successfully");
    delay(2000);
  } else {
    // if the file didn't open/create, print an error
    lcd.clear();
    lcd.setCursor(0, 0);
    lcd.print("File Creation");
    lcd.setCursor(0, 1);
    lcd.print("Failure");
    while (1)
      ;
  }
  // re-open the file for reading:
  datafile = SD.open("myData.txt");
  if (datafile) {
    lcd.clear();
    lcd.setCursor(0, 0);
    lcd.print("Data Read :");
    lcd.setCursor(0, 1);
    // read from the file until there's nothing else in it:
    while (datafile.available()) {
      cArray[index++] = datafile.read();
      if (index >= 10)
        break;
    }
    lcd.print(cArray);
    // close the file
    datafile.close();
    delay(3000);
    if (!(memcmp(dataArray, cArray, sizeof(dataArray)))) {
      lcd.clear();
      lcd.setCursor(0, 0);
      lcd.print("Data");
      lcd.setCursor(0, 1);
      lcd.print("Matches");
      while (1)
        ;
    } else {
      lcd.clear();
      lcd.setCursor(0, 0);
      lcd.print("Data");
      lcd.setCursor(0, 1);
      lcd.print("Doesn't Match");
      while (1)
        ;
    }
  } else {
    // if the file didn't open, print an error
    lcd.clear();
    lcd.setCursor(0, 0);
    lcd.print("File Opening");
    lcd.setCursor(0, 1);
    lcd.print("Failure");
    while (1)
      ;
  }
}
void loop() {
  // nothing happens after setup
}
To learn how to check Micro SD card Information and code explanation, visit: Interfacing Micro SD Card Module with Arduino