Mfr Part # DFR0706-EN
UNIHIKER IOT PROGRAMMING SBC
DFRobot
License: Attribution Arduino ESP32
In this beginner-friendly tutorial, you will learn how to use the Mini Laser Distance Range Sensor with both the UNIHIKER K10 and UNIHIKER M10 development boards.
We will walk through how to:
- Connect the sensor using a Gravity I2C Hub for a clean and expandable setup
- Use a ready-made Python/MicroPython driver module to get real-time distance measurements
- Switch between distance units: millimeters (mm), centimeters (cm), and meters (m)
- Apply a calibration offset to fine-tune accuracy
- Display results on Terminal with Unihiker M10
- Display results with a simple GUI on the UNIHIKER K10
This tutorial is ideal for students, hobbyists, or educators who want to integrate precise distance sensing into projects such as robotics, automation, obstacle detection, or smart measuring tools. You can find more details about the Mini Laser Distance Range Sensor as well as the example code for Arduino on this Wiki page.
1Unihiker M10
1Unihiker K10
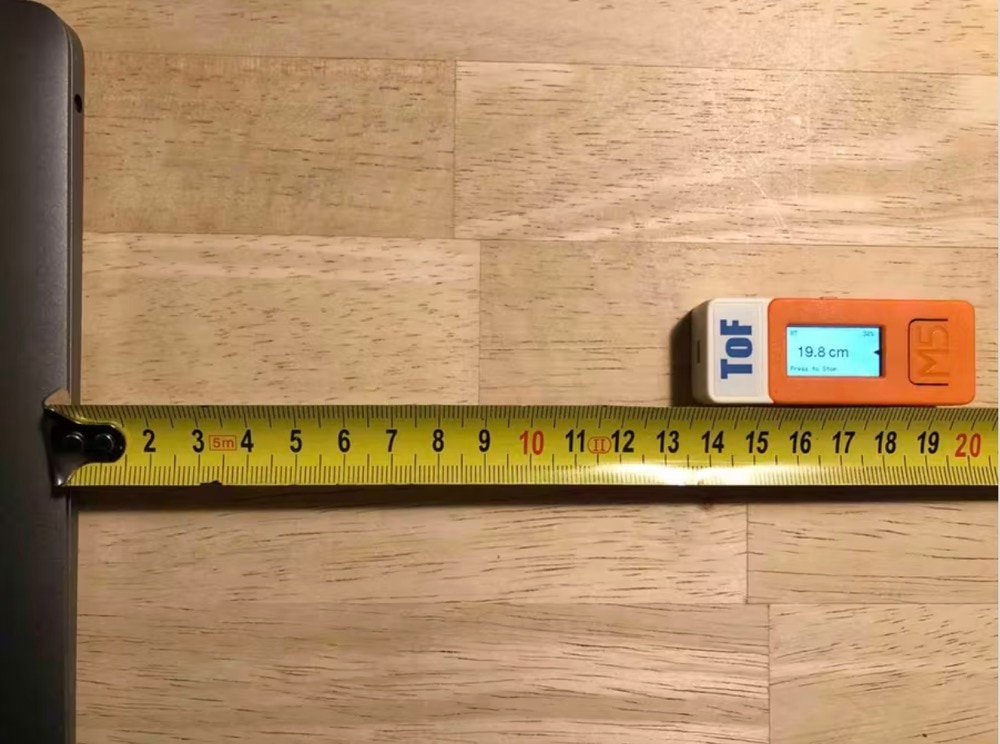
1Mini Laser Distance Range Sensor
1Gravity: I2C HUB
STEP 1
Connecting the Hardware
When it comes to wiring, it makes no difference whether you want to use the Unihiker M10 or Unihiker K10. It is important that you turn off the devices first! We are using the Gravity I2C Hub to make wiring easier and allow for future sensor expansions.
Wiring steps:
- Connect the Mini Laser Distance Sensor to any port on the I2C Hub using the provided I2C cable.
- Plug the I2C Hub into the I2C port of your UNIHIKER K10 or UNIHIKER M10 (any I2C port is possible).
- That is it! No soldering, no complex setup.

Important: Before powering up, check that the wiring is correct! In the “Board Overview” section of the DFRobot sensor wiki, you will find a table with all the important information about the colors. Incorrect cabling can cause serious problems or even damage your hardware.
STEP 2
Project Setup
Create a folder on your computer called LaserRangeSensor. Then, inside this folder, create another folder called lib. After that, two more files are required. One file is called main.py and is created directly in the root directory of your project. The second file, named DFRobot_MiniLaser.py, is created in the lib folder. This represents the driver module used in the main.py file.
Here is an example of what the project looks like after creating the folders and files:
# show directories and files (optional)

$ tree LaserRangeSensor/

LaserRangeSensor/

|-- lib

|   `-- DFRobot_MiniLaser.py

`-- main.py
Notice: The project structure does not differentiate between Unihiker M10 and Unihiker K10, as it is the same for both devices. The differences lie in the code, as well as the upload and use of each device. Unihiker M10 is an SBC with a Linux operating system, and Unihiker K10 is an ESP32 microcontroller.
STEP 3
The Python/MicroPython Code
Unihiker M10 (Python)
Python is used on the Unihiker M10. Copy the contents of the following examples into the respective empty files you have already created.
DFRobot_miniLaser.py
from time import sleep

from pinpong.board import I2C

from typing import Optional, Union

DEFAULT_I2C_ADDR: int = 0x74

class MiniLaserRangeSensor:

"""

    Class for handling I2C communication with DFRobot Mini Laser Range Sensor (SEN0590).

    Measurement range: 2-400cm

    Measurement accuracy: ≤ 25cm ± 1cm, >25cm ± S * 4% cm (with an actual error of around 5mm)

    Operating voltage: 3.3-5V

    Detection angle: 19°

    """

    _TRIGGER_REG: int = 0x10

    _TRIGGER_CMD: int = 0xB0

    _DISTANCE_REG: int = 0x02

    _UNIT_CONVERSION = {

"mm": 1,

"cm": 0.1,

"m": 0.001

    }

def __init__(self, address: int = DEFAULT_I2C_ADDR, bus: int = 0):

"""

        Class constructor.

        :param address: The I2C address of the target device.

        :type address: int

        :param bus: The I2C bus number to use.

        :type bus: int

        """

        self._unit = "mm"

        self._calibration_offset = 0.0

        self._addr = address

try:

            self._i2c = I2C(bus)

except Exception as err:

            print(f"[ERROR] Failed to initialize I2C: {err}")

            self._i2c = None

def set_measurement(self, unit: str) -> None:

"""

        Sets the measurement unit for distance output.

        :param unit: Desired unit ("mm", "cm", or "m").

        :type unit: str

        :return: None

        """

        valid_units = {"mm", "cm", "m"}

if unit.lower() in valid_units:

            self._unit = unit

else:

            print(f"[ERROR] Invalid unit '{unit}'. Allowed units: 'mm', 'cm', 'm'.")

def set_calibration(self, offset: Union[int, float]) -> None:

"""

        Sets the calibration offset for distance adjustments.

        :param offset: Calibration offset value to be set.

        :type offset: Union[int, float]

        :return: None

        """

if isinstance(offset, (int, float)):

            self._calibration_offset = offset

else:

            print("[ERROR] Calibration offset must be a numeric value.")

def _write_reg(self, reg: int, data: int) -> None:

"""

        Writes data to a specific register address using I2C communication.

        :param reg: The address of the register to write to.

        :type reg: int

        :param data: The data to be written to the register.

        :type data: int

        :return: None

        """

if isinstance(data, int):

            data = [data]

try:

            self._i2c.writeto_mem(self._addr, reg, data)

except OSError as err:

            print(f"[ERROR] Write issue: {err}")

def _read_reg(self, reg: int, length: int) -> Optional[bytes]:

"""

        Reads a block of bytes from a specified memory register over I2C.

        :param reg: Address of the memory register to read from.

        :type reg: int

        :param length: Number of bytes to read from the memory register.

        :type length: int

        :return: Read bytes from the register if successful, otherwise None.

        :rtype: Optional[bytes]

        """

try:

return self._i2c.readfrom_mem(self._addr, reg, length)

except OSError as err:

            print(f"[ERROR] Read issue: {err}")

return None

def get_distance(self) -> Optional[float]:

"""

        Calculate and return the distance measured by the sensor.

        :return: The measured distance in the specified unit, or None.

        :rtype: Optional[float]

        """

if self._i2c is None:

            print("[ERROR] Cannot get distance. I2C not initialized.")

return None

        self._write_reg(self._TRIGGER_REG, self._TRIGGER_CMD)

        sleep(0.05)

        buf = self._read_reg(self._DISTANCE_REG, 2)

if buf is None or len(buf) != 2:

            print("[ERROR] No valid data received from sensor.")

return None

        raw_value = (buf[0] << 8) | buf[1]

        distance = round(raw_value * self._UNIT_CONVERSION[self._unit], 4)

return round(distance + self._calibration_offset, 4)
main.py
from time import sleep

from pinpong.board import Board

from lib.DFRobot_MiniLaser import MiniLaserRangeSensor

if __name__ == '__main__':

    Board("UNIHIKER").begin()

    sensor = MiniLaserRangeSensor()

    sensor.set_measurement("cm")

    sensor.set_calibration(-2.0)

while True:

        distance = sensor.get_distance()

if distance is not None:

            print(f"{distance} cm")

else:

            print("[ERROR] Failed to read distance from sensor.")

        sleep(0.1)
When you run the program later (via main.py), you will see the removal information in the terminal. You can set the unit of measurement (mm, cm, and m) in the code, as well as a positive/negative calibration. When specifying the calibration, be careful to specify the respective unit of measurement; otherwise, calculation errors may occur.
Unihiker K10 (MicroPython)
MicroPython is used on the Unihiker K10. Copy the contents of the following examples into the respective empty files you have already created.
DFRobot_miniLaser.py
import micropython

from machine import I2C, Pin

from utime import sleep_ms

DEFAULT_I2C_ADDR = const(0x74)

class MiniLaserRangeSensor:

    TRIGGER_REG = micropython.const(0x10)

    TRIGGER_CMD = micropython.const(0xB0)

    DISTANCE_REG = micropython.const(0x02)

    DELAY = micropython.const(50)

    UNIT_CONVERSION = {

"mm": 1,

"cm": 0.1,

"m": 0.001

    }

def __init__(self, sda, scl, i2c_addr=DEFAULT_I2C_ADDR, i2c_bus=0):

        self._unit = "mm"

        self._calibration_offset = 0.0

        self._addr = i2c_addr

try:

            self._i2c = I2C(i2c_bus, sda=Pin(sda), scl=Pin(scl))

except Exception as err:

            print(f'[ERROR] Could not initialize I2C! bus: {i2c_bus}, sda: {sda}, scl: {scl}, error: {err}')

def _write_reg(self, reg, data):

if isinstance(data, int):

            data = [data]

try:

            self._i2c.writeto_mem(self._addr, reg, bytearray(data))

except Exception as err:

            print(f'[ERROR] I2C write issue: {err}')

def _read_reg(self, reg, length):

try:

            result = self._i2c.readfrom_mem(self._addr, reg, length)

except Exception as err:

            print(f'[ERROR] I2C read issue: {err}')

return None

return result

    @micropython.native

def _convert_unit(self, value):

        factor = self.UNIT_CONVERSION.get(self._unit, 1)

return round(value * factor, 4)

def set_measurement(self, unit):

        valid_units = {"mm", "cm", "m"}

if unit.lower() in valid_units:

            self._unit = unit

else:

            print(f"[ERROR] Invalid unit '{unit}'. Allowed units: 'mm', 'cm', 'm'.")

def set_calibration(self, offset):

if isinstance(offset, (int, float)):

            self._calibration_offset = offset

else:

            print("[ERROR] Calibration offset must be a numeric value.")

def get_distance(self):

if self._i2c is None:

            print("[ERROR] Cannot get distance. I2C not initialized.")

return None

        self._write_reg(self.TRIGGER_REG, self.TRIGGER_CMD)

        sleep_ms(self.DELAY)

        buf = self._read_reg(self.DISTANCE_REG, 2)

if buf is None or len(buf) != 2:

            print("[ERROR] No valid data received from sensor.")

return None

        raw_value = (buf[0] << 8) | buf[1]

        distance = self._convert_unit(value=raw_value)

return round(distance + self._calibration_offset, 4)
main.py
from micropython import const

from utime import sleep_ms

from unihiker_k10 import screen, button

from lib.DFRobot_MiniLaser import MiniLaserRangeSensor

SDA_PIN = const(47)

SCL_PIN = const(48)

DELAY = const(100)

DEFAULT_UNIT = 'cm'

DEFAULT_CALIBRATION_CM = 0

UNITS = ['mm', 'cm', 'm']

CONVERSION_FACTORS = {

'mm': 10.0,

'cm': 1.0,

'm': 0.01

}

CONVERSION_TO_M = {

'mm': 0.001,

'cm': 0.01,

'm': 1.0

}

BLACK = 0x000000

WHITE = 0xFFFFFF

GRAY = 0x808080

RED = 0xFF0000

def update_unit():

global current_unit_index, sensor

    unit = UNITS[current_unit_index]

    factor = CONVERSION_FACTORS.get(unit, 1.0)

    calibration = DEFAULT_CALIBRATION_CM * factor

    sensor.set_calibration(calibration)

    sensor.set_measurement(unit)

    print(f'[INFO] Changed to unit: "{unit}" calibration: "{calibration}"')

def btn_a_event():

global current_unit_index

    current_unit_index = (current_unit_index + 1) % len(UNITS)

    update_unit()

def btn_b_event():

global current_unit_index

    current_unit_index = (current_unit_index - 1) % len(UNITS)

    update_unit()

if __name__ == '__main__':

# initialize the display

    screen.init(dir=2)

    screen.show_bg(color=BLACK)

# initialize on-board buttons

    btn_a=button(button.a)

    btn_b=button(button.b)

    btn_a.event_released = btn_a_event

    btn_b.event_released = btn_b_event

# initialize the I2C sensor

    sensor = MiniLaserRangeSensor(sda=SDA_PIN, scl=SCL_PIN)

    sensor.set_measurement(DEFAULT_UNIT)

    sensor.set_calibration(DEFAULT_CALIBRATION_CM)

# define variable

    current_unit_index = UNITS.index(DEFAULT_UNIT)

# get sensor value and update display

while True:

        unit = UNITS[current_unit_index]

        distance = sensor.get_distance()

if distance is not None:

if distance < 0:

                message = f"Distance: 0.0 {unit}"

else:

                message = f"Distance: {distance} {unit}"

else:

            message = "Sensor issue"

        btn_colors = [BLACK, BLACK, BLACK]

        btn_colors[current_unit_index] = GRAY

        dist_m = distance * CONVERSION_TO_M.get(unit, 0.01)  # fallback: cm

if dist_m < 0.1:

            circle_colors = [RED, RED, RED]

elif dist_m < 0.15:

            circle_colors = [RED, RED, GRAY]

elif dist_m < 0.3:

            circle_colors = [RED, GRAY, GRAY]

else:

            circle_colors = [GRAY, GRAY, GRAY]

# create UI

        screen.draw_line(x0=30, y0=20, x1=210, y1=20,color=WHITE)

        screen.draw_rect(x=30, y=35, w=50, h=25, bcolor=WHITE, fcolor=btn_colors[0])

        screen.draw_rect(x=95, y=35, w=50, h=25, bcolor=WHITE, fcolor=btn_colors[1])

        screen.draw_rect(x=160, y=35, w=50, h=25, bcolor=WHITE, fcolor=btn_colors[2])

        screen.draw_text(text='mm', x=38, y=37, color=WHITE)

        screen.draw_text(text='cm', x=105, y=37, color=WHITE)

        screen.draw_text(text='m', x=176, y=37, color=WHITE)

        screen.draw_line(x0=30, y0=75, x1=210, y1=75,color=WHITE)

        screen.draw_text(text=message, x=30, y=110, color=WHITE)

        screen.draw_circle(x=120, y=250, r=100, bcolor=BLACK, fcolor=circle_colors[0])

        screen.draw_circle(x=120, y=250, r=70, bcolor=BLACK, fcolor=circle_colors[1])

        screen.draw_circle(x=120, y=250, r=30, bcolor=BLACK, fcolor=circle_colors[2])

        screen.draw_rect(x=0, y=250, w=240, h=70, bcolor=BLACK, fcolor=BLACK)

        screen.show_draw()

        sleep_ms(DELAY)
After starting the device, the file boot.py (which is not used here) and then main.py are automatically used. You can customize the constants in the main.py file (e.g., for colors, the default unit of measurement after loading or calibration). While the program is running and measurements are being taken and displayed, you can change the unit of measurement at any time (via on-board buttons A and B).
STEP 4
Uploading and Running the Code
Unihiker M10:
- Connect the Unihiker M10 via USB to your Computer
- Choose the protocol for upload (SCP, FTP, or SMB). See the DFRobot Wiki for more details.
- Upload both DFRobot_MiniLaser.py (to lib/) and main.py (to the root or a test folder).
- Run main.py from your terminal (via SSH) or the touch screen of Unihiker.
- The output appears in the terminal, showing calibrated distance values in your chosen unit.
Unihiker K10:
- Open Thonny and connect to your Unihiker K10.
- Upload the DFRobot_MiniLaser.py file in the lib/ folder (you may need to create it first), and upload main.py.
- Run the code (via Thonny or just re-power the device)
- A small graphical interface will appear on the screen.
Note: The MicroPython firmware: unihikerK10mpy_20241122_V0.5.bin was used during the creation of the example code. You can find the latest MicroPython firmware and important information in the DFRobot Wiki.
If you are not a Windows user, here are a few (macOS) commands for you:
# check if the USB device was recognized

$ ls -la /dev/cu.*

# create a new directory and change into it

$ mkdir ~/unihiker_k10 && cd ~/unihiker_k10/

# create Python virtualenv

$ python3 -m venv venv

# activate Python virtualenv

$ source venv/bin/activate

# install esptool

(venv) $ pip3 install esptool

# verify connection and chip (optional)

(venv) $ esptool.py --port /dev/cu.usbmodemXXXX chip_id

# erase flash

(venv) $ esptool.py --port /dev/cu.usbmodemXXXX --chip esp32s3 erase_flash

# flash MicroPython

(venv) $ esptool.py --port /dev/cu.usbmodemXXXX --chip esp32s3 --baud 460800 write_flash 0 unihikerK10mpy_20241122_V0.5.bin

# install Thonny IDE

(venv) $ pip3 install thonny

# start Thonny IDE

(venv) $ thonny
STEP 5
Ideas and Extensions
Here are some creative directions you could explore with this setup:
- Automated obstacle avoidance: Integrate the sensor into a robot to detect nearby objects
- Digital measuring tool: Use the sensor as a precise ruler with unit conversion
- Environment interaction: Combine with other sensors (e.g., temperature, humidity) for smart monitoring
- Machine learning inputs: Feed distance data into AI models for gesture detection or space awareness
- Custom GUI: Develop awesome GUIs for specific Unihiker devices