VocalFusion Stereo Dev Kit for Amazon AVS
The XMOS VocalFusion Stereo Dev Kit for Amazon AVS (DigiKey part number 880-1130-ND) is a Raspberry Pi specific dev kit to help with the development of “far-field voice capture and processing” applications for the Amazon Alexa Voice Service (AVS). “Far-field voice capture” technology “aims to enable smart devices to recognize distant human speech (usually 1m to 10m).” Through the Amazon AVS technology, it is not necessary to “train” a voice recognition system. The system is ready to go out of the box.
 Figure 1: XMOS VocalFusion Stereo Dev Kit for Amazon AVS. (Image source: XMOS)
What’s included:
- Linear array of 4 omni-directional microphones: up to 180° capture, for ‘edge of the room’ applications
- Low-jitter audio clock
- Configurable user input buttons and LEDs
- I2S audio and I2C control connectivity
- USB power, with optional USB 2.0 device audio and control connectivity
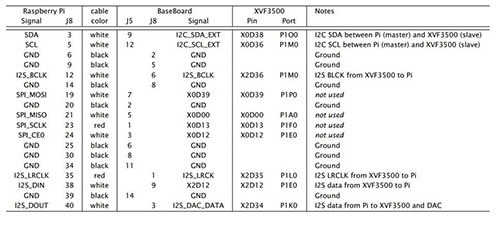
- 40-pin Raspberry Pi interface cable (see Figure 3 for the pinout)
What’s not included but needed:
- Raspberry Pi – DigiKey part number 1690-1025-ND
- Power adapter (minimum 2 A recommended) – DigiKey part number 1690-1022-ND
- SD card (minimum 16 GB recommended) – DigiKey part number 1582-1004-ND
- Speaker
- USB keyboard
- USB mouse – DigiKey part number CH969-ND
- Monitor with HDMI input or Raspberry Pi touchscreen – DigiKey part number 1690-1007-ND
- HDMI cable – DigiKey part number Q396-ND (not needed if you are using 1690-1007-ND)
- Ethernet connection with internet connectivity
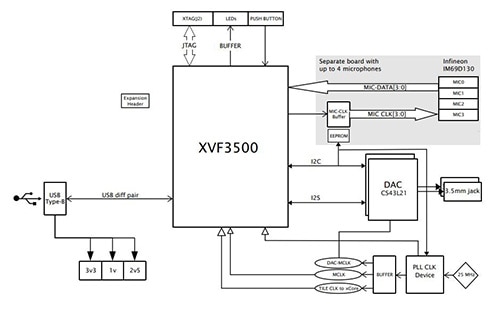
VocalFusion Stereo Dev Kit block diagram is shown in Figure 2. It includes:
- VocalFusion XVF3500 Voice Processor
- Four MEMS microphones on a separate board
- A micro-USB connector for power (and optionally USB 2.0 device connectivity)
- Extension headers for I2S and I2C control connectivity
- Four general purpose push-button switches
- 13 user-controlled LEDs
- Low-jitter clock source
- An xSYS connector for an xTAG debug adapter
 Figure 2: VocalFusion Stereo Dev Kit Block Diagram. (Image source: XMOS)
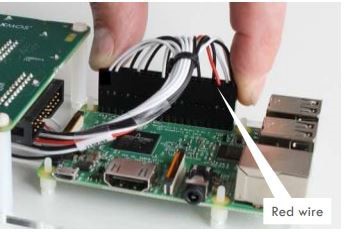
XMOS provides a straight-forward setup guide. One note to keep in mind, the 40-pin Pi connector is not keyed so it is worth a second check to make sure the connector is placed correctly (see Figure 3).
 Figure 3: RPi 40-pin connector. (Image source: XMOS)
Please see Figure 4 for additional information on the Raspberry Pi pinout.
 Figure 4: Raspberry Pi Cable Pinout. (Image source: XMOS)
Install Raspbian
Download Raspbian Stretch by following this link.
Put the SD card into the computer via the SD card slot or a USB adapter.
Install the downloaded image onto the SD card by following these instructions (based on the OS you are using):
Linux Terminal
- Ctrl-Alt-T will open a new terminal window.
- At the command prompt type lsblk to get the address of the SD card, it could be either /dev/mmcblk0 or /dev/sdb or something similar.
- Type: sudo dd if=/dev/zero of=/dev/mmcblk0 bs=1M count=10
- Type: unzip -p 2018-06-27-raspbian-stretch.zip | sudo dd of=/dev/mmcblk0 bs=4M conv=fsync
- Note the date 2018-06-27 may be different so type the date that is appropriate for your download.
- Wait until the image is written and eject disk.
Mac OS
- Open terminal
- Type: diskutil list to find the disk for the SD card, it should be something like disk3 or disk4.
- Type: sudo diskutil eraseDisk FAT32 Raspbian /dev/disk3 (make sure you have the correct disk number)
- Type: sudo dd bs=1m if=2018-06-27-raspbian-stretch.img of=/dev/disk3 conv=sync
- Wait until the image is written and eject disk.
Windows
- Download the Windows install etcher.io
- Run Etcher and select the 2018-06-27-raspbian-stretch.zip.
- Select the SD card drive.
- Click “Flash”.
- Wait until the image is written and eject disk.
Install and Setup Amazon AVS
Follow this link to the Raspberry Pi Quick Start Guide, which will walk you through the process of installing the necessary dependencies and getting the Amazon AVS up and running. When this is finished, type: sudo reboot.
Run Amazon AVS
- Type: avsrun
- To test, say: “Alexa, what time is it?”
References:

Have questions or comments? Continue the conversation on TechForum, DigiKey's online community and technical resource.
Visit TechForum


