Customize Your Aluminum Enclosure End Caps Using 3D Printing
As a small-volume electronics manufacturer (and hobbyist), I often use aluminum enclosures to house my products and projects. I like the durability and strength of the extruded aluminum casing, and the aluminum construction provides a large surface area for heat dissipation should I ever need it as a heat sink. I’ve been using Hammond Manufacturing series 1455C802 aluminum extruded cases and have been very pleased with their quality.
While I enjoy the feel of the aluminum casing, I find drilling and cutting ports in the plastic end caps to fit my various binding posts and connectors to be very challenging and inconsistent. Drilling holes is straightforward enough; a good drill press and a template can solve this challenge. But when it comes to anything other than a round hole, things can get tricky. Many of my products and projects require square, rectangular, and even non-uniform geometric shapes to expose various connectors (USB ports, board headers, LCD panels). I use a variety of tools to perform these cuts, including an X-ACTO knife, diagonal cutters, and nippers. I still have all my fingers, but I know it’s just a matter of time until something happens when using the X-ACTO knife.
3D printing is safer, faster, and looks more professional
While the odd one-off project or prototype can be completed using these tools, my results often make the finished product look amateurish. In addition, when manufacturing in the hundreds of units per year as I do, cutting these by hand can be very time-consuming. My solution has been to discard the plastic end caps provided by the manufacturer and instead 3D print new ones to meet my specifications (Figure 1).
 Figure 1: Example of 3D printed end caps (left) to fit the Hammond 1455C802 case (right). (Image source: Doug Peters)
While the additive 3D manufacturing process has a bit of a learning curve, once mastered, the things you can print are only constrained by your imagination.
There are essentially three steps to the process. First, a computer -ided design (CAD) file must be created, and the output saved as a Standard Tessellation Language (STL) file. There are many free and low-cost CAD software programs available to generate STL Files. I use a free web-based application called TinkerCad for my designs.
Second, the STL file must be converted into a set of numerical instructions for the 3D printer. This new file format is called G-code and can be generated using what is called a “Slicer” for converting STL into G-code files. I use a free version of the Cura software package, but there are many others available, and most are free. Finally, once the G-code has been generated, you just send it to your preferred 3D printer, and voila, you’ve just created a new widget!
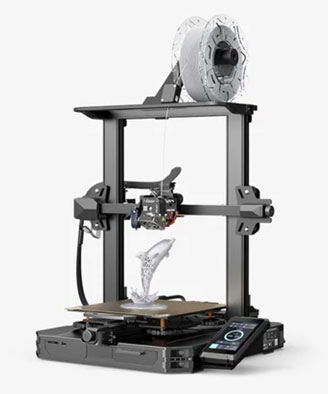
For my own 3D printing needs, I use the ENDER-3 S1 Pro from Creality (Figure 2). I find the quality and speed of the ENDER-3 S1 Pro to be excellent, especially for the price. Printing time depends on the complexity of your design, of course, but in my example for the Hammond 1455C802 case, it takes about 25 minutes to complete the two end caps. I’ve also started to print two sets of end caps in one print job, which takes about 40 minutes.
 Figure 2: Using the ENDER-3 S1 PRO from Shenzhen Creality 3D Technology Co., Ltd., it took about 25 minutes to complete the two end caps for the Hammond 1455C802 enclosure. (Image source: Shenzhen Creality 3D Technology Co., Ltd.)
There are multiple types of filament to select from when 3D printing, including polylactic acid (PLA), polyethylene terephthalate glycol (PETG), and acrylonitrile butadiene styrene (ABS). A quick search on YouTube will provide you with an overwhelming set of videos explaining the pros and cons of all the filaments available. Flashforge USA provides PLA filament (among other types) in a multitude of colors (Figure 3).
 Figure 3: Examples of the many PLA filament color options. (Image source: Flashforge USA)
Conclusion
I’ve found the 3D printing process to be the perfect solution for my small business and hobby needs when it comes to enclosure end cap manufacturing. It enables me to focus on my electronics design while at the same time increasing the quality and appearance of my finished product. I’ve also put my 3D printer to use around my lab to print a multitude of useful gadgets.
Personally, I‘ve found that using a 3D printer for enclosure end-cap manufacturing has more than justified my purchase of a 3D printer and maybe even saved my fingers in the process!

Have questions or comments? Continue the conversation on TechForum, DigiKey's online community and technical resource.
Visit TechForum


