Mfr Part # 3501
ADAFRUIT GEMMA M0 - MINIATURE WE
Adafruit Industries LLC
A recent article explored various online circuit simulation tools makers can use for experimenting with electronic components. One such tool that was also particularly interesting for classroom environments is MakeCode Maker. This article introduces you to the online app, and it gives an overview of the most important features.
To begin, navigate to the MakeCode Maker website. Note that some maker board manufacturers, such as Adafruit, have custom MakeCode websites you can also use. All these websites function the same. However, vendor-specific versions often contain fewer boards and extensions.
 The main page of the app lets you load existing projects. From here, you can also create a new project.
You’ll see only the new project button when you first visit the website. However, I’ve already created a few projects before, so the app lists them on the dashboard. Click the new project button to begin. Next, the website will ask you to enter a name for your project:
 Select a name for your new project.
In this pop-up window, you can also select the programming language you want to use. Next, you have to choose the development board you want to simulate in the design:
 You can choose from a large selection of development boards.
Once done, the app will load the editor and the simulator window, which form the main UI you’ll use to create your designs.
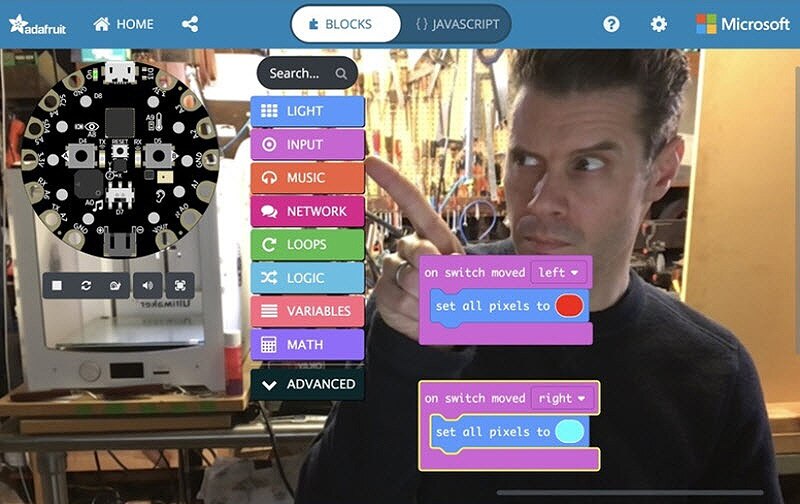
Over time, the MakeCode Maker UI can become intuitive, fun to work with, and easy to use. The following image illustrates the main features of the user interface:
 This image shows the main user interface of MakeCode Maker.
The UI consists of two parts. On the left, you see the simulator. The left panel is where MakeCode Maker generates the breadboard layout for your design. The blocks editor on the right-hand side of the UI lets you define the functionality of your circuit. MakeCode Maker then generates the hardware layout in the simulator based on these blocks. You can also use source code for programming if you prefer it that way. Start designing a circuit by dragging in blocks from the categories outlined in orange:
 The simulator view adds components to your design once you define the intended behavior of your project using the blocks editor.
The app updates the simulator view and adds elements according to your code. If you want to delete blocks from your project, drag them back into the category panel that separates the editor and simulator views:
 Drag a block back to the block container to remove it from your design.
So far, you’ve seen how to add simple I/O components to your design by dragging blocks into the editor view of MakeCode Maker. However, you can also load extensions that add support for more complex components such as LCDs, gamepads, and keyboards. Start by clicking the advanced category in the blocks editor and then choose extensions:
 You can find the extensions view in the advanced blocks section.
Doing so opens a new pop-up dialog that lets you select modules to import. You can also use the search bar to find extensions:
 Choose the extensions you want to add to your project. You can also filter them using the text input at the top of the extensions view.
As mentioned earlier, MakeCode Maker targets beginners, and it’s a fantastic tool for teaching STEM classes. For that purpose, the app includes a few tutorials and examples that teachers and students can follow to learn how to use MakeCode Maker. You can find the tutorials by scrolling down on the app’s main page. You can find the tutorials below the button you used to create a new project earlier:
 MakeCode Maker includes a few tutorials to get to know the app.
Selecting any of the tutorials opens a new project that includes step-by-step instructions. Each of the tutorials is rather short and easy to follow. However, they perfectly illustrate how the app functions and they also highlight the most important features of MakeCode Maker:
 The tutorials guide users through the process of creating simple projects.
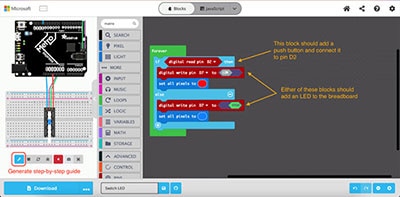
You can use MakeCode Maker to create printable step-by-step assembly guides for your projects. You can then hand them out to students to show them how to build a project using physical components. Open any project to generate such a document. Then, click the wrench icon in the simulator panel of that project:
 Click the highlighted button to generate a step-by-step assembly guide for your project.
Note that the button is only visible once the program adds components to the simulator. It does not show up if the simulator view only contains the development board. Anyway, once you click the button, the program generates an easy-to-understand assembly guide that you can either save as a PDF or print:
 The program then displays a preview of your guide. You can either print it or save it as a PDF file.
Once you get the hang of it, MakeCode Maker is an incredibly easy-to-use and fun tool for experimenting with electronics. The program requires users to define the intended behavior of the circuit, and it then automatically generates a design based on the source code. Therefore, the app is particularly interesting for hobbyists and students who are new to working with electronics.
MakeCode Maker supports a wide range of modern development boards that users can choose from when generating a new project. The blocks editor works perfectly and is fun to use. Users can load in more complex components using the extensions option in MakeCode Maker. For classroom environments, the app offers step-by-step guides and tutorials, and it also allows teachers to generate printable assembly guides for their students.