Mfr Part # 5980
FEATHER RP2040 ADALOGGER
Adafruit Industries LLC
License: See Original Project Humidity Temperature Adafruit Feather STEMMA
Courtesy of Adafruit
Guide by Ben Everard
Overview
Taking regular readings with a sensor and storing the results are a common task for microcontrollers, but it usually requires some programming and soldering. However, thanks to WipperSnapper Offline and STEMMA QT, we can get everything up and running without programming or soldering.
In this project, you create a temperature and humidity monitor that can record values as bread dough rises (the process known as proofing). However, you can use this for any situation where you want to record the temperature and humidity over time. It's not just temperature & humidity; you can connect a wide variety of sensors to record other things. There's a list of supported hardware at https://learn.adafruit.com/no-code-offline-data-logging-with-wippersnapper/supported-hardware.
Parts
Adafruit Feather RP2040 Adalogger - 8MB Flash with microSD Card
Adafruit Sensirion SHT45 Precision Temp & Humidity with PTFE
The SHT45 sensor is available with and without a PTFE filter. In this case, I recommend the version with the filter as it will help keep contaminants out of the sensor.
WipperSnapper offline can work with any MicroSD card under 32 GB. If you don't already have one, I recommend the following:
SD/MicroSD Memory Card (8 GB SDHC)
Optional components
The above components will let you record data at regular intervals but won't keep track of the time that readings were taken. If you want to record the actual time of readings, then you'll need the real-time clock (RTC) below and another STEMMA QT cable.
CR1220 12mm Diameter - 3V Lithium Coin Cell Battery
You might also need:
You'll also need a way of connecting the RP2040 Adalogger to a computer and a power supply. The RP2040 Adalogger has a USB-C port, so depending on your computer, you'll need one of the following if you don't already have them.
You'll also need a way of reading the data off the MicroSD card. Many laptops have SD cards built in, though you might need a MicroSD to SD adapter, which is included with the MicroSD card above. If you don't have one already, you'll need something like the following (which needs a USB-C port).
Configure the MicroSD Card
A MicroSD card is required to be inserted into your board for offline mode. This applies even for cases where data is only intended to log to USB serial.
Which MicroSD Card Should I Get?
Any MicroSD Card with a capacity of less than 32GB should be good. When purchasing the card, be aware that some cheap cards are "fakes" and may cause headaches. The MicroSD cards in the Adafruit shop are guaranteed to work.
You will also need a way to read the logged data from the MicroSD Card. To do this, you will need an external SD Card reader to plug into your computer.
Formatting under Windows/Mac
If you bought a MicroSD card, chances are it's already pre-formatted with a FAT filesystem. However, you may have problems with how the factory formats the card, or if it's an old card, it needs to be reformatted. The Arduino SD library used in the Wippersnapper software supports both FAT16 and FAT32 filesystems.
If you have a MicroSD card with a very small capacity, say 8-32 Megabytes you might find it is formatted FAT12 which isn't supported by Offline Mode. You'll have to reformat these cards.
Either way, it's always a good idea to format the card before using it, even if it's new! Note that formatting will erase the card so save anything you want first.
Before proceeding with the guide, we strongly recommend you use the official SD card formatted utility to format your MicroSD Card. This tool is written by the SD Association, and it solves many problems that come with bad formatting. The link is below:
Download the Official SD Card Formatter for Windows/Mac
Insert the MicroSD Card
The Feather RP2040 Adalogger's MicroSD card slot is located at the end of the board, directly behind the STEMMA QT port. After formatting the MicroSD card, insert the card into the MicroSD card slot.
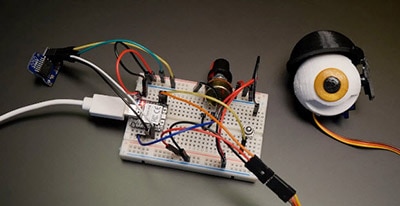
Connecting the Hardware
Connect the RP2040 Adalogger to the DS3231 clock (if you are using one), and then the other port on the DS3231 to the SHT45 using STEMMA QT Cables. You can use either port on the DS3231 and SHT45 for input or output. The circuit will work whether you have the SHT45 or the DS3231 first in the chain. However, I found it a bit easier to position the hardware for accurate temperature monitoring if the SHT45 is last in the chain.
The cables should push snugly into place. they only go in one way around, so if they're not going in, try rotating them.
The circuit should look like this if you have a clock:
Or this if you don't:
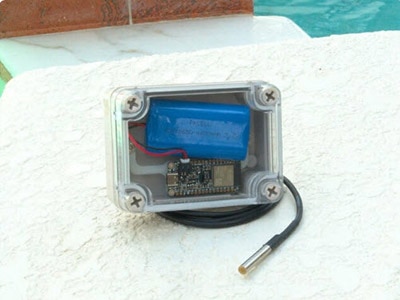
Protecting the hardware
In this project, we're working with food and electronics, and we want to be a bit careful to keep the two separate. At the same time, we need the sensor to be exposed so that it can fully sense the environment. The best setup here depends on what your bread proofing setup looks like.
In many cases, you should be fine placing your electronics next to the bowl or basket you're proofing your dough in.
If you're proofing dough on a metal baking sheet, be careful to place the electronics in contact with anything conductive.
With everything together, you're now ready to install the firmware.
Install WipperSnapper Offline Firmware
I have a compatible board already running WipperSnapper but want to try out Offline Mode
If you wish to try Offline Mode and have a device running WipperSnapper, you must download the WipperSnapper Offline Mode beta firmware and install it on your device. This will replace the existing WipperSnapper (online) firmware on your board.
WipperSnapper (offline) is not permanently installed on your board, you can switch back to WipperSnapper (online) at any time.
I have a compatible board running an Arduino Sketch but want to try out Offline Mode
Installing WipperSnapper Offline will completely erase the Arduino sketch that is currently running on your board. Before installing WipperSnapper Offline, ensure your computer has a backup of the sketch running on the Arduino.
WipperSnapper is not permanently installed on your board, you can switch back to Arduino at any time.
I have a compatible board running CircuitPython but want to try out Offline Mode
WipperSnapper is a different application from CircuitPython. Because of this, installing WipperSnapper will completely erase the CircuitPython installation and all files on your board. WipperSnapper is not permanently installed on your board, you can switch back to CircuitPython at any time.
Before installing WipperSnapper, verify and back up your CircuitPython Installation by following the instructions below:
When you plug a CircuitPython board into your computer, your computer will see the board's flash memory as a USB flash drive where files can be stored. When the board is running CircuitPython, you'll see the CIRCUITPY drive.
If you see the CIRCUITPY drive appear as a USB flash drive:
Copy all files to a safe location on your computer, like your desktop. code.py is the most important file on this drive as it contains your CircuitPython code.
If you do not see the CIRCUITPY drive and instead see a drive named boardnameBOOT (or similar such as one of these drive names):
Locate the reset button on your board. It's a small, black button, and on most of the boards, it will be the only button available. It is typically labeled RESET or RST on the board.
Tap this button once
If the drive changes from boardnameBOOT to CIRCUITPY, follow the instructions above to back up its contents
If it stays as boardnameBOOT, the board does not have CircuitPython installed. You may proceed to the next step.
Once you've backed up your CIRCUITPY drive, proceed to the next steps to download and install the WipperSnapper firmware.
Download WipperSnapper Firmware with Offline Mode
WipperSnapper will ultimately be released as a single firmware file that supports online and offline modes. But, for now, WipperSnapper is split into two different files/firmware:
WipperSnapper (Online) - Downloadable from io.adafruit.com/devices/new
WipperSnapper (Offline) - Only downloadable from the WipperSnapper Arduino GitHub repository
To download WipperSnapper with Offline Mode, navigate to the releases page for the WipperSnapper Arduino project.
From the releases page, click the release for the latest version of the offline firmware. The offline firmware will have "offline" in the title.
Under Assets, select the UF2 file for the Adafruit RP2040 FeatherWing. It should look something like wippersnapper.feather_rp2040_adalogger_tinyusb.1.0.0-offline-beta.x.uf2.
Save the file to your computer's desktop.
Install WipperSnapper Offline Firmware
To enter the bootloader, hold down the BOOT/BOOTSEL button (highlighted in red above), and while continuing to hold it (don't let go!), press and release the reset button (highlighted in red or blue above). Continue to hold the BOOT/BOOTSEL button until the RPI-RP2 drive appears!
If the drive does not appear, release all the buttons, and then repeat the process above.
You can also start with your board unplugged from USB, press, and hold the BOOTSEL button (highlighted in red above), continue to hold it while plugging it into USB, and wait for the drive to appear before releasing the button.
A lot of people end up using charge-only USB cables and it is very frustrating! Make sure you have a USB cable you know is good for data sync.
You will see a new disk drive appear called RPI-RP2.
Drag the wippersnapper.feather_rp2040_adalogger_tinyusb.1.0.0-offline-beta.x.uf2 file to RPI-RP2.
The RPI-RP2 drive will disappear, and a new disk drive called WIPPER will appear.
That's it, you're done! :)
Flash Resetting UF2
If your board ever gets into a really weird state and the WIPPER doesn't show up as a disk drive after installing WipperSnapper, try loading this 'nuke' UF2 to RPI-RP2. which will do a 'deep clean' on your Flash Memory. You will lose all the files on the board, but at least you'll be able to revive it!
After loading this UF2, follow the steps above to re-install WipperSnapper.
Download Flash "Nuke"/Reset UF2 file for RP2 based boards
If not using the Raspberry Pi Pico (or 2 / W) then find your board's learn guide for further details on resetting/erasing the flash memory and restoring the UF2 bootloader.
Setting the Configuration
Now that you have the hardware connected and the firmware installed, you need to configure WipperSnapper so that it knows what hardware is connected and how frequently you want to take readings. You do this with the config.json file.
Connect the Adafruit Feather RP2040 Adalogger to your computer via USB, and you should see a new drive appear called WIPPER. You need to save the configuration in a text file called config.json in that directory.
Using a text editor, copy the text to the editor and save the file onto the WIPPER drive.
The contents of the file should be one of the following:
If you have the DS3231 real-time clock attached, then it should be:
{
    "exportedFromDevice": {
        "referenceVoltage": 3.3,
        "totalGPIOPins": 18,
        "totalAnalogPins": 4,
        "sd_cs_pin": 23,
        "statusLEDBrightness": 0.5,
        "rtc": "DS3231"
    },
    "components": [
        {
            "name": "SHT45 Sensor",
            "componentAPI": "i2c",
            "i2cDeviceName": "sht45",
            "period": 15,
            "i2cDeviceAddress": "0x44",
            "i2cDeviceSensorTypes": [
                {"type": "relative-humidity"},
                {"type": "ambient-temp"},
                {"type": "ambient-temp-fahrenheit"}
            ]
        }
    ]
}
If you aren't using the real-time clock, it should be:
{
    "exportedFromDevice": {
        "referenceVoltage": 3.3,
        "totalGPIOPins": 18,
        "totalAnalogPins": 4,
        "sd_cs_pin": 23,
        "statusLEDBrightness": 0.5
    },
    "components": [
        {
            "name": "sht45",
            "componentAPI": "i2c",
            "i2cDeviceName": "sht45",
            "period": 15,
            "i2cDeviceAddress": "0x44",
            "i2cDeviceSensorTypes": [
                {"type": "relative-humidity"},
                {"type": "ambient-temp"},
                {"type": "ambient-temp-fahrenheit"}
            ]
        }
    ]
}
Once that's saved to the device, you can reset the device (either by pressing the reset button or by plugging it in and then unplugging it), and it will start recording data. The status light on the Adafruit RP2040 Adalogger should flash every 15 seconds when it takes a reading.
You now have a working temperature logger. Next, to look at the data that is being stored.
Analysing Your Data
WipperSnapper saves data in a format called JSON and stores it on the SD card. To read the data, unplug the device to power it down, then take out the MicroSD card and plug it into your computer. You should see one or more files with names ending .log.
If you have a real-time clock module attached, the files should contain something like this:
{"i2c_address":"0x44","timestamp":1742312411,"value":66.88853,"si_unit":"%"}
{"i2c_address":"0x44","timestamp":1742312411,"value":18.89563,"si_unit":"C"}
{"i2c_address":"0x44","timestamp":1742312411,"value":66.00252,"si_unit":"F"}
{"i2c_address":"0x44","timestamp":1742312426,"value":66.76837,"si_unit":"%"}
{"i2c_address":"0x44","timestamp":1742312426,"value":18.89029,"si_unit":"C"}
{"i2c_address":"0x44","timestamp":1742312426,"value":66.01213,"si_unit":"F"}
{"i2c_address":"0x44","timestamp":1742312441,"value":66.97055,"si_unit":"%"}
{"i2c_address":"0x44","timestamp":1742312441,"value":18.86625,"si_unit":"C"}
{"i2c_address":"0x44","timestamp":1742312441,"value":66.03136,"si_unit":"F"}
{"i2c_address":"0x44","timestamp":1742312456,"value":66.97055,"si_unit":"%"}
{"i2c_address":"0x44","timestamp":1742312456,"value":18.88228,"si_unit":"C"}
{"i2c_address":"0x44","timestamp":1742312456,"value":65.95926,"si_unit":"F"}While if you don't have a clock module, they should look like this:
{"i2c_address":"0x44","timestamp":0,"value":63.74326,"si_unit":"%"}
{"i2c_address":"0x44","timestamp":1,"value":19.98245,"si_unit":"C"}
{"i2c_address":"0x44","timestamp":2,"value":67.97803,"si_unit":"F"}
{"i2c_address":"0x44","timestamp":3,"value":65.10895,"si_unit":"%"}
{"i2c_address":"0x44","timestamp":4,"value":19.40032,"si_unit":"C"}
{"i2c_address":"0x44","timestamp":5,"value":66.94461,"si_unit":"F"}
{"i2c_address":"0x44","timestamp":6,"value":65.95392,"si_unit":"%"}
{"i2c_address":"0x44","timestamp":7,"value":19.13062,"si_unit":"C"}
{"i2c_address":"0x44","timestamp":8,"value":66.47356,"si_unit":"F"}
{"i2c_address":"0x44","timestamp":9,"value":66.48989,"si_unit":"%"}
{"i2c_address":"0x44","timestamp":10,"value":18.92767,"si_unit":"C"}
{"i2c_address":"0x44","timestamp":11,"value":66.10345,"si_unit":"F"}
{"i2c_address":"0x44","timestamp":12,"value":66.97437,"si_unit":"%"}
{"i2c_address":"0x44","timestamp":13,"value":18.78881,"si_unit":"C"}
{"i2c_address":"0x44","timestamp":14,"value":65.79103,"si_unit":"F"}
The difference is that with a clock, each reading is tagged with the timestamp (this is the number of seconds since January 1st, 1970), while if you don't, each reading is numbered sequentially.
Converting to CSV
You can read the JSON files, but if you want to analyse the data in a spreadsheet, you'll need the data in another form. Now let's convert it into CSV (comma separated values), a common file type for data like this.
Head to https://konbert.com/convert/jsonl/to/csv and upload the log file. Click Convert and then Download to save your data. The downloaded file can then be read in by most popular spreadsheets.
We'll now look at how to generate useful charts with this using Google Sheets, and the process is very similar in LibreOffice Calc or MS Excel.
Loading into Google Sheets
Head to https://sheets.google.com and create a new sheet (you might need to sign up for an account if you don't already have one). Then go to File > Import and load the CSV file that you downloaded in the previous step.
If you are using a real time clock, we can convert the time into a more usual date and time format. If you're not using the clock, you can skip this step.
Create a new column that will hold your date. In the top data cell in that column, enter the formula
=EPOCHDATE(B2)
and this should convert the timestamp (in cell B2) into a human-readable date. You can copy and paste this down the whole column and it will give you the correct date and time for each reading.
You also need to break out the temperature and humidity data into their own columns so that the chart will plot them correctly. Create a new column called temp and add the formula:
=if(E2="C", D2, "")
or
=if(E2="F", D2, "")
Depending on if you want the temperature in Celsius or Fahrenheit.
Then create a new column called humidity and add the formula
=if(E3="%", D3, "")
Both of these new formulas should be copied and pasted down the column.
We're now ready to create the chart. Highlight the data and then go to Insert > Chart. This should create a scrambled chart that we need to change some settings on. In the box on the right-hand side select the following (and remove any additional entries in the X axis and Series):
Chart Type: Line chart
X axis: date or timestamp if not using the real time clock
Series: temp and humidity
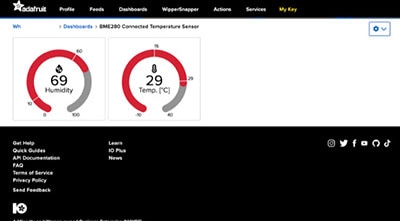
Your chart should now be displaying temperature and humidity against time. You can set the title and other parts of its appearance in the Customize section should you wish.
We've used this to monitor the temperature and humidity of our bread proofing. There are many different opinions on what the best temperature and humidity may be. Do you want a slow steady rise, or do you need the bread to be ready quickly? By monitoring the values, you can see how they affect the bread and decide what is the best option for what you want to bake.