Using Google’s Vision API For Low-Cost, Cloud-Enabled Embedded Image Recognition
Contributed By DigiKey's North American Editors
2018-08-15
Increasingly, embedded systems need to perform image recognition in the field whether it’s facial, text, or some other image data. Many implementations require an expensive, high-end applications processor with custom and expensive application code. Also, image processing is performed on-chip, which can make the cost and development times difficult for designers to justify the investment in resources.
One potential solution is to use an embedded microcontroller that can connect to the Google Cloud Platform (GCP) and use its vision APIs to perform the analysis. This has the advantages of low-cost hardware and the offloading of processing to the cloud.
This article will explore how embedded developers can leverage the GCP and STMicroelectronics’ STM32F779 microcontroller to setup and perform image recognition.
Introduction to machine vision
The ability to recognize objects and identify them in an image can be used in a wide range of applications from identifying obstacles in autonomous vehicles, through cataloging product numbers coming off an assembly line. As such, machine vision is helping to provide embedded systems with a new level of intelligence.
Implementing machine vision in an embedded system has traditionally been done on either a high-performance processor or an application processor such as the Raspberry Pi Zero (Figure 1) from Pi Supply. This low-cost development board has a camera connector that can be used to capture images that can be analyzed by machine vision algorithms.

Figure 1: The Raspberry Pi Zero is a low-cost development board that features a camera interface over which to capture images that can be analyzed by machine vision algorithms. (Image source: Pi Supply)
In these applications a developer might use something like OpenCV for face detection, or use a more advanced software package to perform object detection.
The problem with an application processor solution in a deeply embedded application is that the power consumption and form factor is often too large to fit the bill, not to mention the BOM cost.
Cloud-based computing offers developers an interesting trade-off. Rather than spending the upfront costs on high-end computing, software, and the time necessary to get an integrated solution, developers can instead use a deeply embedded target that can capture an image and then transmit it to the cloud for processing. This allows a developer to use a low-cost hardware platform that is energy efficient, and leaves the image recognition and computing to the cloud server.
There is a small cost associated with using the cloud and the vision recognition APIs; but given that most IoT solutions are already connected to the web, the additional costs are minimal, though they will vary depending upon the cloud provider.
Selecting a machine vision platform
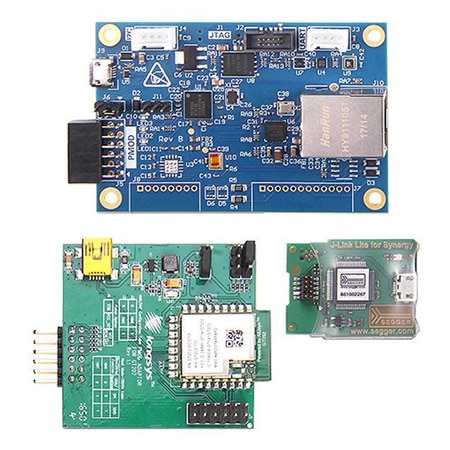
A development team interested in using machine vision on a deeply embedded processor has a wide range of processors and platforms to choose from. The goal should be to select a platform that provides the building blocks to get up and running quickly, and which also has the basic connectivity software already included. A good example is the AE-Cloud1 from Renesas, which is designed to help developers connect to a cloud service provider like Amazon Web Services (AWS) in ten minutes or less (Figure 2).
The AE-Cloud1 is based on a Renesas S5 processor and includes Renesas’s YSAEWIFI-1 Wi-Fi module that is designed to help developers quickly and easily connect to AWS. The development kit also includes a debugger.

Figure 2: The Renesas AE-Cloud1 development board is based on a Renesas S5 processor and includes a Wi-Fi module and debugger. (Image source: Renesas)
A team might also decide to use something like STMicroelectronics’ STM32 IoT Discovery Board which runs the Amazon FreeRTOS OS and allows a developer to easily connect to AWS.
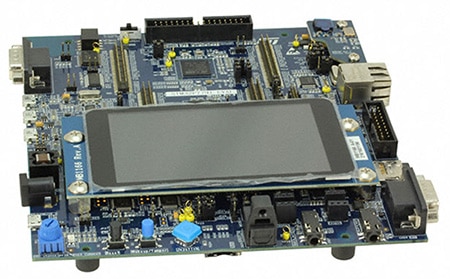
There are many different combinations of hardware and software that a developer can use to create a machine vision solution, including STMicroelectronics’ STM32F779 Evaluation Board (Figure 3). Among its many features are an onboard camera, an Ethernet connection, and an LCD. All can be used together to capture images and verify the machine vision application.

Figure 3: The STM32F779 Evaluation Board is based on the STM32F779 microcontroller which includes an onboard camera, Ethernet connection and a display that can be used to acquire, review and monitor machine vision applications. (Image source: DigiKey)
The development board uses a DP83848CVV controller from Texas Instruments that provides a physical layer (PHY) for Ethernet that makes the overall solution great for industrial environments.
Setting up the Google Cloud Platform for machine vision
Embedded developers have several different cloud-based machine vision services that can be used in their applications. These include the Google Cloud Platform and Amazon Rekognition, amongst others. In this article we are going to look at how to setup the Google Cloud Platform Vision API.
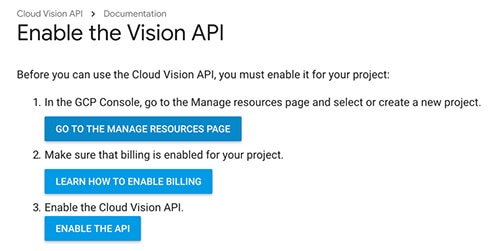
The easiest way to setup the Vision API is to visit the “Before You Begin” page. This page contains all the instructions that need to be followed in order to setup and configure the Vision API. Before starting, developers need to have a Google account that they can use to login and configure their Vision project. First-time users of the GCP receive one year of free use that can be used to develop prototypes and experiment with the platform.

Figure 4: The main steps that need to be followed in order to setup the Google Cloud Platform for machine vision. A 12-month free trial period is included. (Image source: Beningo Embedded Group)
The main steps that a developer needs to follow to configure the Vision API are:
- Create a new project
- Make sure that billing is enabled (it starts with a 12-month trial, then costs up to $300, but it doesn’t bill without explicit permission)
- Enable the Cloud Vision API
Creating a new project is done through the GCP Console and is as simple as clicking “New Project” and providing the name of the project such as “Embedded Vision”. Enabling the API is done by clicking the “Enable API” button, and then selecting the project that was just created. This enables the API, but the real trick to the ordeal is generating the API credentials, which turns out to be quite simple.
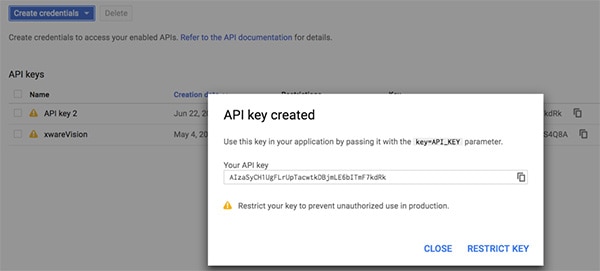
The credentials can be found through the project interface by selecting “API Services and Credentials.” A developer will then create the credential by clicking the “Create Credentials” button (Figure 5).

Figure 5: The GCP Vision API key is created through the GCP interface. This key must be used by the embedded platform in order to access the Vision recognition capabilities. (Image source: Beningo Embedded Group)
At this point, the Vision APIs are setup and ready for use in the embedded system. The embedded system needs to acquire an image and then use the Vision APIs to transmit the image to the cloud for image recognition.
Machine recognition on the STM32F779
The software that is used on the embedded system to connect to the GCP will vary based on what the developer selects to use or decides to create themselves. I recently used the STM32F779 in conjunction with Express Logic X-Ware IoT Platform which had a simple demonstration already created for using machine vision with the GCP.
The demonstration was simple; a user could take a picture using the camera on the STM32F779 evaluation board through the LCD touchscreen. Once the picture is taken, the user can select whether the image analysis should be for an object or for text. I decided that a good test would be to write “Hello World!” on a flash card and present it to the camera. “Hello World!” just seemed like an appropriate first test for machine vision, coming of course, from a software developer’s perspective.
The test turned out to be a success! The image was captured and the GCP Vision API was able to successfully recognize and identify the text consistently, as well as with other words that I presented it. I decided to try a corner case where the image that I provided it was slightly blurry and written very quickly to see how well it would recognize the writing. The captured image and the result are shown (Figure 6). In this case, my blurry “Hello World!” was nearly completely identified except for my sloppily written ‘d’ which was recognized as a j.

Figure 6: A screenshot capture of the result returned from the GCP Vision API from the Express Logic X-Ware IoT Platform. The “d” in “World” provided interesting results. (Image source: Beningo Embedded Group)
Interestingly, the exact same writing presented to the camera on multiple occasions resulted in about a 50% correct recognition rate for my sloppy and out of focus ‘d’. Examining the terminal log, it can be seen that ‘Hello World’ was recognized half the time and “Hello WorlJ’ the other half (Figure 7).

Figure 7: The terminal output from the GCP Vision API responses showing the text that was recognized in the submitted image. (Image source: Beningo Embedded Group)
Now in this example, I can see as a human why the cloud vision algorithm struggled to determine the character. Looking at it myself I saw it both ways which is an interesting test.
Tips and tricks for implementing machine vision on an embedded system
There are several tips and tricks that developers can follow when developing their machine vision application. These include:
- If vision recognition does not have a real-time or deterministic deadline, offload image recognition to the cloud.
- Use an embedded software platform to ease connection to the cloud-based machine vision service.
- By default, the Google Vision API is disabled and must be enabled manually to utilize the service.
- Don’t forget to enter your Google API key into the software platform that you are using: this is used to validate permission to use the API.
- The GCP provides a basic one-year free trial that can be used to develop and prototype the system.
- Make sure that the image or text is correctly positioned and clearly visible in order to decrease recognition errors.
Conclusion
Machine vision applications can be dramatically simplified on a low cost embedded system by leveraging high performance processing in the cloud. Traditionally, developers interested in machine vision had to use an application processor and develop or license sophisticated software for their application.
With the Google Cloud Platform and a low-cost microcontroller and development kit, developers can access image and text recognition capabilities at just a fraction of the cost. Developers can also use widely available and scalable software platforms to help simplify their secure connection to the cloud, while also easing application development.

Disclaimer: The opinions, beliefs, and viewpoints expressed by the various authors and/or forum participants on this website do not necessarily reflect the opinions, beliefs, and viewpoints of DigiKey or official policies of DigiKey.


